 Skip to content
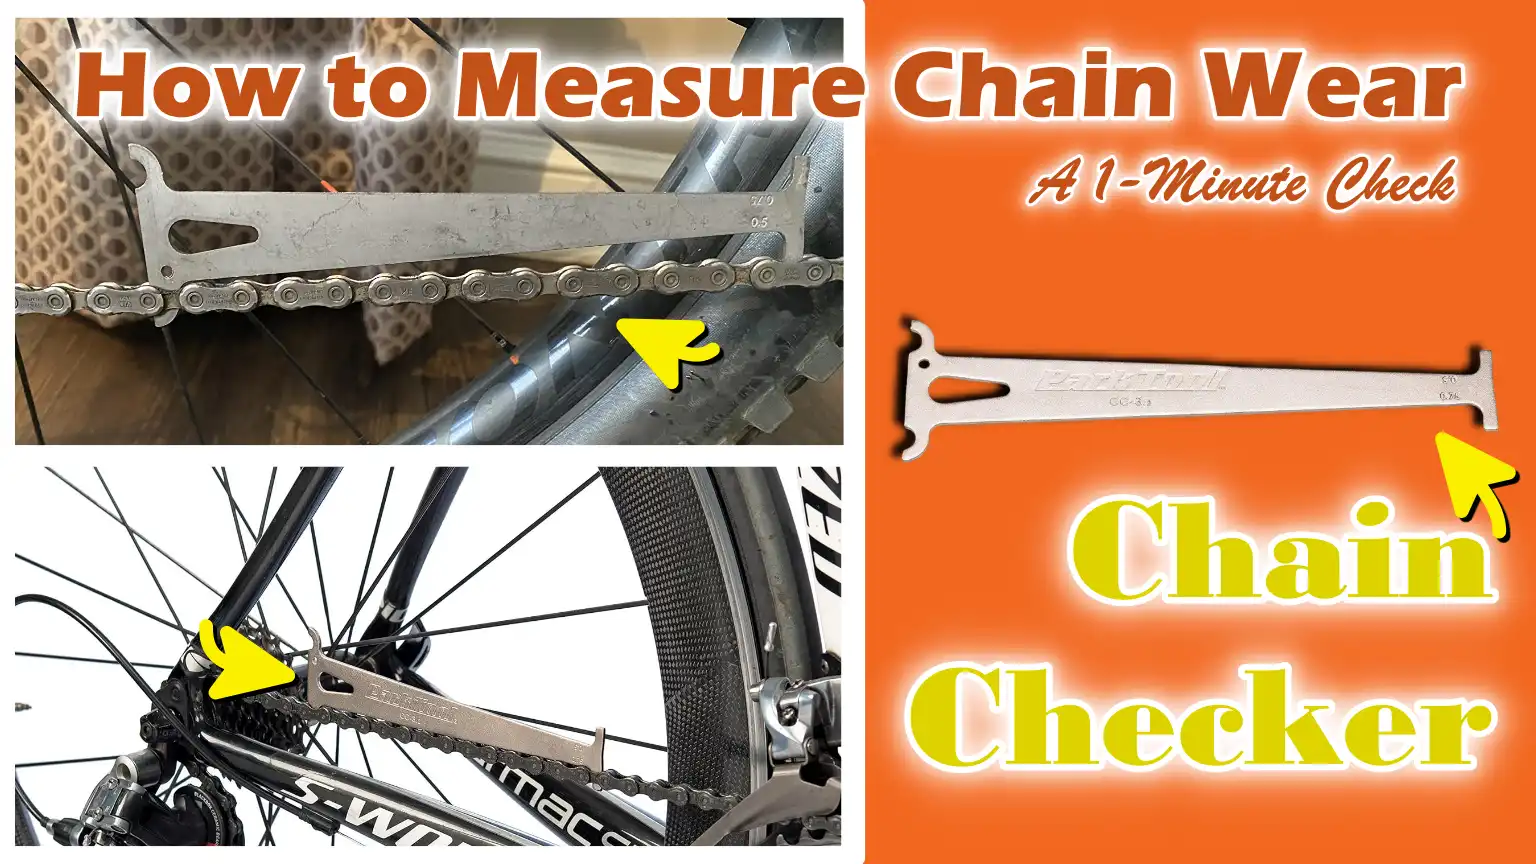
Written By: Jonathan
Fact Checked By: Caroline Dezendorf
Reviewed By: Matt Tanner
You really need to know this: every time, yes every time you pedal your bike, then there’s a quiet process happens inside your drivetrain: it is your chain that slowly wearing down, “LINK BY LINK”.
And, many riders call it “CHAIN STRETCH” which isn’t actually stretching at all; but it is gradual wearing of tiny metallic pins and rollers that literally increases the distance between links over the time.
So, this small change, often less than a millimeter, literally can have a big impact.
Along with this, there’s studies in bicycle maintenance and drivetrain efficiency that consistently shows that once a chain wears past about 0.75%, then it begins to damage the cassette and chainrings; that literally leads to the poor shifting, energy loss and costly repairs as well.
So, this is the proper guide about How to Measure Chain Wear, so that you can understand about the early signs and use simple and most effective ways to protect your bike.
Know, What is Chain Wear?
Chain wear refers to the gradual deterioration of a bicycle chain over time, resulting from regular use.
Although many riders refer to this phenomenon as “chain stretch,” the metal plates of the chain do not, in reality, stretch.
Instead, the chain’s small internal components, primarily the pins and rollers, gradually wear down due to friction, pressure and dirt.
Every time you pedal, these components rub against one another under pressure; after hundreds or thousands of kilometers of use, this abrasion creates tiny gaps between the chain’s links.
These gaps cause the chain to elongate beyond its original dimensions, even though no individual component of the chain has actually stretched.
This alteration is minute, often invisible to the naked eye, yet it is significant enough to disrupt the chain’s synchronization with other bicycle components.
Understanding this distinction is crucial, as it helps riders recognize that while chain wear is a normal and inevitable process, regular inspection and maintenance are essential to prevent more serious mechanical issues.
1. Explaining “Chain Stretch” – Pin and Roller Wear vs Actual Stretching
The term “chain stretch” is commonly used, but it is not scientifically accurate.
Bicycle chains are constructed from hardened steel, which does not stretch under normal cycling conditions.
What actually occurs is that the pins, which hold the links together, and the rollers, situated between the links, gradually wear down.
As these components wear, the distance between adjacent pins increases slightly.
It is this increase in spacing that people typically refer to as “stretching.”
For instance, if every single link in a section of the chain elongates even slightly, say, by just one millimeter, the cumulative effect can be quite significant.
This is precisely why chain wear is measured based on how much the chain has elongated relative to its original length.
Understanding this helps riders realize that “wear” implies internal deterioration, rather than merely visible stretching, and that the only reliable method for detecting it is through precise measurement.
2. The Impact of Wear on Drivetrain Components
As a chain wears and elongates, it no longer meshes perfectly with the teeth of the cassette and chainrings.
These teeth are specifically designed to align precisely with the exact spacing of a brand-new chain.
When a worn chain passes over these teeth, it fails to seat properly; this results in uneven contact and places excessive stress on the teeth.
Over time, this causes the cassette and chainrings to wear out prematurely, causing their teeth to become thinner, sharper and sometimes even hooked in shape.
This misalignment also leads to common riding issues, such as gear slipping, difficulty shifting gears and increased noise.
Simply put, a worn chain forces the entire drivetrain to work harder and compromises its overall efficiency.
Instead of power being transferred smoothly, some of your effort is wasted and components wear out far more rapidly than they otherwise would.
3. The Impact on the Lifespan of Cassettes and Chainrings
The lifespan of your cassette and chainrings is directly influenced by the extent to which your chain wears down as you continue to ride.
If the chain is replaced proactively, typically while it is still only moderately worn, the cassette and chainrings can last for a very long time; sometimes, they remain in good condition even after multiple chain replacements.
However, if the chain continues to be used long after it has worn out, its increased length begins to alter the shape of the teeth on these components.
Once this occurs, simply installing a new chain does not resolve the issue, as the new chain cannot seat properly on the worn teeth.
This often causes the gears to slip under load, compelling the rider to replace not only the chain but also the cassette, and sometimes even the chainrings.
Practically speaking, replacing the chain at the appropriate time is a simple and inexpensive measure that can prevent far costlier repairs and ensure that the entire drivetrain continues to operate smoothly for an extended period.
Why is Measuring Chain Wear Important?
Measuring chain wear is one of the simplest, yet most effective, maintenance habits for cyclists.
This is because it has a direct impact on the lifespan of the entire drivetrain and the overall performance of the bicycle.
Bicycle chains are designed to maintain a very precise spacing between their links.
If wear causes even a slight deviation in this spacing, the chain may struggle to seat properly on the cassette and chainrings.
This change occurs gradually and often goes unnoticed.
Consequently, many cyclists remain unaware of the issue until a major problem arises.
By regularly checking for chain wear, you can detect this deviation in its early stages and take the necessary steps before a major issue develops.
This simple task takes just a few minutes, yet it can save you from poor bicycle performance, sudden breakdowns and unnecessary expenses.
Simply put, measuring chain wear isn’t just about caring for the chain itself; it is also about protecting all the moving components that work in conjunction with it.
1. Preventing Costly Drivetrain Damage
When a worn chain is used over an extended period, it begins to damage the cassette and chainrings.
This occurs because the chain no longer aligns correctly with their original shape and spacing.
The teeth on these components are specifically engineered to mesh perfectly with a new chain.
However, a worn chain fails to seat properly, resulting in excessive pressure being exerted on specific points.
Over time, this causes the teeth to wear down rapidly, become thinner and lose their original shape.
Once this damage occurs, simply replacing the chain is not sufficient; in such cases, the cassette, and sometimes even the chainrings, must also be replaced.
These components are significantly more expensive than the chain itself.
For precisely this reason, by monitoring chain wear in a timely manner and replacing the chain at the appropriate time, you can avoid incurring substantial repair costs in the future.
2. Improved Gear Shifting Performance
If chain wear remains within acceptable limits, the chain runs very smoothly over the gears.
This allows the derailleur (the gear-shifting mechanism) to shift gears with greater precision and speed.
As a chain wears out, the spacing between its links gradually increases.
Consequently, the chain begins to struggle to engage properly with the teeth of the gears.
The result is delayed shifting, the chain skipping, or, in some instances, gears failing to shift correctly at all.
Cyclists may notice that their bikes no longer respond with the same agility as before, or that they need to exercise extra caution when shifting gears.
By monitoring chain wear and replacing the chain at the right time, you ensure that the chain always fits securely with the gears.
This guarantees that the gear-shifting experience remains consistently smooth, precise and reliable on every ride.
3. Enhances Efficiency and Ride Smoothness
A well-maintained chain transmits power from your pedals to your wheels in a smooth and efficient manner.
When a chain becomes worn, this power transfer becomes less effective because the chain no longer seats properly on the gears.
This can lead to a slight loss of energy, meaning you have to expend more effort to maintain the same speed.
Furthermore, a worn chain often generates increased noise and vibration, making the ride feel rough rather than smooth.
Measuring and addressing chain wear helps the drivetrain operate quietly and efficiently, ensuring that every pedal stroke feels consistent and comfortable.
4. Saves on Long-Term Maintenance Costs
Regularly measuring chain wear is an inexpensive practice that can lead to significant savings over time.
Although the chain is one of the most affordable components of the drivetrain, it directly impacts, and is, in turn, affected by, much more expensive parts.
By replacing the chain at the appropriate time, you can often significantly extend the lifespan of your cassette and chainrings.
Conversely, neglecting chain wear can lead to the simultaneous wear of multiple components, thereby increasing overall maintenance costs.
Simply put, investing a little time and money to inspect and replace your chain when necessary can help you avoid far greater expenses and keep your bike in excellent condition for the long haul.
Know, Common Signs Shows That Your Chain Is Worn Out

A worn-out chain often provides clear warning signs, provided you know what to look and listen for.
These signs typically emerge gradually, which is why many riders initially overlook them or assume they are normal.
In reality, these subtle changes are early indicators that the chain is no longer engaging properly with the drivetrain.
As the chain, cassette and chainrings are designed to work in perfect harmony with one another, even the slightest wear can impact performance.
Paying attention to these signs allows you to take immediate action, accurately measuring the chain and replacing it before it causes further damage.
Understanding these symptoms is crucial because they often manifest even before severe wear becomes visible to the naked eye, thereby serving as a vital first step in assessing the condition of your chain.
1. Gear Slippage Under Load
The most common and easily recognizable sign of a worn-out chain is gear slippage, particularly when you apply significant force, such as while climbing a hill or accelerating rapidly.
This occurs because a worn chain cannot seat itself firmly onto the teeth of the cassette; consequently, when placed under tension, it suddenly slips forward.
When a gear slips, you may experience a momentary loss of power or a sudden jolt in the pedals.
This is not only frustrating but can also be unsafe specially when cycling in traffic or on rough terrain.
This issue typically worsens over time and if left unaddressed, it can cause further damage to both the cassette and the chainrings.
2. Difficulty or Irregularity in Shifting Gears
A healthy chain ensures smooth and precise gear shifting, whereas a worn-out chain often leads to delays or irregularities in the shifting process.
You may notice that the chain takes longer than usual to move from one gear to another, struggles to stay engaged in the selected gear, or requires multiple attempts to shift correctly.
This occurs because a worn chain, which has stretched over time, as it can no longer mesh properly with the gear teeth.
Consequently, the derailleur is unable to guide the chain as effectively as it should.
This issue is sometimes mistakenly attributed to a derailleur adjustment problem; however, in many cases, the actual culprit is simply chain wear.
3. Chain Slippage or Noise
Unusual noises and a sensation of slippage are also definitive signs of chain wear.
A worn chain often generates more noise than usual while pedaling, manifesting as clicking, grinding, or rattling sounds.
This noise arises because the chain fails to seat properly on the gear teeth, resulting in uneven contact and vibration.
In some instances, the chain may feel as though it is slipping slightly, even when not under heavy load.
These symptoms compromise riding comfort and efficiency and often indicate that the chain is no longer working in harmony with the other components of the drivetrain.
4. Visible Stretch or Rust
When a chain becomes excessively worn, clear signs of stretching or rust may become visible.
Chain stretch can sometimes be detected by comparing its length against that of a new chain, or by observing how loosely it sits upon the gears.
However, this stretching is typically very slight and can be difficult to detect without precise measuring tools.
Rust is another clear indication that the chain has been exposed to moisture and has likely not been properly maintained.
Rust increases internal friction within the chain, thereby accelerating the rate of wear on the pins and rollers.
Although surface rust can sometimes be cleaned off, a heavily rusted chain is often already compromised; therefore, it should be replaced to prevent any further damage or malfunction during riding.
Tools
| Tool/Material | How to Use It | Why It Is Needed |
|---|---|---|
| Chain Wear Indicator Tool | Place the tool onto the chain and allow it to settle between the links. If it fits fully into the chain, check the markings (such as 0.5% or 0.75%) to determine the extent of the chain’s wear. | This method provides fast and precise results without any guesswork, allowing you to know exactly when your chain needs to be replaced. |
| Ruler or Measuring Tape – 12-inch / 30 cm | Align the ‘0’ mark with the center of one of the chain pins, then measure across 12 full links. If the measurement exceeds 12 inches, it indicates that the chain has worn out. | This is an inexpensive and reliable method that requires no specialized tools; it is particularly useful for beginners and those looking to perform a quick check. |
| Bike Stand – Optional but Helpful | Mount your bike on a stand in a way that allows you to rotate the pedals while keeping the chain stationary during the measurement process. | This makes the process easier, more stable and more accurate specially when you are working alone. |
| Gloves – Optional | Put these on before handling the chain to ensure your hands remain clean while taking measurements or rotating the pedals. | This protects your hands from dirt, oil and grease, making the entire process cleaner and more comfortable. |
How to Measure Chain Wear Using a Chain Wear Tool
Using a chain wear tool is one of the easiest and most accurate methods for assessing the condition of your bicycle chain.
This method is widely utilized by professional mechanics because it yields quick and reliable results without the need for complex measurements.
The chain wear tool is designed to measure the extent to which the distance between the chain links has increased due to internal wear.
As even a slight increase in this distance can affect how the chain engages with the cassette and chainrings, this tool helps you detect wear before any damage occurs.
The process takes only a few seconds and does not require removing the chain from the bicycle, making it a practical option for routine maintenance.
By using this tool correctly, you can make more informed decisions regarding when to replace your chain and effectively protect the rest of your drivetrain.
1. What is a Chain Checker Tool?
A chain checker tool is a small, simple device, typically made of metal, specifically designed to measure chain wear.
It functions by checking how well it fits between the links of the chain.
The tool features specific measurement points corresponding to common levels of wear, such as 0.5%, 0.75% and 1.0%.
When a chain is new, the tool does not fit fully inside the links, as the spacing between them remains within the correct tolerance.
As the chain wears and the distance between the links increases, the tool begins to drop easily into place.
This design allows you to quickly determine the level of wear without the need for any manual calculations or measurements.
Because it is easy to use and yields consistent results, it is one of the most highly recommended tools for both novice and experienced cyclists alike.
2. Clear & Easy Step
To use the chain wear tool, first position your bicycle in a stable spot so that you can easily access the chain.
You do not need to remove the chain, but it is essential that the chain be clean to ensure an accurate measurement.
Take the tool and gently place it onto the chain, allowing its ends to rest on the chain links at two specific points.
Then, without applying any force, simply let the tool settle naturally into the chain.
If the chain is not significantly worn, the tool will not drop fully into place.
If the chain is worn, the tool will sink deeper into its links.
Once it is properly seated, observe the markings on the tool; these typically display values such as 0.5%, 0.75%, or 1.0%.
This reading indicates the extent of the chain’s wear and helps you determine the appropriate course of action.
3. Interpreting the Results
Correctly interpreting the results obtained from a chain wear tool is crucial for proper bicycle maintenance.
If the tool indicates that the chain has worn by approximately 0.5%, this is generally considered the ideal time to replace the chain on high-end or multi-speed drivetrains; this is because these systems are more sensitive to wear and require precise adjustments to function correctly.
If the reading is approximately 0.75%, this is generally considered the appropriate time to replace the chain on most standard bicycles; If you wait any longer than this, it can adversely affect shifting performance and lead to accelerated wear on other drivetrain components.
If the tool indicates that the chain has worn by 1.0% or more, it signifies that the chain is excessively worn and has likely begun to damage the cassette, and potentially the chainrings as well.
In such a scenario, simply replacing the chain may not resolve all the issues; you may need to have other components inspected or replaced as well.
Properly interpreting these readings allows you to take timely corrective action, ensuring that your bike continues to run smoothly and helping you avoid unnecessary expenses.
How to Measure Chain Wear with a Ruler
Measuring chain wear with a ruler is a simple and reliable method that requires no specialized tools; nevertheless, if performed with care, it can yield highly accurate results.
This method is based on the principle that the spacing between the links of a new bicycle chain is fixed and precise and any increase in this length serves as a direct indicator of internal chain wear.
As chain wear occurs gradually, and is often too subtle to be detected by the naked eye, using a ruler allows you to identify even minute changes in length.
This technique is widely adopted as a standard reference method because it measures actual physical changes rather than relying on the predetermined thresholds of specialized tools.
It is particularly useful for beginners or riders who wish to cross-check results obtained from other tools.
When executed correctly, this method can help you determine exactly when to replace your chain, thereby preventing damage to other components of your drivetrain.
1. Why This Method Works
This method works because bicycle chains are manufactured to very precise specifications.
Each complete link of a standard chain measures exactly one inch from pin to pin; therefore, when the chain is new, the total length of twelve complete links should measure exactly twelve inches.
As the chain is used, friction and tension cause the pins and rollers to wear down, resulting in an increased distance between the pins.
Although this elongation is negligible for a single link, when measured across the span of twelve links, it becomes clearly visible and measurable.
By comparing the actual length of the chain against its original standard length, you can accurately determine the extent of the wear that has occurred.
This method is based on a concrete physical measurement, making it accurate and easy to understand without the need for any specialized tools.
2. Easy Steps to Measure Chain Wear By Ruler
To measure chain wear using a ruler, first ensure that the chain is straight and under slight tension so that it does not hang loosely.
Place the ruler alongside the chain, aligning the zero mark precisely with the center of one of the chain pins.
Next, count twelve full links and observe where the twelfth pin falls on the ruler.
On a new chain, the twelfth pin should align exactly with the twelve-inch mark.
If the pin extends beyond this mark, even by a small amount, it indicates that the chain has worn down and its length has elongated.
For accurate results, it is crucial to keep the ruler straight and to measure from the center of one pin to the center of the next.
Taking a moment to ensure proper alignment guarantees that the measurement accurately reflects the true condition of the chain.
3. How to Interpret the Results
Interpreting the results obtained from this method is quite straightforward, provided you understand the standard limits.
If the measurement appears to be approximately one-sixteenth of an inch (1/16″) longer than twelve inches, it indicates that the chain has experienced some minor wear; the chain is approaching its limit, but it can still be used for some time.
If the measurement exceeds twelve inches by approximately one-eighth of an inch (1/8″), it is a clear indication that the chain should be replaced to prevent further damage.
If the measurement exceeds one-eighth of an inch, it signifies that the chain is severely worn and has likely begun to cause damage to the cassette and chainrings as well.
In such a scenario, simply replacing the chain will not suffice; you may also need to address other components of the drivetrain.
Understanding these limits enables you to take necessary steps at the right time, allowing you to maintain your bike in the most effective and cost-efficient manner.
Know, The Chain Wear Limits by Bike Type
| Bike Type | Recommended Wear Limit | How to Use This Limit | Why It Is Needed |
|---|---|---|---|
| Road Bike | Around 0.5% to 0.75% | Regularly inspect your chain using a chain wear tool or a ruler. For optimal performance, replace the chain as soon as it reaches approximately 0.5% wear; or, to err on the side of caution, replace it before it reaches 0.75% wear. | Road bikes feature a higher number of gears and thinner chains, making them more susceptible to wear. Replacing the chain promptly ensures smooth gear shifting and helps prevent damage to expensive cassette components. |
| Mountain Bike | Around 0.75% to 1.0% | Measure chain wear after riding on rough terrain or in muddy conditions. To protect the drivetrain from damage, replace the chain before it reaches 1.0% wear. | Mountain bikes are designed for rugged terrain; consequently, their chains can withstand slightly higher levels of wear. However, dust and mud increase friction, making frequent inspections essential. |
| E-Bike | Around 0.5% to 0.75% (check more often) | Measure chain wear more frequently, as the motor places additional stress on the chain. Replace the chain promptly, ideally once it reaches approximately 0.5% wear. | On e-bikes, the power generated by the motor exerts significant pressure on the chain. This causes the chain to wear out more rapidly; therefore, timely chain replacement protects the drivetrain and helps maintain the bike’s overall performance. |
How Often Should You Check for Chain Wear?
Regularly checking for chain wear is the most effective way to keep your bike running smoothly and avoid costly repairs.
Every time you ride, your chain undergoes a certain amount of wear; the extent of this wear depends on the distance covered, your riding style, weather conditions and chain maintenance.
As this wear occurs gradually and is not easily visible to the naked eye, many riders wait until they begin to experience problems such as: difficulty shifting gears or noises coming from the chain, before taking any action.
However, by that time, the chain may be excessively worn and may have already started damaging other components of the bike.
By checking for chain wear at the right time, you can catch the problem in its early stages and replace the chain before it causes damage to the cassette and chainrings.
This is a simple habit that helps maintain bike performance, enhance safety and extend the overall lifespan of the drivetrain.
1. Every 300–500 km Or Monthly
For most riders, a good general rule of thumb is to check for chain wear every 300 to 500 kilometers, or, if you ride regularly, at least once a month.
This interval strikes an effective balance between monitoring normal chain wear and establishing a practical schedule for maintenance.
Although the rate of chain wear varies for every rider, checking within this specific distance range allows you to detect significant wear in its early stages without the need for excessively frequent measurements.
If you cycle daily or cover long distances, a monthly check ensures that you do not overlook the point at which the chain needs to be replaced.
Adhering to this rule is simple and it serves as a reliable method for monitoring the condition of the chain over time.
2. Check More Frequently in Wet or Muddy Conditions
Riding in wet, muddy, or dusty environments accelerates chain wear far more rapidly than riding on clean, dry roads.
Water can wash away the lubricant applied to the chain, while dust and mud act as abrasive particles that grind against the chain’s pins and rollers.
This leads to accelerated wear within the internal components of the chain and can significantly reduce its overall lifespan.
In such conditions, it becomes essential to check for chain wear more frequently, sometimes even after just a few rides, particularly if the bike has not been properly cleaned and lubricated.
Conducting regular checks in such environments helps protect the chain from premature damage and ensures that the drivetrain continues to operate smoothly, even under challenging conditions.
3. E-Bike Riders Should Check More Often
E-bike riders should check for chain wear more frequently, as the motor on an e-bike places additional stress on the drivetrain.
This extra power increases the tension on the chain during pedaling, causing it to wear out faster than the chain on a standard bicycle.
Even if you cover the same distance, this constant additional load can cause an e-bike’s chain to wear out prematurely.
For this reason, it is advisable to check your chain more often than the generally recommended intervals and, if necessary, replace it sooner than typically scheduled.
Regular checks help maintain smooth power delivery, protect expensive drivetrain components and ensure that riding remains both safe and efficient.
Know, Common Mistakes While Measuring Chain Wear
Understanding chain wear involves not only knowing how to measure it but also avoiding the minor errors that can lead to inaccurate results or unnecessary damage.
Many riders believe they are maintaining their chains correctly; however, small errors made during the inspection process or in the timing of the check can compromise the accuracy of the results and lead to costly repairs.
Chain wear occurs gradually and often silently; therefore, taking precise measurements and taking action at the right time is crucial.
Avoiding these common mistakes ensures that your measurements are accurate, your decisions are sound and your drivetrain remains in good condition for the long haul.
Paying attention to these small details can make a significant difference in performance, safety and long-term maintenance costs.
1. Measuring a Dirty Chain
Measuring a chain without cleaning it first is one of the most common mistakes.
Dirt, dust and old lubricant can accumulate between the chain links and rollers, preventing the chain-wear measurement tool from seating properly or a ruler from aligning correctly with the chain pins.
This buildup can sometimes lead to inaccurate measurements, making the chain appear either less or more worn than it actually is.
Furthermore, internal grime increases friction and accelerates the rate of wear, so inspecting a dirty chain does not provide an accurate assessment of its true condition.
Cleaning the chain before measuring ensures that the tool or ruler makes proper contact with the metal components, resulting in more accurate and reliable results.
2. Using the Wrong Ruler
Another common mistake is using a ruler or measuring tool that is inaccurate, or one that is not used correctly.
Using worn-out rulers or flexible tape measures, or incorrectly aligning the measuring tool with the chain pins, can lead to measurement errors.
As changes in chain wear are often very subtle, even a slight error in taking a measurement can lead to an incorrect judgment regarding whether or not the chain needs to be replaced.
It is crucial to use a clean ruler with clearly legible markings and to measure precisely from the center of one pin to the center of the next.
Accurate tools and careful alignment help ensure that the measurement accurately reflects the actual wear on the chain.
3. Ignoring Early Signs of Wear
Many riders notice the early signs of chain wear such as: faint noises, slightly less smooth gear shifting, or minor chain slippage, yet choose to ignore them because the bike remains rideable.
This is a mistake, as these early symptoms serve as warning signs that the chain has begun to wear beyond its optimal condition.
Waiting until the problem becomes more severe often means that the chain has already caused damage to other components of the drivetrain.
Taking these early signs seriously and immediately inspecting the chain can prevent further wear and ensure that the bike continues to run smoothly.
4. Waiting Too Long to Replace
Delaying chain replacement is one of the most costly mistakes a rider can make.
Once a chain wears beyond its acceptable limit, it accelerates the wear on the cassette and chainrings as well.
At this stage, simply replacing the chain may not resolve the issue, as the other components have already worn down to match the worn chain.
This often necessitates replacing multiple components simultaneously, significantly increasing the overall cost.
Replacing the chain at the right time, based on accurate measurements, is an easy and effective way to safeguard the entire drivetrain and avoid unnecessary expenses.
Know, Great Tips for Reducing Chain Wear
Reducing chain wear is not difficult, but it requires consistent care and a basic understanding of how the chain functions while cycling.
A bicycle chain operates under constant pressure, friction and movement, which naturally leads to wear and tear over time.
However, factors such as dirt, a lack of proper lubrication and the use of incorrect gears can significantly accelerate this process.
By adopting a few simple and practical habits, you can slow down chain wear, improve overall performance and extend the lifespan of your entire drivetrain.
These tips are grounded in an understanding of how wear actually occurs within the chain, specifically on the pins and rollers, and they emphasize reducing friction, keeping components clean and ensuring that the chain runs smoothly.
Also, there’s engineering studies that actually confirms that chain wear directly reduces drivetrain efficiency and increases the friction as well, this clearly means that even small levels of wear can affect how much power reaches the wheels, even it measures chain wear accurately helps the riders to maintain efficiency and avoid any unnecessary energy loss as well.[¹]
1. Regular Cleaning and Lubrication
Keeping the chain clean and properly lubricated is the most critical step in minimizing wear.
Dirt, dust and fine grit can infiltrate the interior of the chain and act like sandpaper, grinding against and wearing down the metal surfaces inside the links.
This increases friction and causes the pins and rollers to wear out much faster.
Cleaning the chain removes these damaging particles, while lubrication creates a thin protective layer that minimizes direct metal-to-metal contact.
Using the correct amount of lubricant is essential; too little lubricant leaves the components unprotected, while too much can attract and trap excessive dirt.
Regular maintenance, particularly after riding in wet or dusty conditions, helps ensure that the chain operates smoothly and that unnecessary wear is minimized.
2. Avoid Cross-Chaining
Cross-chaining occurs when the chain runs at an excessively skewed angle, specifically, when the chain is engaged simultaneously with the largest front gear and the largest rear gear, or with the smallest front gear and the smallest rear gear.
In such situations, the chain does not travel in a straight line, subjecting it to significant lateral stress.
This increases tension on the chain links and causes uneven wear on both the chain and the gears.
Over time, this can reduce drivetrain efficiency and shorten the lifespan of its components.
Avoiding such gear combinations, and selecting gears that allow the chain to remain in a straight alignment, helps minimize stress and ensures that the chain runs smoothly.
3. Replace the Chain Proactively
Replacing the chain before it becomes excessively worn is a simple yet highly effective method for preserving the entire drivetrain.
As a chain ages, it begins to lose its proper engagement with the cassette and chainrings.
If the chain is replaced in a timely manner, the new chain will mesh correctly with the gear teeth, thereby preventing future damage.
However, if the chain is used for too long, it can damage the teeth of these components, causing them to become incompatible with a new chain.
This degrades performance and may necessitate the replacement of several other components in addition to the chain itself.
Replacing the chain on time, based on accurate measurements, helps maintain performance and reduces overall maintenance costs.
4. Use High-Quality Lubricants
The use of high-quality lubricants plays a crucial role in minimizing chain wear.
High-quality lubricants are formulated to penetrate deep into the structure of a chain and protect its internal components, particularly the pins and rollers, where the most wear occurs.
They also help reduce friction, repel water and prevent rust.
Different types of lubricants are available for various conditions such as: dry lubricants for dusty environments and wet lubricants for rainy or muddy conditions.
Choosing the right lubricant and applying it correctly ensures that the chain remains protected across a wide range of riding conditions.
This not only minimizes wear but also enhances smoothness and efficiency during every ride.
When to Replace Other Components
Replacing a worn-out chain at the right time can help preserve the rest of the drivetrain; however, if the chain has been in use for an extended period, other components may also have worn down and might require replacement as well.
Cassettes and chainrings are designed to precisely match the pitch (spacing) of a new chain; when a worn chain runs over them for a prolonged period, it gradually alters their shape.
This wear is not always immediately visible, but it directly impacts how the bike shifts gears and how smoothly it operates.
Knowing when to replace these components is crucial, as installing a new chain onto worn parts can degrade performance, cause the chain to slip and lead to operational difficulties.
By recognizing the signs of wear on each individual component, you can make better decisions and ensure that your drivetrain continues to function at its best.
1. Signs of Wear on the Cassette
The cassette, the cluster of gears located on the rear wheel, will exhibit clear signs of wear if it has been used for a long time in conjunction with a worn-out chain.
One of the most noticeable indicators is the shape of the teeth.
On a new cassette, the teeth are uniform in shape and slightly rounded; however, as they wear down, they begin to appear thinner, sharper and sometimes hooked.
Another common sign is the chain slipping under load, particularly when using specific gears, even after a new chain has been installed.
This occurs because the worn teeth no longer align correctly with the precise spacing of the new chain.
In many cases, if a new chain continues to slip on the cassette even after proper adjustment, it is a definitive sign that the cassette needs to be replaced.
2. Signs of Wear on the Chainring
Chainrings, the front gears connected to the pedals, also wear out over time, particularly if the chain has been used beyond its recommended lifespan.
Much like the cassette, the teeth of a worn chainring often appear pointed, thin, or hooked rather than having a uniform shape.
Riders may also notice that the chain does not seat properly on the chainring, or that shifting between the front gears is no longer as smooth as it used to be.
In some instances, the chain may slip or make noise when under pressure.
As chainrings are generally more durable than cassettes, they tend to last longer; however, if a worn chain is not replaced in a timely manner, the chainrings will eventually wear out as well.
Regularly inspecting their condition helps prevent recurring performance issues.
3. How Chain Wear Affects the Entire Drivetrain
The impact of chain wear is not limited solely to the chain itself; it affects the entire drivetrain system.
As the chain elongates due to internal wear, it no longer meshes properly with the cassette and chainrings.
This mismatch places uneven pressure on the gear teeth, causing all interconnected components to wear out at an accelerated rate.
Over time, the drivetrain components adapt to the worn chain, leading to compatibility issues, specifically, improper seating, when a new chain is installed.
This is why, when a chain is excessively worn, it often becomes necessary to replace multiple components simultaneously.
Furthermore, worn-out components compromise efficiency, increase noise levels and make it more difficult to maintain control over the bike while shifting gears.
Understanding this interrelationship highlights the importance of replacing the chain at the appropriate time, as it helps safeguard the entire drivetrain, ensure smooth bike performance and reduce overall maintenance costs.
Read More:
How to Fix Ghost Shifting on a Bike
How To Change a Bicycle Chainring
How To Shorten a Bicycle Chain
Conclusion – How to Measure Chain Wear
So, you have clearly understood that: a chain may look okay, but you should check and know if they are wear out as these literally decides how your entire bike performs.
A bicycle chain functions under constant tension and over time, its internal components undergo wear that is not always visible to the naked eye.
This subtle, gradual change affects how the chain engages with the cassette and chainrings, components designed to operate within very precise tolerances.
When a chain becomes excessively worn, it begins to damage these parts, leading to shifting difficulties, wasted energy and increased repair costs.
This is why regular inspection is not merely a maintenance chore, but a prudent strategy for safeguarding your entire drivetrain.
By understanding the distinction between normal usage and actual wear, and by utilizing simple tools such as a chain checker or even a standard ruler, any rider can accurately measure chain wear.
The key lies in two factors: regularity and timing.
Conducting inspections at regular intervals, paying attention to early warning signs like noise or chain slippage and replacing the chain before it reaches its wear limit, these small actions can make a significant difference.
These simple steps help ensure smooth shifting, enhance riding comfort and extend the lifespan of expensive components.
It is also important to remember that chain wear is influenced by your riding style and environmental conditions.
Factors such as dust, water, or heavy loads can accelerate the wear process, while good habits such as: regular cleaning, proper lubrication and appropriate gear selection, as it can effectively slow it down.
This means that every rider has a certain degree of control over how long their chain and drivetrain will last.
Now, that’s it from this guide about How to Measure Chain Wear, also you can ask related questions below.
Frequently Asked Questions
Q1: What is chain wear and why does it occur?
Answer: Chain wear refers to the gradual deterioration of a bicycle chain over time, resulting from regular cycling. It is often referred to as “chain stretch,” but in reality, the chain does not literally stretch. Instead, the small internal metal components such as: the pins and rollers, gradually wear down due to friction, pressure and the accumulation of dirt and grit. This wear increases the spacing between the chain links, causing the chain to become longer than its original size. This alteration disrupts the chain’s alignment with the gears; if left unaddressed, it can lead to difficulties in riding the bicycle.
Q2: How can I detect chain wear without using any tools?
Answer: Sometimes, you can identify the early signs of chain wear without the aid of any tools. Common indicators include: gears slipping when you pedal hard, hesitation or delay when shifting gears, the presence of unusual noises (such as clicking or grinding sounds) and a general sensation that the bicycle is no longer riding as smoothly as it used to. However, these signs typically only become apparent once the chain has already worn down significantly. For accurate results, it is always best to measure the chain using an appropriate tool or a ruler.
Q3: What is the most accurate method for measuring chain wear?
Answer: The most accurate and straightforward method for measuring chain wear is to use a “chain wear indicator tool.” This tool is specifically designed to fit into the chain links and quickly determine the extent of the chain’s wear. Another reliable method involves using a ruler to measure a section of 12 chain links and comparing that length against the standard 12-inch measurement. Both methods are effective; however, for routine checks, a dedicated chain wear tool is generally faster and more convenient.
Q4: How often should I check my bicycle chain?
Answer: Generally, it is recommended that you check your chain every 300 to 500 kilometers, or, if you cycle regularly, at least once a month. If you ride in wet, muddy, or dusty conditions, you should check it more frequently, as chain wear and tear accelerate in such environments. E-bike riders should also perform checks more often, as the motor places greater stress on the chain, causing it to wear out more rapidly.
Q5: When should I replace my chain?
Answer: As soon as your chain begins to show clear signs of wear, you should replace it immediately to prevent damage to other bicycle components. For most bicycles, a good rule of thumb is to replace the chain once it has worn by approximately 0.75 percent. For high-performance or multi-speed bikes, it is advisable to replace it slightly sooner, when it has worn by about 0.5 percent. If the chain wears to the 1.0 percent mark, it is generally considered excessively worn and may have already caused damage to the cassette and chainrings.
Q6: Can I continue riding with a worn chain?
Answer: You can continue riding with a slightly worn chain for a while, but it is not advisable to delay its replacement for too long. A worn chain does not mesh properly with the gears, which significantly accelerates the wear and tear on both the cassette and the chainrings. Over time, this can degrade the bike’s performance and lead to increased repair costs. Replacing the chain at the right time is far more cost-effective than having to replace multiple drivetrain components later on.
Q7: Does a worn-out chain affect the bike’s performance?
Answer: Yes, a worn-out chain has a direct impact on the bike’s performance. It can lead to issues such as difficulty shifting gears, gear slippage, excessive noise and a reduction in the bike’s overall efficiency. When the chain does not seat properly on the gears, some of the energy generated by pedaling is wasted, resulting in a less smooth riding experience. Maintaining a healthy chain preserves the bike’s efficiency, minimizes noise and makes pedaling easier.
Q8: Is it necessary to clean the chain before measuring its wear?
Answer: Yes, it is absolutely essential to clean the chain before measuring its wear. Dirt and old lubricant can prevent a chain-wear measurement tool from seating properly on the chain, or hinder the proper alignment of a standard ruler. This can lead to inaccurate measurements. A clean chain yields more precise results and helps provide an accurate assessment of the chain’s actual condition.
Q9: Can I use a standard ruler instead of a specialized chain-wear measurement tool?
Answer: Yes, if used correctly, a standard ruler can be used to accurately measure chain wear. To check if the chain’s length has stretched beyond 12 inches, you need to measure the distance across 12 full links of the chain. This method is simple and inexpensive, although it requires holding the ruler steady and paying close attention to detail. Although using a specialized tool to measure chain wear is generally more convenient, a standard ruler remains a reliable alternative.
References:
[1] A novel model for bicycle drivetrain efficiency
https://www.researchgate.net/publication/392961985_A_novel_model_for_bicycle_drivetrain_efficiency
Jonathan, the passionate owner of Bicycle Time, brings a lifelong love for bikes and automotive craftsmanship, that reflects into every corner of the shop. With deep passion in both cycling and automotive accessories, Jonathan is more than just an expert.
