 Skip to content
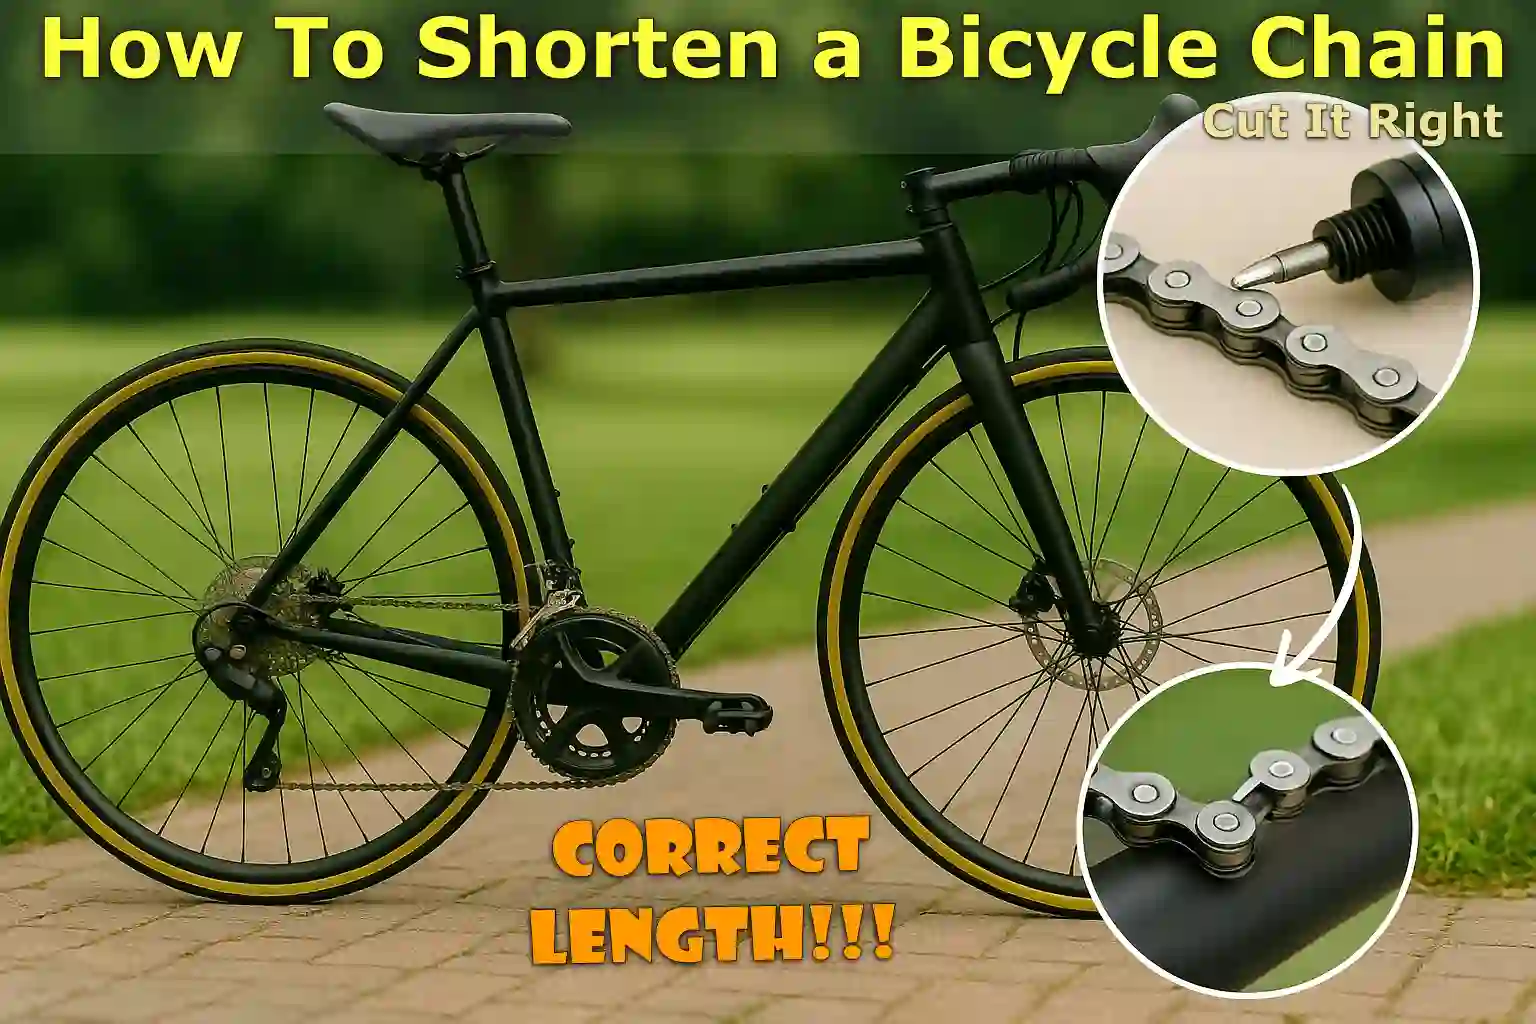
Written By: Jonathan
Fact Checked By: Caroline Dezendorf
Reviewed By: Matt Tanner
A properly sized bicycle chain is indeed one of the most important components that provide you with a smooth and safe ride.
If your chain is too long it can cause poor shifting, noisy pedaling, chain slip and may even cause the derailleur to derail, thus compromising both performance and safety.
Yes, chains naturally stretch over time due to regular wear or simply they have been serving for too long and now you want to buy a new one, and it is a very obvious fact that new chains are actually manufactured with extra links that adjust to different types of bicycles, and this is where we have to shorten it before installation.
Additionally, according to the Sheldon Brown Bicycle Technical Information Collection, a bicycle chain that is too long will not actually be able to maintain adequate tension on the derailleur, which can cause sluggish gear changes or even cause the chain to fall off.
So, shortening your chain to the correct length ensures that your derailleur works properly with it, so that your gears shift smoothly and your drivetrain lasts longer.
And with the right tools and proper work procedure, you can shorten your bicycle chain at home as well, which is actually good for both your time and repair cost.
That’s why this guide tells you specifically when and How To Shorten a Bicycle Chain.
Understanding Bicycle Chain Anatomy
It’s important to understand how it works and what it’s actually made of, it may look like a simple loop but it’s actually a precisely engineered part of your drivetrain system.
So you must be aware of the basic parts and types of chain which will definitely help you avoid mistakes and choose the right method to shorten your chain.
1. What Is a Bicycle Chain Made Of?
A bicycle chain is made up of many repeating links that allow it to bend and rotate easily around your bicycle’s gears and pulleys, and each of these links, which includes of inner plates, outer plates, rollers and pins and all of these together form an actual functioning bicycle chain.
So, let’s understand what all these parts are made of:
Inner Plates
Also known as inner links, these are the flat metal plates located on the inside of the chain, as they literally help the chain wrap around the teeth of your bicycle’s gears, also known as sprockets.
Outer Plates (Outer Links)
These outer plates are located on the outside of the chain and hold the inner plates together.
Rollers
These are small cylindrical parts that actually sit in between the inner plates, and they spin on the gear teeth and reduce friction when you pedal.
Pins (Rivets)
The pins are small, hardened steel rods that actually go through the outer and inner plates and they are responsible for holding the chain together, and some pins are actually permanent and others can be pushed out to remove or shorten the chain.
One full link is made up of two connected inner and outer links each, and this is very important to remember when you shorten a bicycle chain, because you can always easily remove the links in a full set.
2. Types of Bicycle Chains
So, there are two main types of bicycle chains available and it really depends on the gearing system of your bicycle:
1-Speed Chains (Single-speed Chains)
This type of chain is used on bicycles with only one gear, such as BMW bicycles, fixies or some cruiser bicycles.
So, these are the wider and simpler type of chains usually around 1/8 inch wide, as they don’t really need to move between many gears, which is why the design is straightforward and there’s no mess involved.
Multi-Speed Chains
These types of chains are found on most road bicycles and mountain bikes, as they are narrow and must fit between tightly spaced cogs on the rear cassette.
So basically, the more gears your bicycle has like: 8-speed, 10-speed, 11-speed and more, the narrower the chain should be.
For example: 11-speed chains are thinner than 8-speed chains, so if you use the wrong chain type it can really cause shifting problems or it can literally even damage your drivetrain.
3. Quick Links and Master Links
Most modern chains these days come with special types of links, making it very easy to attach or detach the chain whenever you need it and that too without any special tools:
Master Link (Quick Link, Connecting Link or PowerLink)
This is a special type of link that actually allows you to attach or detach the chain by hand or with the help of pliers, and does not require any type of chain tool.
As it fits into place, it is specially useful for removing and reinstalling the chain during chain cleaning or chain repair.
Not only this, some chains do not actually have master links and are simply attached permanently using chain pins, as these actually require a chain breaker tool to push the pin in or out and once you remove them the pins often can’t be used again.
Note: If you’re not sure whether your chain has a master link, just look for a link that looks slightly different from the others, it may also have a slot or be marked with an arrow or log. Master links can usually be removed by hand or with special master link pliers.
Plus, Shimano actually warns that too long chains can actually cause poor shifting accuracy and produce excessive noise; as a bicycle chain that is too small can put stress on the derailleur or prevent gear changes altogether, it is important to have the correct size chain.[¹]
When Should You Shorten a Chain?
Essentially, shortening a bicycle chain is a task that you have to do once in a while, as there are clear signs that tell you when it’s necessary.
Or it could be a requirement if you have just installed a new chain or you are facing drivetrain issues, then check the proper chain length which can prevent any kind of potential damage to your components and shortening the chain also makes your ride more smooth.
1. Signs Your Chain Is Too Long
If you have installed a new chain this is the perfect time, as they often come from the factory with extra long chains to fit a variety of bicycles.
As these chains must be the correct size before you install them, and if you leave them on too long the chain can dangle, slip or even cause serious damage to your derailleur or gears.
Also, according to Park Tool, correct chain length is also vital for proper shifting and rear derailleur performance.
So, a chain that’s too long can actually make gear shifting slow or inaccurate and can also cause more wear on your drivetrain.
2. Chain Slack and Poor Shifting
Looseness in the chain basically means that it doesn’t stay tight when you’re actually pedaling or changing gears, so a properly sized chain should always be a must as long as it has enough tension to stay aligned with your gears, and this becomes very essential in multi-speed bicycles.
If you notice your chain hanging loose or shaking awkwardly when you change gears, it means it’s too long, and this can lead to poor gear changes, especially when you’re moving between bigger and smaller cogs.
Also, the rear derailleur is designed to manage chain tension, but it can only compensate so much, as too much slack means the derailleur can’t take the extra length, causing performance issues later.
3. Gear Skipping or Chain Slap
This is another sign that you need to reduce the chain length, as it seems to cause your gears to skip or slip when you pedal under pressure.
As often happens when climbing or accelerating, a chain that is too long will not fit snugly over the gear teeth, causing it to slip or “drop” under the load.
Similarly, chain slap: which is essentially the sound of your chain hitting the chainstay, which is part of your bicycle’s frame, is also a strong indication of excess chain length.
Not only that, chain slap creates a really annoying noise and it can also scratch or damage your bicycle frame and derailleur over time, that’s why if you hear this kind of sound frequently while driving on rough roads or uneven roads, check your chain length immediately.
IMPORTANT: If you’re not sure about chain length, you can use the simple and effective “big-big method”, which means simply shift to your largest front chainring and largest rear cog without routing through the derailleur and then tighten the chain, and then add two full links to that length and that way you can know the correct chain size for most setups.
Tools
| Tool | Purpose |
|---|---|
| Chain tool / Chain breaker | This is used to push the chain pin out. |
| Master link pliers (optional) | This is actually optional but it helps the master link open and close easily. |
| Ruler or chain wear tool | With this you can easily measure the chain length accurately. |
| Gloves | Keep your hands free from dirt and use it for grip as well. |
A chain tool is really beneficial because most new chains come with around 116 links that need to be shortened with a chain tool, ensuring reliable drivetrain function when done correctly.[²]
How To Shorten a Bicycle Chain (Step-By-Step Guide)
This is a guide on how to cut a bicycle chain easily and here you will learn about removing, measuring, breaking and reassembling the chain.
1. Shift to the Smallest Gears
You should first shift your bicycle into the smallest gear combination possible, as this means the smallest chainring on the front and the smallest cog on the rear.
It reduces the tension in the chain and also gives you maximum slack, which is why it makes the process of removing or shortening the chain easier and safer.
Not only that, but it also protects the derailleur from getting stretched or damaged while working with it.
It’s simply about creating a “loose area” in the chain that gives your hands and tools room to really do the work.
2. Remove the Chain If Needed
Basically if you are actually working with a new chain, you will need to perform this step before installing the new chain, because if the chain is already on the bike, you will need to remove it in order to work more comfortably.
So, to do this there are two main methods by which you can easily remove the chain:
With Master Tool
If your chain already has a master link/quick link then you will simply need to use master link pliers or you can do it with your hands to remove it.
Without Master Link
So, if your bicycle chain does not have a master link then you will actually have to use a chain tool so that you can push out one of the pins/rivets and then you will be able to easily open the chain.
Read More:
3. Measure and Decide How Much to Remove
Now, this is the most important step in this guide, and it actually requires a method called the “big-big method,” which is actually widely recommended by mechanics, including Park Tool and Shimano.
- So, to do this you’ll first need to wind the chain around the largest front chainring and the largest rear cog, which will bypass the rear derailleur altogether.
- Also, you need to pull the chain tight in this position.
- And then, add two full links to that length: an inner and an outer pair, and that will be your bicycle’s ideal chain length.
If your chain is already mounted on the bike, you can also measure the existing length and then compare it to the manufacturer’s instructions or check for excessive stretch.
In addition, you must ensure full link count: this obviously means a set of outer plates and a set of inner plates as well.
Because removing half the link can cause alignment problems and make it impossible to reassemble the chain properly.
4. Break the Chain
So, once you know how many links to remove, it’s time to break the chain with the help of the chain tool:
First, line up the pin of the chain tool with the riven on the link where you actually wanted to cut it.
You will then need to gently turn the handle of the chain tool to push the pin out, and if you plan on reusing the same chain pin you will need to make sure you don’t push it all the way in: leave it partially inserted.
Now, if your chain does in fact use a master link, just make sure you remove an even number of links so that the remaining ends are ideally compatible with the master link installation.
NOTE: You need to be very careful, because if you apply pressure to the tool too quickly or at an angle it can bend the link or even break the tool.
5. Reconnect the Chain
So, now your chain is the correct length and all you need to do is reassemble it:
Connect It With Master Link
If you want to use a master link, all you need to do is connect the two ends of the chain and then simply slide the link into place.
And then you have to apply pressure to the pedal or simply press the link with the help of pliers until you actually hear it clicking into the ideal position.
Connect It Using Chain Pin System
With a chain pin system, you basically have to use your chain tool so you can easily reassemble the link by pressing a new pin into it.
Be sure that some chains actually require special one-time-use connecting pins, which are also provided by the manufacturer.
NOTE: You must make sure that the master link or connecting pin you are attaching the chain to is fully seated, and the link should actually rotate freely: not stiff or excessively loose.
IMPORTANT: You should always double-check the length before reconnecting the chain, because once you cut the chain you can’t easily connect the links back together unless you use a chain extender or put on a new chain, it’s important to double-check the length.
6. Check Chain Length and Function
So, once your chain is properly attached, you now need to test it thoroughly before cycling:
First, turn the pedals in a backwards and forwards direction so you can check how smoothly the chain is actually moving.
Now, you should change all the gears one by one to make sure that the derailleur can actually handle the new length as well.
And also look for any stiff links, which may feel or sound like a “click” or “jump” in the chain, and if you actually find such a link, gently flex it side-to-side by hand or you can apply a drop of chain lube to loosen it more easily.
NOTE: The way to tell if the chain is shortened properly is that it should be really tight, but also flexible enough to shift cleanly and be quiet while riding.
Read More:
Conclusion
If you maintain the right kind of chain length it ensures really smooth gear shifting, reduces wear on your drivetrain and it also makes for a more efficient ride overall, so that means this is a very important factor as well.
So whether you are installing a new chain or want to adjust an old chain that has become too long, you can do so easily by understanding the correct steps on How To Shorten a Bicycle Chain.
So, by now you have learned exactly what a bike chain is actually made of, when it is necessary to shorten it, what tools to use and how to do it in a safe and best way.
And if you still have some queries then you are welcome to comment section below.
FAQs On How To Shorten a Bicycle Chain
Q1. Can I shorten a bike chain without a chain tool?
Answer: Technically it is yes, but some people try to use a nail, pliers or hammer to push the pin out, but this can actually damage the chain and be unsafe, so a chain tool/chain breaker is an excellent tool for removing and installing chain pins cleanly and accurately.
Q2. What happens if I remove too many links?
Answer: If you actually remove too many links the chain will be too short and this can actually prevent the derailleur from reaching the bigger gears, it can actually stretch the derailleur cage too far forward, Also, it might break due to the pressure while riding. Keep in mind that once a chain becomes too short you can’t fix it unless you have extra links or a chain extender, so this is the main reason why you should always test the links gradually rather than removing them too much at once.
References:
[1] Shimano. (n.d.). How to Check Your Chain Length.
https://bike.shimano.com/stories/article/determine-chain-length.html
[2] How to Shorten a Bike Chain: Step-by‑Step Guide.
https://vtuviaebike.com/blogs/news/how-to-shorten-a-bike-chain-step-by-step-guide-vtuvia-ebike
Jonathan, the passionate owner of Bicycle Time, brings a lifelong love for bikes and automotive craftsmanship, that reflects into every corner of the shop. With deep passion in both cycling and automotive accessories, Jonathan is more than just an expert.
