 Skip to content
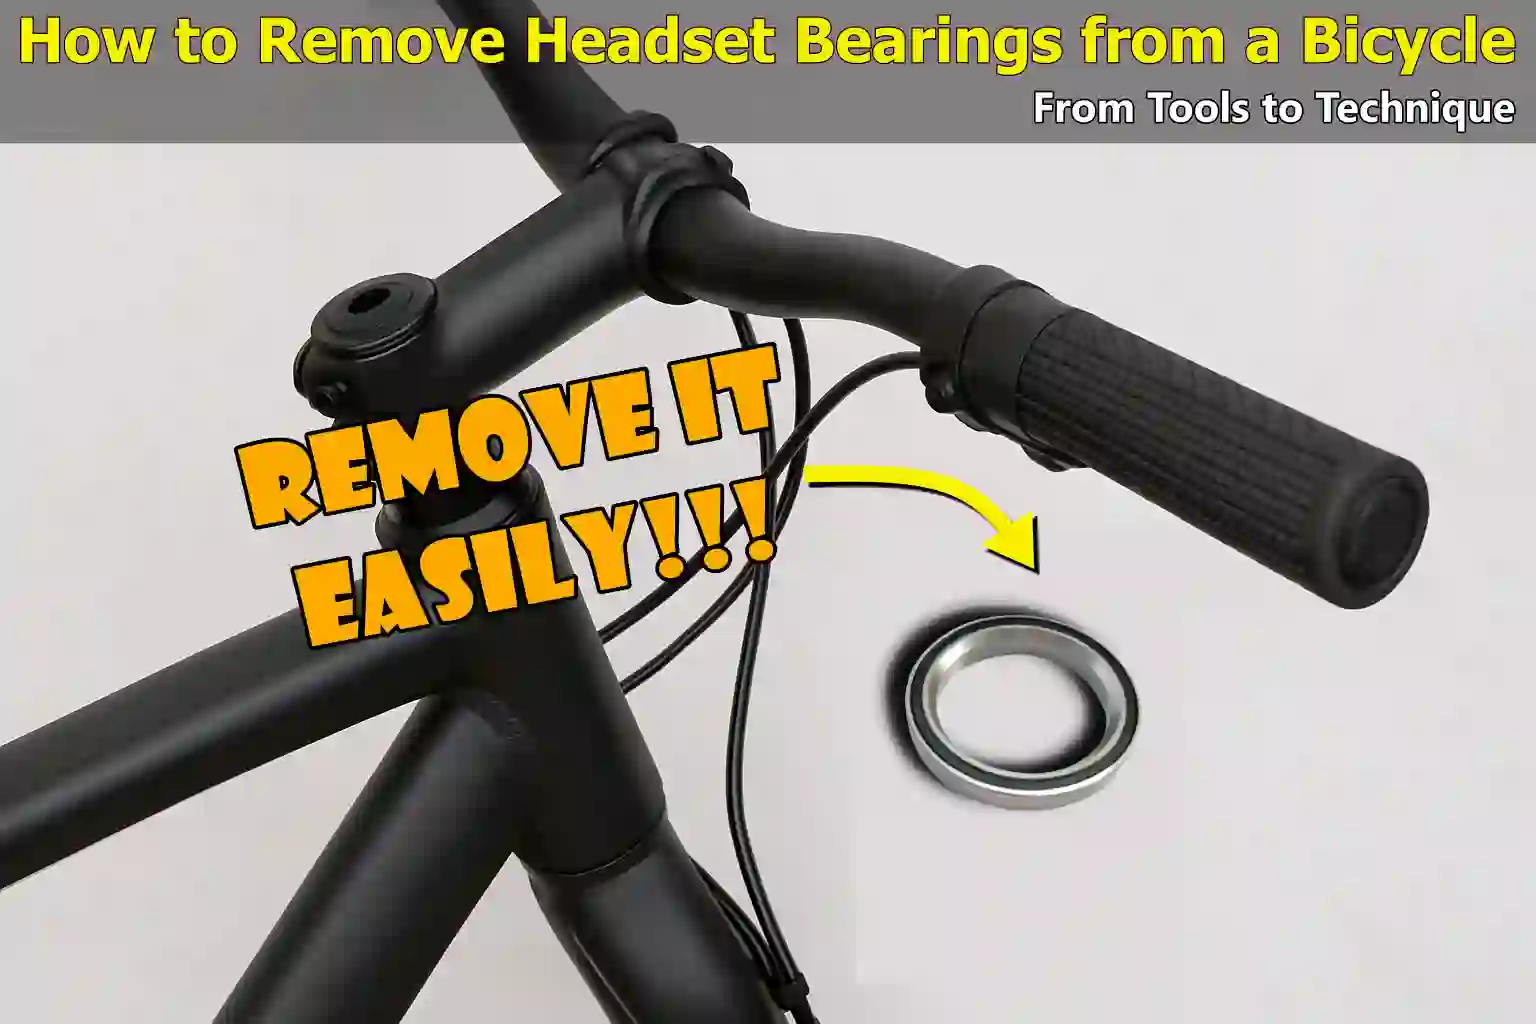
Written By: Jonathan
Fact Checked By: Caroline Dezendorf
Reviewed By: Matt Tanner
Headset Bearings very responsible components that ideally allows your handlebars and front fork to rotate in the smooth way, and it directly affect the ability to steer and control the bicycle.
Now, basically the headset bearings are positioned inside the head tube of the frame and these are the bearings that actually absorbs the loads from turning, bumps and braking forces as well.
Plus, it is possible that over the period of time it gets dirt, water and when you use your bicycle regularly then it can cause the bearings to wear out and they can become stiff as well: that later lead to the grinding noises, rough steering or “notchy” feel as well whenever you turn the handlebars.
This is why you should have conduct regular inspection and proper removal are really becomes essential for long-term bicycle performance.
As most of the bicycle either uses sealed cartridge bearings or loose ball bearings which totally depends on the headset type you actually have: threaded, threadless, integrated or semi-integrated as they uses different types of headset bearings.
As well as, the setup to remove each of them also slightly different, but you actually requires a gentle handling for all of these to avoid any possible damage to the frame or fork.
Not only this, according to the bicycle maintenance professionals: when you clean or replace the headset bearings on every 3,000 to 5,000 miles then it can greatly extend your headset’s lifespan.
This is the proper guide on How to Remove Headset Bearings from a Bicycle, so whether you wanted to replace worn bearings or just wanted to service your bicycle you can achieve headset bearing removal in safest way possible.
Understand Headset Bearings
1. What Are the Headset Bearings?
Headset bearings are actually small but really vital components inside the head tube of your bicycle’s frame, as they really allows the fork and the handlebars to turn smoothly and literally help you steer the bicycle in a stable and controlled way.
Not only this, these bearings actually sit between the frame and the steering tube and take on all the pressure and the motion that comes when you turn, go through bumps and even when you brake your bicycle.
And if these bearings becomes dry, dirty or worn out then you will immediately notice something like: grinding, stiffness or any kind of strange noises as well when you turn the handlebars.
Plus, there are two main types of headset bearings as available:
a. Cartridge Bearings
These are actually sealed units where the balls and enclosed in a casing, as they are very easy to install, replace and you can easily keep them clean as well, that makes them the most common choice for the modern day bicycles.
Plus, as they are sealed, which means they don’t require much maintenance but they do eventually wear out and actually need full replacement sometimes.
b. Loose Ball Bearings
So, these are the individual ball bearings and that sit directly inside the bearing cups or the races, and these are often found in the older or budget friendly bicycles.
Not only this, they can be cleaned, greased and reused again, but actually they are more exposed to dirt and moisture, that’s why if you not have maintained them at the regular time interval then they can rust or wear unevenly.
Which is why you should understand first that which type of your bicycle actually uses the headset bearings as it is really important as it changes how you remove, clean and replace them.
2. Types of Headsets
Basically bicycle headsets also comes in the different styles, and the type of headset you have will also affects that how the bearings are actually removed and serviced. So, the main types are:
Threaded Vs Threadless Headsets
Threaded Headsets
These are commonly found on the older bicycles, as these uses a locknut and adjustable cup on the top of the head tube, and the bearings sit in the races that are threaded onto the fork.
And to remove the bearings, you usually have to unscrew and disassemble the cups, and loose ball bearings are often used in these kind of setups.
Threadless Headsets
The threadless headsets actually found on the most of the modern bicycles, specially on the mountain and the road bicycles.
Plus, these actually uses a stem that clamps onto the fork’s steerer tube, and there’s a top can available that holds everything together.
Not only this, the bearings sits in the cups which is pressed into or integrated into the frame.
As well as, the most threadless systems actually uses the cartridge bearings that makes the removal and replacement very easy.
3. Integrated Vs Semi-Integrated Vs Non-Integrated Headsets
Integrated headsets
The integrated headsets are actually designed with the bearings cups which are built directly into the bicycle frame, and the cartridge bearings sit directly in these shaped pockets, which basically means that very fewer parts and a cleaner look it has.
Yes, they are really simpler to work with but the frame tolerances must be perfect as well.
Semi-Integrated or Internal Headsets
The semi-integrated or internal headsets actually uses bearings cups that are pressed into the frame, but the bearings sit inside those cups rather than directly in the frame.
As well as, they often require special tools to remove the cups or bearings specially if they are really tight or stuck actually.
External Cup Headsets (Traditional/Non-Integrated)
So, these actually have a bearings cup that sits outside the frame and are very commonly found on the older or entry-level bicycles, as well as the cups can usually be tapped out with a tools or drift as well.
4. How Design Actually Impacts Bearing Removal
Actually the type of headset you have really determines not just the tools needed but also it determines how careful you really have to be.
As an example:
- Integrated Headsets often allows you to lift the fork and pull the cartridge bearings straight out with your fingers.
- Threaded Headsets may require wrenches to loosen the locknuts and then you have to remove the cups before accessing the loose bearings.
- Press-fit or Semi-Integrated Headsets actually need a bearing removal tool or a headset cup remover to safely knock out the bearing or the cup from the frame.
That’s why when you know the exactly what kind of headset type you have before starting the job that will definitely help you to prevent frame damage and that ensures that the bearings to be removed without unnecessary force or confusion.
Read More:
Signs It’s Time to Remove or Replace Headset Bearings
So, over the time headset bearings can wear out due to the regular use, exposure to the water, dirt and lack of the maintenance as well, and if you left them unchecked then the worn or damaged bearings can actually makes the steering really difficult and it actually affects your control and even it can cause long-term damage to your bicycle frame or fork as well.
Now, below there are the most common and important signs that then it is the time to remove, inspect, clean or replace your headset bearings as well.
1. Grinding or Rough Steering
If your handlebars actually feeling really stiff or rough when turning, then it is strong sign that your headset bearings are dirty, dry or starting to wear out.
As well as this grinding sensation usually means that there’s either rust or the debris inside the bearing system or the grease has actually dried up.
As well as, over the period of time, this friction can damage the bearing surfaces and that reduces your control while riding, as steering should always feel smooth and fluid: if it doesn’t then it is the time to check the bearings.
2. Unusual Noises When Turning
When you hear something clicking, creaking or crunching noises when you turn the handlebars that can be a red flag as well, as these are the sounds which often comes from the headset area and usually mean the bearings are either loose, dry or misaligned as well.
As sometimes the noise can also come from the dirt or grit trapped in the bearing races as well.
Not only this, according to the professional bicycle mechanics, these are the noises that often worsen over the period of time if you ignore them and eventually lead to the poor steering response or even bearing failure as well.
3. Visible Corrosion or Dirt
And when you remove the top cap or loosen the headset and actually see brown rust, thick grime or dry black grease which is also the clear indication that the headset bearings that really needs attention.
As well as, moisture, sweat or even just road dust can actually cause the corrosion over the period of time.
Plus, the rusted bearings not only perform poorly but can also damage the bearing seats or cups.
And in the severe cases, the corrosion may prevent the smooth movement altogether and lead to the permanent frame damage if not handled early.
4. Excess Play in the Headset
If you really feel a knocking or clicking sensation when you apply the front brake and rock the bicycle back and forth, as there’s likely play in the headset as well.
This basically means that the bearings are either worn out or the headset is not properly tightened.
As well as, a loose headset that can affect the handling and literally becomes very dangerous as well specially at the high speeds or on the uneven surfaces.
And in the most of the cases, when you adjust the headset will actually it fix the issue, but if the play continues even after the proper tightening then it is the time to inspect or replace the bearings as well.
Tools
| Tool/Supply | Purpose |
|---|---|
| Allen keys (usually 4–6mm) | It is really used to loosen and remove the top cap and stem bolts on threadless headsets. Plus, it is actually Essential for accessing the fork and headset assembly. |
| Headset press/removal tool | It is actually a specialized tool which is designed to safely press headset cups into the frame or remove press-fit bearings without damaging the frame or bearing seats. |
| Soft mallet | this is really useful for gently tapping out the fork or loosening stuck components without scratching or damaging delicate bicycle parts. |
| Degreaser or alcohol | It is that helps to break down old grease, grime and rust from bearing surfaces and cups, because of this it ensures clean contact points for reinstallation. |
| Clean cloths or rags | Also, it is used to wipe down the bearings, headset cups and surrounding areas during removal and cleaning and it is really Important for keeping the workspace tidy. |
| Bearing grease or anti-seize | Actually it prevents future rust, seizing and friction during reassembly and also Helps bearings to rotate smoothly and extends their lifespan. |
| Gloves (optional) | This is really optional stuff but it keeps your hands clean and protected from grease, chemicals and sharp edges while handling components. |
How to Remove Headset Bearings (Step-By-Step)
You can easily remove the headset bearings in a way careful way, just follow these simple and yet really essential steps.
1. Loosen the Stem and Top Cap
Now, it is the first step as you have to remove the components that holds the front of the bicycle together, so you can use a Allen key usually of 4mm, 5mm or 5mm and then just begin by unscrewing the top cap bolt on the top of the steerer tube.
Actually this is the bolt that helps to keep the headset preload in a tight manner.
And then next, you have to loosen the stem bolts on the side of the stem where it actually clamps around the steerer tube.
As well as, you don’t need to remove them completely: so just loosen them enough so the stem can slide off easily and nothing more.
Plus, once you loose the bolts then you have to gently slide the stem and any spacers upward and off the steerer tube.
Just set them aside in the correct order so you can reinstall them properly without any kind of confusion later.
It really gives you full access to the top of the headset and allows the fork to drop out once it is unsupported.
2. Remove the Fork
Now, after you have removed the stem and spacers, now it is the time to remove the fork as fork is no longer held in the place as well.
So, the support the fork with your hand and then carefully slide it downward and out of the head tube.
And then just move it slowly so nothing falls suddenly or gets damaged.
Not only this, as you pull out the fork, you have to be ready to catch any bearings that may fall as well, specially if your bicycle uses loose ball bearings.
And in some of the cases, the bearings may stick slightly due to the old grease that’s why they might not drop out immediately, so just have this in mind.
Additionally, if your bicycle has sealed cartridge bearings, then they will usually stays in their bearing seats inside the frame and actually won’t fall out.
But if they are really loose or worn out, then they might come out along with the fork as well.
3. Remove the Bearings
So, to remove the bearings there’s a dependency as what kind of bearings your headset really uses.
a. How to Remove a Cartridge Bearings
If your bicycle has a sealed cartridge bearings which is more commonly found in the modern headsets, then you can usually remove them by hand as well.
So, just use your fingers to gently pull or wiggle the cartridge bearings out of their seats, and if they are really stuck, then you have to use a bearing puller tool to carefully pop them out without damaging the bearing seat or frame as well.
Not only this, sometimes cartridge bearings sit tightly in the integrated frames which is why you may also need to do a soft tap from the inside using a removal tool or plastic drift as well.
NOTE: some integrated systems actually requires more aggressive methods such as: slide-hammers combined with the penetrating oil as well to remove them.[¹]
b. How to Remove Loose Ball Bearings
Now, if your headset actually uses loose bearings, then they may b e sitting in removable bearing cups they can be external or pressed-in manner as well.
So, in these cases, you have to use a soft mallet and a plastic or brass drift so that you can carefully tap around the edge of the bearing cup from the inside of the frame.
As this will slowly push the bearing cup out of the head tube easily.
Furthermore, you really have to be very gently and you have to work evenly around the cup so that you can avoid damaging the frame or misaligning the bearing seat.
And once the cup is out, then you can remove all the individual bearings and clean the area comfortably.
IMPORTANT: If you are working with a carbon frame or carbon steerer tube, then you should never have to use a metallic tools directly on the surface, so just always use frame-safe tools to avoid any costly damage later on.
4. Inspect Bearing Races and Cups
Now, once you see that bearings are out, now you have to take a close look at the bearing races, cups and seats as well which is inside the head tube and all around the fork crown as well.
And then just look for these following signs of wear:
- Pitting: is there any tiny dents or craters are available.
- Is there Rust or Discoloration is happened.
- Is it Worn or Flattened The Bearing Tracks.
So, if you find any of these issues, then it is actually the sign that the headset was either too dry, overtightened or used in wet and dirty conditions for too long time as well.
Basically you have to use a clean rag and a mild degreaser or rubbing alcohol to thoroughly clean all the internal surfaces.
As by doing this it will easily removes any available old grease, grime and rust flakes as well and it prepares the area for either new bearings or reinstalling the cleaned ones as well.
Actually it is important as clean bearing seats and cups are really essential for smooth steering and long-lasting performance.
Conclusion On How to Remove Headset Bearings from a Bicycle
So, by now the headset bearings are no longer a mystery and you know the right tools and step-by-step approach and that’s why it becomes a straightforward task that keeps your bicycle performing at its best.
Not only this, you can now do regular inspection and work with the cartridge or loose ball bearings and easily prevent any serious issues such as: steering failure, frame damage and bearing collapse as well.
You should always remember that one thing: as you have to handle parts very gently by using the right tools specially on the carbon frames.
As well as, you should never ever ignore the warning signs such as: grinding, looseness or corrosion as well.
You can ask questions in the comment section.
FAQs On How to Remove Headset Bearings from a Bicycle
Q1. How do I know if my headset bearings need to be removed or replaced?
Answer: If you really feel that your handlebars are rough when you turning then, also it makes grinding or clicking noises or even if you notice rust or looseness in the headset, which clearly means you have to inspect or replace the bearings accordingly. Plus, these are really clear signs that the bearings are dirty, worn out or corroded and could really affect your steering control as well.
Q2. Can I reuse my old headset bearings after cleaning them?
Answer: Yes, if you see them still on the ideally good condition, just clean them thoroughly and then check for rust, pitting or roughness as well. And if they spin smoothly and look totally undamaged then you can reuse them easily. However, sealed cartridge bearings that feel gritty or don’t spin freely should be replaced immediately for safety purpose.
References:
[1] Reddit.com. How to remove rotten integrated headset bearings if the outer race is seized in the frame?
https://www.reddit.com/r/bikewrench/comments/fiip3r/how_to_remove_rotten_integrated_headset_bearings/
Jonathan, the passionate owner of Bicycle Time, brings a lifelong love for bikes and automotive craftsmanship, that reflects into every corner of the shop. With deep passion in both cycling and automotive accessories, Jonathan is more than just an expert.
