 Skip to content
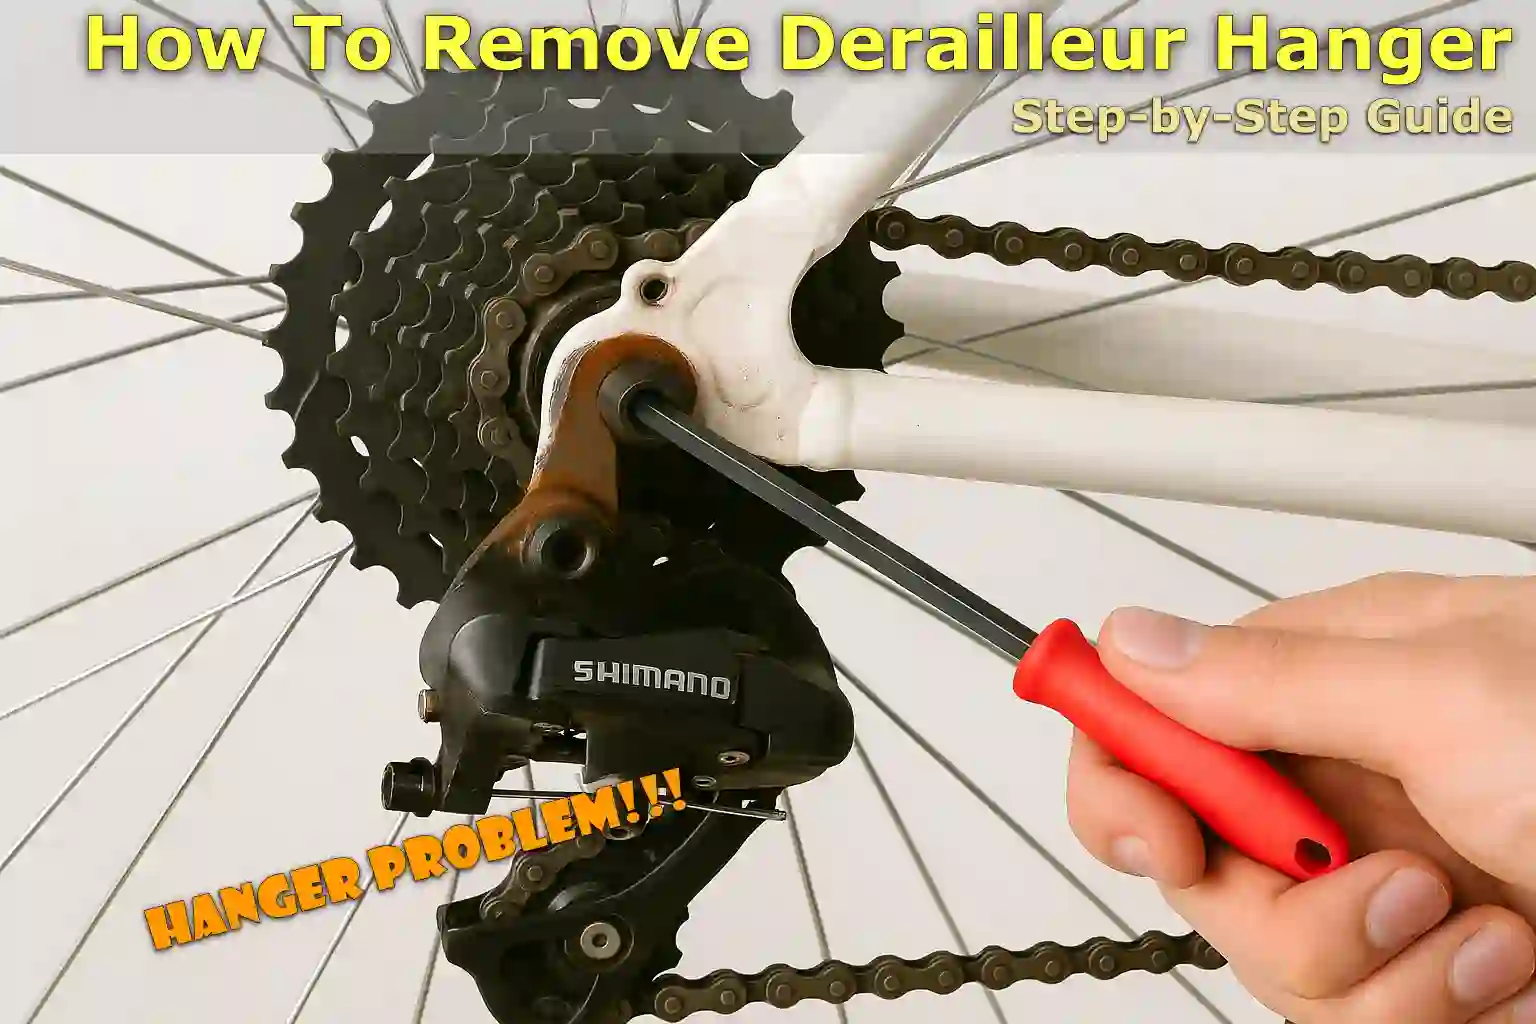
Written By: Jonathan
Fact Checked By: Caroline Dezendorf
Reviewed By: Matt Tanner
The derailleur hanger is actually the metal piece that connects the rear derailleur to the bicycle frame at the dropouts.
Also, most modern bicycles actually use replaceable derailleur hangers that are made of really soft aluminum.
It is actually designed to bend or break during a collision, with the intention of preventing any serious damage to your derailleur and frame.
Also, over time, these hangers can get bent due to a fall, improper movement, or even while transporting the bicycle.
This is why a misaligned or damaged derailleur hanger can cause poor shifting, chain skipping, excessive drivetrain wear, or even the possibility of the derailleur being pulled into a spoke which is really dangerous and costly to repair.
That’s why this guide is specifically on How To Remove Derailleur Hanger so that you can get information about the tools and safety instructions you need to follow to remove it.
Tools
| Tool/Supply | Purpose | Notes |
|---|---|---|
| Allen Wrenches (2mm–6mm) | This will be needed to remove the derailleur and hanger bolts. | Also, the most common sizes are 4mm, 5mm, 6mm. So, use a high-quality wrench to avoid stripping the bolt. |
| Torque Wrench | Reinstalling the hanger with the correct torque will be helpful | So 4 to 8 Nm torque which is the recommended torque so that you can easily prevent from over tightening or damaging the frame. |
| Torx Key (T25 or T30) | In fact you’ll need to use this for hangers that use Torx bolts rather than hex bolts. | So be sure to check your hanger bolts before you begin as some brands use Torx heads. |
| Chain Whip or Pliers | If the derailleur is stiff or stuck, it will be helpful to hold it steady. | Yes, this is actually optional and not usually needed, but it is useful if parts are hard to loosen. |
| Clean Rag | Effective wiping of dropout and hanger contact surfaces. | Because it prevents dirt, old grease, and debris from interfering with the seating and alignment of the bolt. |
| Bicycle Degreaser | This will help to thoroughly clean the threads and contact points. | You can simply use a bike-safe degreaser to avoid damaging the frame or paint. |
| Zip Tie or String | This will be needed to securely secure the derailleur while working. | This prevents the derailleur from hanging up or scratching the frame after easy removal. |
Understand the Derailleur Hanger First
Just knowing the basics about derailleur hanger and how important it is in a bicycle.
1. What is the Derailleur Hanger?
The derailleur hanger is actually a small but very important piece of metal that ideally connects your bicycle’s rear derailleur to the frame, specifically at the rear dropout which is the area where the rear of the wheel connects.
So, basically its main function is to hold the derailleur in the correct position so that your gears can shift really smoothly and in the most precise manner possible.
As the derailleur hanger actually sits on the outer edge of the bicycle frame it is actually intentionally designed to be a bit weaker so that if there is an impact that could be noticed in an accident or fall of the bicycle, then simply the hanger will bend or break before the frame or derailleur, which literally saves you from a much more expensive repair as it absorbs all the impact itself and spares the expensive components of your beloved bicycle.
2. Types of Derailleur Hangers: Replaceable Vs Integrated
Yes, there are two main types of derailleur hangers used on bicycles: replaceable and integrated/fixed derailleur hangers.
1. Replaceable Derailleur Hangers
So, from the name itself you can know that they are replaceable and that is why these are the most commonly found type on modern bicycles and particularly you will see them on aluminium or carbon frames.
As they are bolted to the frame and made of really soft aluminum, if they get bent you can easily unscrew and replace them, making maintenance very easy and cost effective.
This is why many bicycle brands actually have their own custom sized hangers, so it also becomes important to purchase the exact match for your bicycle model.
2. Integrated or Fixed Derailleur Hangers
You’ll mostly find these on older steel-frame bicycles or some budget models, as these hangers are actually built directly into the frame itself.
This basically means that if they get bent or damaged you cannot replace them, as you might have to bend them back with the help of special alignment tools or have them repaired, which is actually more difficult and expensive too.
3. How to Identify the Derailleur Hanger On Your Bicycle
Therefore, it is also easy to identify the derailleur hanger on your bicycle with a quick inspection:
- Simply, look at the area where the rear derailleur actually attaches to the frame, which is located near the rear axle.
- And then if you actually see a little metal plate that’s attached with one or two bolts, that basically means it’s a replaceable hanger.
- Or if you see that the derailleur is screwed directly to the bicycle frame without any sort of separate part, it is more likely to be an integrated hanger.
Additionally, most replaceable hangers are ideally made of silver or black aluminum, and they also usually have a slight curve or “hook” shape to them.
Not only that, some even have a small part number imprinted on them, which really helps you when you want to order a replacement for it.
How To Remove Derailleur Hanger (Easy & Safe Method)
So, with this method you can easily remove the derailleur hanger, as this part of the process is usually simple but you really have to be very careful and attentive.
To remove that derailleur hanger: You must first go to the smallest cog and then remove the derailleur bolt and then the hanger can be removed according to this guide.[¹]
1. Locate the Mounting Bolts
Now, the first step is to figure out where the derailleur hanger is actually attached to your bicycle frame, as with most modern bicycles with replaceable hangers it is actually bolted onto the dropout which is actually a small slot at the back of your frame where the wheel axle fits.
Not only this, it also depends on the design of your bicycle and the hanger can also be attached with one or two small bolts.
Additionally, these bolts are often visible on the outside or inside edge of the dropouts, or sometimes even inside the rear dropout if it is truly a thru-axle design.
Plus, some bicycles may have hidden or recessed bolts, so it’s worth inspecting that area carefully.
2. Use an Allen Wrench or Torx Key as Needed
So, once you have actually located the bolt, now you actually need to check out what tools it actually requires.
As most hangers actually use Allen/hex bolts, but there are some brands available and specially newer models or higher-end cyclists may also use Torx bolts such as T25 or T30.
So it’s very important to use the correct size tool, so that you don’t have to round off the ends of the bolts as well.
And now insert that corresponding tool securely into the bolt and make sure it is seated properly before turning it.
Plus, it should fit snugly, giving you better control and actually reducing the risk of stripping.
3. Unscrew and Gently Slide Out the Hanger
Now, You will actually need to turn the bolts anti-clockwise to loosen and remove them, plus you’ll need to go slowly and avoid applying force to the tool: if you feel resistance, stop and double-check that you are using the correct size.
So, once the bolts are properly removed, the hanger should slide easily out of the dropout, and if it feels stuck, give it a gentle wiggle from side to side, but don’t actually pry it open with a screwdriver, as this could damage the frame surface or even the mounting threads.
Also, some hangers are actually located between the frame and the axle hardware, so you may want to remove the rear wheel first to make this easier as well.
4. Inspect Threads and Dropout for Damage or Wear
And before you install the new hanger or put the old one back on: It’s also very important to closely inspect the dropout area.
So, take a look at the bolt holes, frame threads and mounting surfaces as well, and if you do see any cross-threading, metal shavings, rust or any cracks, you’ll need to fix these things before reinstalling anything.
Also, when you clean the area with a soft brush or cloth it will definitely help a lot in removing any dirt or any possible grease that can actually affect the bolt seating as well.
Not only this, You do not need to force the bolt back in even if the threads look really damaged or stripped: just consider using a thread repair kit or if you are not comfortable with it you can also consult a bicycle mechanic, or just comment below about your problems.
Because a clean and undamaged surface actually ensures that your new hanger will sit flat and hold firmly, which is also crucial for accurate relocation.
Read More:
Conclusion On How To Remove Derailleur Hanger
You should really never underestimate the derailleur hanger: because you have to remove it correctly to ensure that your bicycle’s shifting remains as fast, safe and smooth as ever.
It actually has a crucial role, as the derailleur hanger is much more than just a connector: as its sacrificial part is designed to protect your frame and derailleur from any serious damage during an impact or crash.
So, whether you’re dealing with really bad shifting, visible misalignment or just routine maintenance, just take the time to safely remove it, inspect it and then you can reinstall or replace your hanger.
If you have any unanswered questions in your mind then ask them in the comment section below.
Frequently Asked Questions
Q1. Are derailleur hangers universal, or do they vary by bike?
Answer: In fact it varies from bicycle to bicycle, as most hangers are specific to the frame model and brand, as there are hundreds of different hanger sizes and bolt patterns, which is why you have to buy the one that exactly matches your bicycle model. So, simply check your frame’s brand website or use the hanger finder tool to identify the correct part that is 100% compatible with your bicycle.
References:
[1] Park Tool. Rear Derailleur Removal & Installation
https://www.parktool.com/en-us/blog/repair-help/rear-derailleur-removal-and-installation
Jonathan, the passionate owner of Bicycle Time, brings a lifelong love for bikes and automotive craftsmanship, that reflects into every corner of the shop. With deep passion in both cycling and automotive accessories, Jonathan is more than just an expert.
