Written By: Jonathan
Fact Checked By: Caroline Dezendorf
Reviewed By: Matt Tanner
By just attaching the Bike Rack to your Car opens the door to the new adventures, as you can take it wherever you like: up in the mountains, on the local trail or to the beach for some extra fun.
But it is all about a great and reliable way to carry the bike to the desired location, and that’s why the BIKE RACKS were invented.
And according to the industry research, over 70% of the cyclists actually uses one thing for safe transportation and that is bike rack.
You might be confused about what type of bike rack would be great for your vehicle type or type of use: and actually How to Attach Bike Rack On Car, but don’t worry about it, because that is exactly i i will be telling you in this guide.
Types of Bike Racks
There are mainly three ideal places where you can install bike racks on car, as they are the most commonly used bike racks so choose them as per your choice.
1. Trunk-Mounted Bike Rack
This is a lightweight, truly portable type of rack, because it straps to the back of your car, typically uses adjustable arms and rubber or foam pads that rest on your vehicle’s trunk or hatchback.
2. Hitch-Mounted Bike Rack
This bike rack itself tells you where it can be mounted, yes in the hitch receiver of your car and it provides a solid and very secure way to transport multiple bikes from 2 to 5 depending on your bike rack capacity.
Plus, it comes with two styles: one holds the bike by the frame and the other is a platform type so the bike can sit on a tray.
3. Roof-Mounted Bike Rack
Now, the installation location of this bike rack is on the roof of your car and it uses crossbars, and with this bike mount your bike will be in an upright position or you will have to remove the front wheel.
Some roof-mounted bike racks clamp onto the frame, and some secure the front wheel of the bike.
Things to Check Before Installing a Bike Rack
It is very important to carry out some important checks to ensure that the process goes smoothly and your bike remains safe during the trip.
Yes, these are very simple steps but they can make a huge difference in terms of safety and play a major role in protecting your car’s finish as it ensures that the rack fits and functions properly.
1. Vehicle Compatibility
First of all, you need to check if the particular rack you have chosen is compatible with your car as you need a vehicle-specific bike rack since not all bike racks fit every vehicle.
Trunk mounted racks, like those in cars, are not a good option, but it can be a good option for sedans and hatchbacks.
Similarly, other bike racks have other requirements such as: Hitch-mounted racks must have a trailer hitch already installed, and if you don’t have one then you need to install a hitch receiver before using such a bike rack.
Also, roof-mounted bike rack require roof racks or crossbars, so you’ll need all of these types of accessories before you can install a bike rack on your car.
So just check the compatibility of the bike rack for your vehicle and what accessories are required to install that particular rack.
2. Rack Weight Limit
Now, as per your usage, you need to check the maximum weight limit of the rack and how many bikes you need to carry.
Each bike rack is designed to carry a certain number of bikes with a specified combined weight, so you’ll need to check this information first if you want to avoid overloading the rack after installing it.
There are also safety concerns as overloading can cause excessive damage to your bike or car.
So, just think about what type of bike you have like an electric bike or a regular bike because there is a huge difference in their weight, especially electric bikes can weigh around 50 pounds or more.
3. Tools
| Rack Type | Tools Needed | Notes |
|---|---|---|
| Trunk-Mounted | Usually None | As most models use straps; so you can easily install a trunk bike rack without any tools. |
| Hitch-Mounted | You will need a wrench or socket set to install it. | This is necessary to secure the hitch-mounted rack to the hitch receiver. |
| Roof-Mounted | To install on the roof you will need an Allen key, torque wrench. | An Allen key and torque wrench are required to securely fasten the rack to the ceiling crossbar. |
4. Clean Surfaces to Prevent Scratches
Before installing the rack you must clean the area where the rack will be placed, because if there is too much dust, sand or dirt then it will damage the paint of the car and also the foam pads and rubber of the rack can act like sandpaper and cause scratches while driving on the road.
Just make sure the surface is clean and sanitized, and then you are good to go.
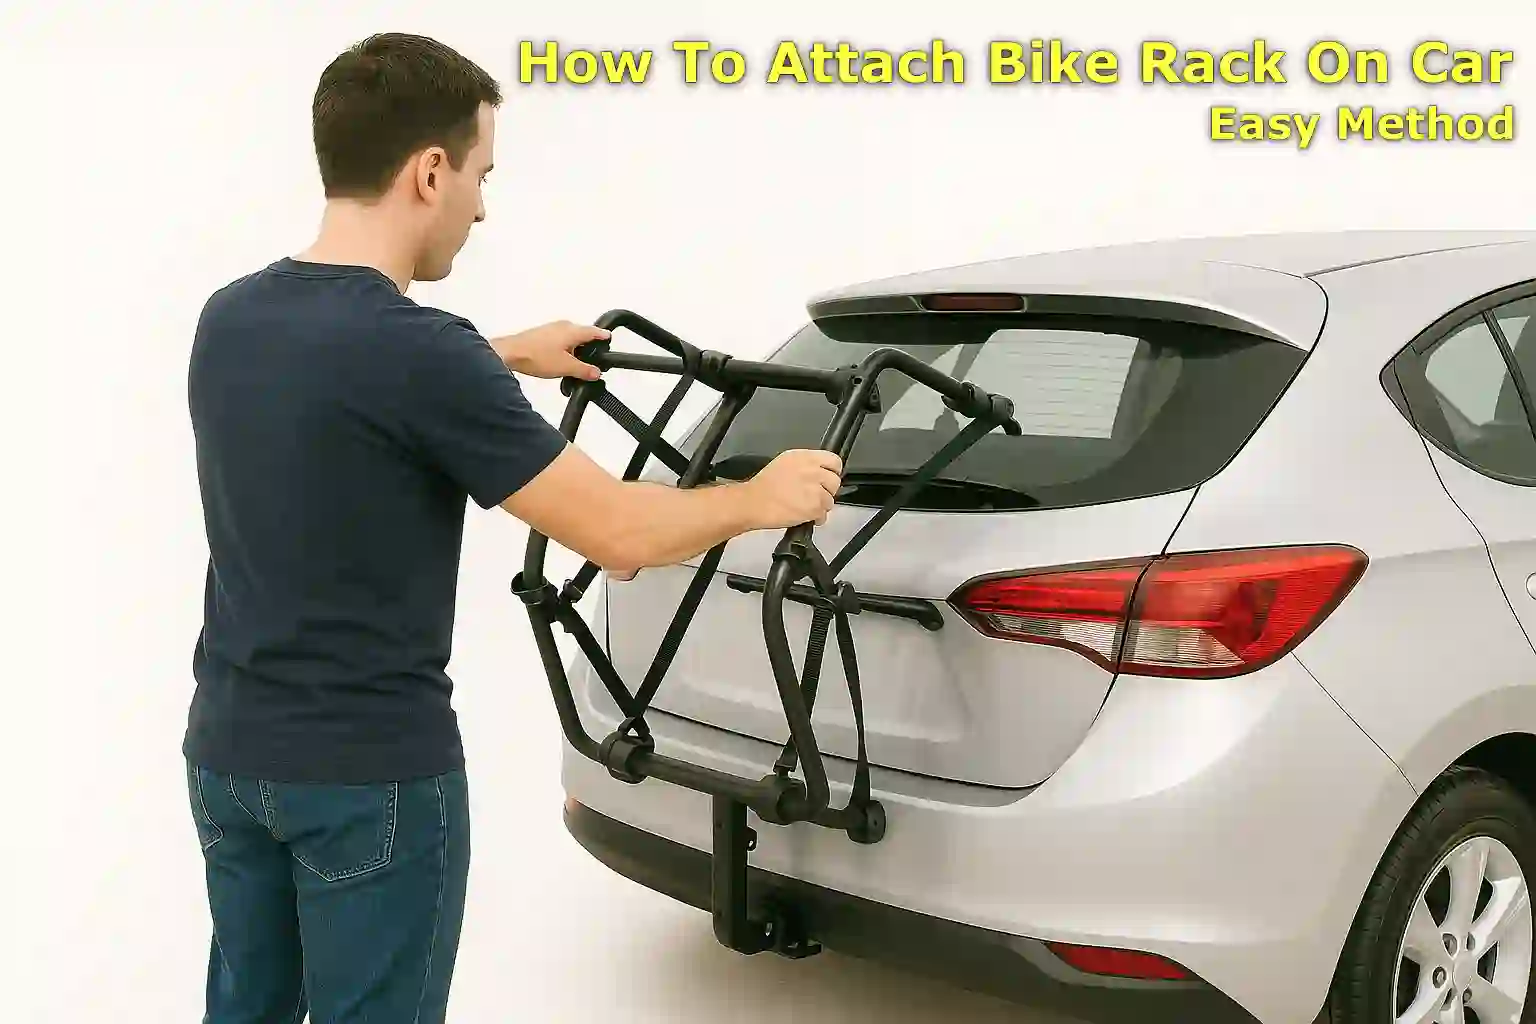
How to Attach a Trunk-Mounted Bike Rack
Trunk mounted bike racks are a popular choice as they are good for most casual cyclists as they are affordable in price, lightweight in quality, and easy to move around.
Yes, you need to install it correctly so that it keeps both your bike and car safe on the road.
So this is the proper step-by-step guide that will help you attach your trunk rack safely even if you are doing it for the first time.
1. Unfold the Rack
The first thing you need to do is unfold the whole rack, and most trunk racks come with two horizontal arms that hold the bike and two padded feet or claws that hold onto the car.
Just take them out of the box and identify which parts will touch your car and whether they come with rubber or foam-padded or not, yes these rubber or foam-padded always come with them to protect the paint.
2. Position the Rack on the Trunk
Now, you will need to place the padded legs of the rack over the front of the trunk or hatch, so that the upper legs usually rest on the upper edge of the trunk and the lower legs sit comfortably on the bumper or lower trunk area.
You have to ensure that the angle of the arms holding the bike should be around 15 to 30 degrees upwards, as this angle helps in keeping the bike stable during travel and it also prevents the rack from swinging cluelessly.
3. Attach the Straps Securely
Trunk mounted racks come with 4 to 6 straps, which are typically used at the top, bottom, and sides to securely fasten the rack.
Now, you need to attach the top straps to the top edge of the trunk or hatch, and the bottom straps to the bottom edge of the trunk or you can also attach it underneath the bumper.
Likewise, the side straps go on the left and right side of the trunk, as this ensures that each hook has a solid grip on metal, just make sure that it does not catch on glass, plastic or spoilers as these are easy to break while driving.
4. Tighten the Straps Evenly
And once the straps are tied, you need to tighten them evenly.
You will need to center the rack, so don’t over-tighten it on just one side at a time, you’ll need to work in a balanced pattern:
This means that you have to first tighten the top straps, then the bottom straps, and then the sides, so that you can successfully keep the rack level and pressed firmly against the car without any wobble while driving.
5. Set the Arm Height and Width
So, you have to adjust the horizontal arms from the parts that hold the bike frame to the appropriate size of the bike, as most racks have locking pins or knobs that help you raise or lower the arms according to your desired height.
Keep in mind that the arms must be level and spaced far enough apart to fit inside the bike’s frame triangle, so that the bike can rest evenly without tilting forward or backward, ensuring the safety of both your bike and car.
6. Check for Bike Frame Contact
Before attaching your bike, you should check if the arms are properly padded or coated with rubber to avoid scratching the bike frame.
If your bicycle has an unusual or different shape such as: a women’s bicycle with a step-through frame or a full-suspension mountain bike, you may need a top-tube adapter bar so you can mount it properly.
7. Shake-Test the Rack
Now, you will have installed the rack correctly, as the straps are also tightened.
Just shake it firmly to check if the whole setup is sturdy enough. If it feels solid and doesn’t move more than a few centimeters, you can assume it’s safe and installed correctly.
Otherwise, if it moves too much then recheck the tension and location of your belts and adjust and tighten them accordingly.
8. Inspect Everything
Now, inspect everything to make sure it is safe enough to use, check for any loose straps and tie them up or you can tuck them in so they don’t flap around while driving.
Just double-check them to see if the hooks are still tight, if the edges of your trunk are soft or curved too much, and open and close the trunk 2 to 3 times to make sure everything still fits securely or else you’ll have to make changes.
9. Test with a Short Drive
Just one more step and you are ready to go, just take a short drive around the block, stop the car and check the condition of the rack and bike after the ride.
Usually, first-time users find that the straps might be a little loose after the first few minutes, so check them carefully.
So, now you have successfully installed the Trunk-Mounted Bike Rack and if you have any questions left, please comment down below for proper information.
How to Attach a Hitch-Mounted Bike Rack
With this guide, you will be able to install a hitch-mounted bike rack without wasting any kind of time.
| Aspect | Details |
|---|---|
| What It Is | It is styled in such a way that can be slid into the vehicle’s hitch receiver. And it is available in two styles: hanging which has frame support or platform to wheel tray. |
| How It Attaches | 1. Now, you need to put in the 1.25” or 2” hitch receiver. 2. You need to secure with a bolt or locking pin. 3. Also, use anti-wobble locks to reduce swinging during ride. 4. Most of the models fold or tilt for trunk access so that you can easily access it. |
| Best For | 1. It is good for SUVs, trucks, or cars with a hitch. 2. Also, great for families or regular cyclists. 3. You can easily use it for heavy or multiple bikes. |
So, if you want more information about hitch-mounted bike racks then you can comment below for more information.
How to Attach a Roof-Mounted Bike Rack
This is the guide that will lead to having the perfectly installed Roof-Mounted bike racks easily.
| Aspect | Details |
|---|---|
| What It Is | It can be easily mounted on the roof of the car using the crossbar. It keeps the bike upright as per your convenience without removing or putting the front wheel on. Also, some clamp the frame, others secure the fork. |
| How It Attaches | 1. It actually requires roof crossbars, it can be factory or aftermarket one, but without it you won’t be able to install the roof-mounted rack. 2. Now, the rack clamps onto the bars with bolts or quick-release the mounts. 3. Just lift the Bike and you have to secure the roof-mounted bike rack with straps or clamps |
| Best For | 1. It is great for sedans, wagons, SUVs with roof crossbars so that you don’t have to worry about safety and comfortability. 2. Also, a cyclists who want full trunk/hitch access also can use this roof-mounted bike racks. 3. As well as, people who need to transport multiple gear types with ones. |
Now, if you specifically want installation instructions or any additional information regarding this, you are welcome to the comment section.
Conclusion
So, everything depends on the right bike rack and the type of car you have, so you need to be very specific about it, and you must know how many bikes you actually want to carry.
And I have explained all about trunk-mounted racks because while they’re great for beginners, hitch-mounted racks offer more stability and are ideal for families or frequent riders, Plus the roof racks actually give you full access to your trunk and you can even carry kayaks or cargo boxes along with the bikes.
In fact, no matter which type you choose, the installation must be correct and in accordance with safety standards.
Because a properly installed bike rack not only protects your car and your bike, but also gives you peace of mind on every ride as it will never land you in trouble later.
So that’s all about this guide on How To Attach Bike Rack On Car and I am sure this bike rack setup helps you to travel smart, safe and enjoy the trip with lots of freedom.
Frequently Asked Questions
1. Which type of bike rack is best for beginners?
The clear winners for beginner-friendly bike racks are trunk-mounted bike racks, as they come in budget-friendly pricing, are lightweight, and you can easily install them without any other additional parts or tools.
2. Can I open my trunk with the bike rack attached?
If you have a trunk-mounted bike rack then you should not open the trunk while the bikes are loaded, but yes hitch-mounted rack comes with tilt-away feature so that you can easily access the trunk portion of your car, so it all depends on your bike rack type.
3. Will a bike rack scratch my car?
Yes, it is quite possible if you have not installed the bike rack properly then the car surface might get affected by it, also you need to clean the contact points before installation and always check if the straps and padding are in good condition to avoid scratches.
4. Is it safe to drive on the highway with a bike rack?
Definitely yes, if you have installed it correctly you don’t even have to worry about driving on the highway, just make sure the bike rack is securely fastened, check the straps, locks and tightness before going for the long trips and yes shake-test is also necessary before driving.
5. Can I use a roof rack if my car doesn’t have crossbars?
No, a roof mounted bike rack actually requires a crossbar, so you must have a crossbar, without it you can not install it on the roof.
Read Also
👉Why Does My Bicycle Chain Keep Slipping?
👉How To Choose The Right Bicycle Size?
👉How to Clean a Bicycle Chain?
👉How to Clean a Bicycle Cassette
👉Why a Bicycle Doesn’t Move Backwards?
👉How to Put Air in a Bicycle Tire: The Right Way
👉How To Become A Bicycle Mechanic?
Jonathan, the passionate owner of Bicycle Time, brings a lifelong love for bikes and automotive craftsmanship, that reflects into every corner of the shop. With deep passion in both cycling and automotive accessories, Jonathan is more than just an expert.