 Skip to content
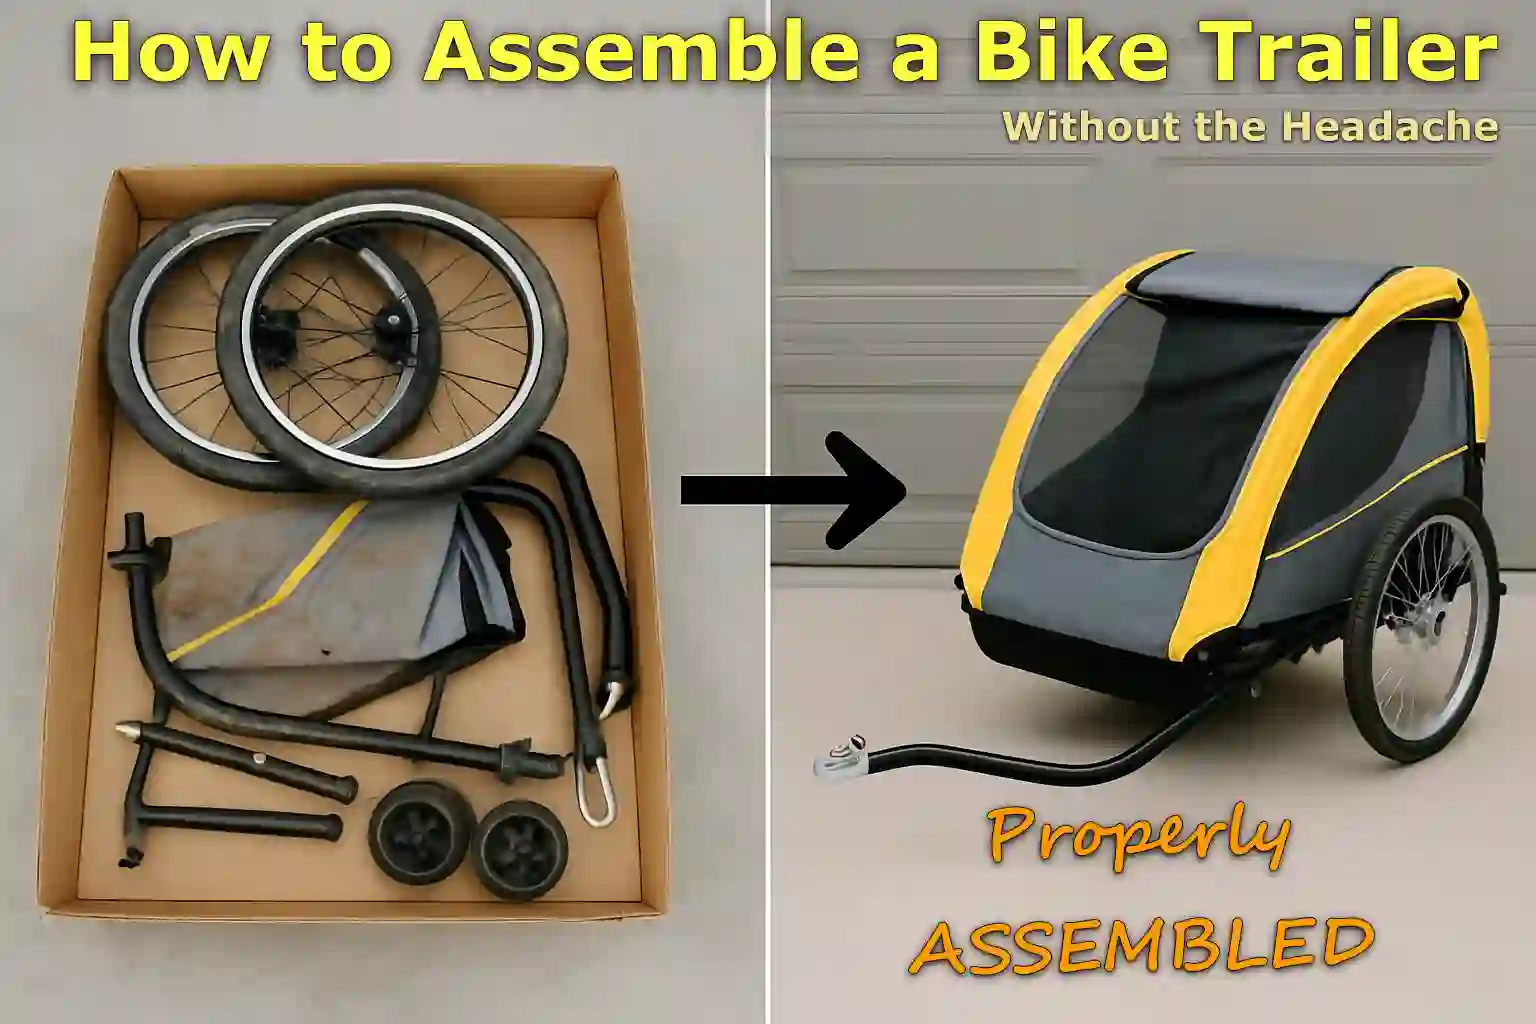
Written By: Jonathan
Fact Checked By: Caroline Dezendorf
Reviewed By: Matt Tanner
When you go to assemble a bike trailer it may seem confusing at first as to what to do, how to connect the parts etc.
But with the right steps and of course some patience, it can be so easy that almost anyone can do it.
When you attach the bike trailer correctly it becomes very convenient to carry your kids, groceries or you can easily take your pet on a ride as it will provide both safety and comfort.
As such, according to the U.S. Consumer Product Safety Commission (CPSC): Many bike-related injuries involving trailers are actually caused by improper assembly or loose parts.[¹]
This is why it becomes very important to know how to properly build and connect your trailer so that serious accidents can be easily prevented.
What’s more, most modern bicycle trailers are actually designed to be more user-friendly, and often require just a few basic tools and take less than 30 minutes to set up.
Plus, many models of bike trailers also feature quick-release wheels and folding frames that make the process even faster than you might expect.
And this guide is specifically on How to Assemble a Bike Trailer, that’s why you will know everything step by step and in simple terms.
Basic Tools
| Item | Purpose / Notes |
|---|---|
| Bike Trailer Kit | In fact this includes the main frame, wheels, hitch arm, safety straps, canopy, reflectors and any small parts or pins and you should always check that nothing is missing before you start. |
| Basic Tools | Basically you will need a wrench, screwdriver and Allen (hex) key which are often needed to tighten bolts or secure the hitch connector, although some models use thumb screws or quick-release mechanisms. |
| Tire Pump | This is for those if the trailer uses pneumatic air-filled tires then you will actually need a pump to inflate them to the correct pressure. |
| Instruction Manual | Yes, this is the tool you heard it right, in fact it is one of the most important tools, because each trailer model has its own design, so you always have to follow brand-specific steps and diagrams to avoid mistakes. |
Unboxing and Inventory Check
Before any other work, you should open up the bike trailer and check all types of inventory so you can make sure there are no missing parts, incorrect parts, or even signs of early wear.
And according to customer service data from major trailer manufacturers like Thule and Allen Sports, over 30% of product shipments are actually support calls because users skipped this crucial step or threw away small parts along with the packaging.
This is a step that will save you from any kind of stress, waste of time, and potential security risks later on.
1. Unbox the Bike Trailer
You should open the packaging gently with the help of scissors or a box cutter, just avoid tearing the box too early as it contains some small but essential parts like: pins or bolts may be held in place with the cardboard.
Then lay all of the items out on a thoroughly cleaned, flat surface, such as a garage floor or a table.
You should always keep the packaging until your bike trailer is fully assembled and tested to work, should this be important in case you need to return or replace something.
2. Identify All Components First
Now, that you have placed all the items, it’s time to go through each part one by one and check them all, and you can check these parts because most bike trailers actually consist of the following main components:
| Component | Purpose |
|---|---|
| Main Frame | It is the main structure that also opens to accommodate passengers or cargo. |
| Wheels | These are usually quick-release and detachable wheels, just check that they are the correct size and that the tire condition is good. |
| Hitch Arm | This is the bar that connects the trailer to your bike, and checking its condition is very important for safety purpose. |
| Coupler / Hitch Connector | It is actually an accessory that attaches to the rear axle of the bike and locks the trailer to your bike. |
| Locking Pins & Clips | These are small but important parts, as they are used to lock various parts, such as the hitch or wheels, in place. |
| Canopy or Cover | It is a fabric covering that protects children, luggage or pets from weather and wind. |
| Safety Flag | This improves visibility and most trailers actually include a two-piece pole and flag. |
| Reflectors | Reflectors are for visibility at night or in low light, and they’re often already mounted on the wheels or rear panel, so check those too. |
Note: If your bike trailer’s manual actually has a checklist, that’s the best and most reliable way to confirm if every piece is included, and if you notice something is missing or damaged, contact the manufacturer immediately before proceeding with anything.
Assemble the Frame and Body First
So once you’ve made sure that all the parts are actually present and good, the next step is to first build the main structure of the trailer.
This involves you opening up the frame and then installing the wheels, and these are the two steps that really form the foundation of your trailer’s strength, stability, and safety.
1. Open and Lock the Frame
Now, you will need to carefully open or spread out the main body of the trailer, as most frames are built to be closed, this way they can also be shipped and stored efficiently.
Additionally, they also usually have locking joints or snap-in braces that actually keep the frame straight and rigid.
So, gently pull the frame upwards and outwards until you hear a click or the joints snap securely into their locked position.
Furthermore, you should also ensure that both sides of the frame should be fully extended and locked properly, as a partially extended frame can actually cause the trailer to collapse or become unstable during use.
Also, if your model actually uses latch locks, rotating arms, or safety clips, you should always double-check that each of these things is in the correct place before proceeding.
Plus, you don’t need to apply force to anything so if a part isn’t moving smoothly, it may be in the wrong direction or needs to be loosened and reinstalled.
2. Install the Wheels of the Bike Trailer
Once you’ve locked the frame in place, it’s time to install its wheels, and most bike trailers actually come with quick-release axles that actually allow you to attach and remove wheels without any type of tools.
Therefore, these axles usually slide or snap directly into sockets located on either side of the frame.
To do it safely:
- Simply hold the wheel by the axle and then align it with the socket located on the frame.
- Now, gently push the axle into the socket until you hear a click or feel it lock into place.
- Additionally, there are some models available that require you to press a small button or pull back a spring-loaded pin before you can insert it.
Also, you should align the wheel, because after attaching both wheels you should give it a good spin and check that it spins freely and without wobble, because misaligned wheels can really cause a bumpy ride or extra stress on the frame.
Not only that, but it is also a fact that properly installed wheels also reduce rolling resistance, which obviously helps the trailer move more efficiently and this can make a noticeable difference especially when you ride uphill or with extra cargo weight.
Now, finally you need to make sure that both the wheels should be secure, by pulling them gently, and they should not move or come out at all, and if you notice that they move then remove them easily and reattach them, and all you have to do is make sure that the locking mechanism should be fully activated.
Read More:
Install the Tow Arm and Hitch Connector
The two arms and the hitch system are the accessories that actually attach your bike trailer securely to your bicycle, and you must attach them very carefully and correctly.
Not only that, but they are one of the most important parts of the whole assembly, as it provides a truly secure connection so that your trailer can ride in sync with your bike and not move apart or wobble dangerously while you’re riding.
1. Attach the Two Arm
First you will need to locate the mounting point on the trailer frame, usually located on the front left side, then you will need to line up the two arms which are actually curved metal or alloy bars that actually extend from the trailer to your bicycle.
And then slide it into the designated slot or receiver tube and then you have to tighten it securely.
As for the tightening this obviously depends on your model because you may actually need to:
- Insert a locking pin or bolt so you can hold both arms securely in place.
- Or you can tighten a thumbscrew or nut which will stop the motion.
Also, you need to ensure that both the arms are firmly attached and that it does not twist or slide out on its own in any way, also it should feel completely solid once secured.
Additionally, some bicycle trailers also include a flexible joint or ball socket at the end of both arms, as this actually facilitates smooth turning and bending while cycling.
Just make sure the joint moves freely, but the arm itself doesn’t move at all from where it connects to the trailer frame.
A study that actually analyzed bicycle-mounted child trailers found that 50% of the injuries recorded were actually caused by falls, likely due to improper hitching, loose axle bolts or even missing components, which is why you need to make sure everything is tight and snug.[²]
2. Install the Hitch Connector to Your Bicycle
Now you will need to attach the hitch connector to your bicycle which is also known as a coupler, this is actually the small metal part that stays attached to your bike even when the trailer is removed.
And most hitch connectors are designed to fit onto the rear wheel axle, the side can be either on the left side of the frame or attached to the bike’s seat stay which is the angled bar between your rear wheel and seat post.
- Additionally, you must first remove the rear wheel’s axle nut or quick-release skewer.
- Next, slide the hitch bracket onto the axle so that it fits snugly on the bicycle frame.
- And then you have to reattach the axle nut or skewer and you have to tighten it firmly to hold the hitch bracket securely in place.
Also, you might actually need a wrench or Allen key to complete this step, and yes it totally depends on the rear axle design of your bike, therefore it is recommended that you always follow your trailer’s manual and match the type of axle to your bicycle which can be standard, quick-release or thru-axle.
Not only that, but you should always check compatibility before riding, as e-bikes or bikes with disc brakes may actually require a different adapter to safely install the hitch connector.
However, some higher-end trailers actually use a “universal coupler” system, which adapts to most bicycles without the need for any additional hardware.
Now, finally double-check that the hitch bracket is completely tight, level, and does not cause any obstruction to the rotation of your wheel.
Connect the Bike Trailer to the Bicycle
This step is all about making sure the trailer is firmly attached, balanced and completely safe for your ride, so you’ll need to attach the trailer to the bicycle.
Yes, there should be two levels of security involved in terms of trailer-to-bike connection such as: locking pin and safety strap should be mandatory.
As this additional connected safety accessory ensures that if one connection point fails the other will keep the trailer from becoming detached while on the move, you can see how important this is in protecting your child, pet, or cargo items.
Also, you should not forget this or improper use of any of these can lead to really dangerous situations, especially when transporting kids or pets.
Yes, it’s a good thing that most modern trailers are actually designed for quick and secure attachment so you can secure your ride in a few simple steps.
1. Join the Hitch Arm to the Connector
First, you will need to take the trailer’s hitch arm which is a curved metal bar that extends out from the trailer frame and then you will need to align it with the coupler or hitch bracket already installed on your bicycle.
Simply slide the end of the hitch arm into the coupler and again it is important that you feel it fits snugly.
You can then secure it using the included locking pin or quick-release pin:
- Simply push the pin through the aligned holes of both the hitch arm and coupler.
- Now, you have to make sure that it clicks or locks into place, which actually also depends on the type of model you have.
Note: For safety reasons you should always check that the locking pin is fully inserted and secured, with some models actually including a cotter pin or spring clip that must be added on the end of the locking pin that provides extra safety purposefully.
2. Attach the Safety Strap
Now, you must add the safety strap, yes this is the secondary safety feature that actually prevents the trailer from coming apart if the main hitch connection fails.
Additionally, most straps are made of thick, durable nylon with a loop or clip at the end, which ensures security while also making the attachment process easier.
Here’s how to attach a safety strap easily and correctly:
- Simply wrap the strap around the frame of your bicycle, which is usually the chainstay or seat post, and you should never tie it around the axle or derailleur alone.
- Now, you’ll need to clip or thread the strap into its own loop so you can tie it securely.
- And you need to pull it tight so that there is no slack in the strap when attaching the trailer.
NOTE: If your bicycle has rear suspension or disc brakes, you’ll need to be extra careful when attaching the strap: as you’ll also need to keep it away from moving parts or hot surfaces.
Add Final Features and Adjustments
Now that you’ve safely assembled the main structure of your bicycle trailer and attached it to your bike, it’s time to add the finishing touches to improve safety while also boosting comfort, visibility, and performance.
Furthermore, visibility aids such as flags and reflectors appear to help reduce child trailer accidents due to improved visibility.
In addition, your tires should be properly inflated, which actually helps reduce trailer drag and also prevents the wheels from wearing out too quickly.
1. Attach Canopy or Rain Cover
Most bicycle trailers, especially those made for carrying children or pets, actually come with canopies or multi-layer weather covers.
As these covers are very essential they provide protection to your pet or baby from all types of wind, sun, dust and rain during the journey so that the weather does not hamper the comfort and safety of your passengers.
Additionally, these canopies can also be attached to the trailer frame with the help of zippers, Velcro stripes or snap buttons.
So, to install a canopy or rain cover on your bike trailer you need to follow these simple steps:
Now, first hang the canopy over the frame, and then align the front and back flaps properly.
Plus, you first have to secure the mesh layer that actually provides ventilation and also keeps out insects and debris.
And then you have to roll down and zip or Velcro the weatherproof rain cover over the mesh layer and you should use it especially when the weather is hot or windy.
IMPORTANT: You should always make sure that the cover is snug and that it won’t become loose in the wind, as loose canopies can actually cause drag, driving at high speeds can make noise or even cause the vehicle to tear up, which could be dangerous for your child or pet and could also spoil the groceries.
2. Install Safety Flag and Reflectors to the Bike Trailers
Don’t think that these are just fancy additions to enhance the look of the trailer, as visibility is actually one of the most important safety factors, and this becomes even more important when you are driving near traffic, at dusk, or at night.
As there is a tall safety flag and multiple reflectors, it gives away the presence of a bike trailer even if visibility is not available.
So you can easily install the safety flag and reflector by following these easy steps:
- Take the flag pole which is usually a two-piece fiberglass rod and then join the two parts.
- Now, simply insert the bottom of the end into the designated mounting socket, which you can usually find in the rear left or rear right corner of the trailer.
- Apart from that, you also need to ensure that it sits firmly and does not move or fall.
Now, it’s time to install the reflectors on the bicycle trailer:
So, to install the reflector, attach the red reflector to the rear panel or frame of the trailer.
And you should install amber or white reflectors on both sides of the trailer which are good for side visibility.
Also, some bike trailers actually come with reflectors on the wheels as well, so you just have to make sure these are present and properly cleaned.
Read More:
3. Inflate the Tire (If they can be)
If your bicycle trailer actually comes with air-filled tires, that is pneumatic, then you will really need to make sure that these are properly inflated before your first ride.
Because if the tires are properly inflated and the tire pressure is correct, it provides comfort, control and stability in the ride.
Follow these steps to inflate a bicycle tire:
- Simply locate the recommended PSI which may also be printed on the tire’s sidewall.
- Alternatively, you can also use a manual or electric bicycle pump to gradually inflate your tires to the correct pressure.
- Finally, you need to double-check that both tires are equally inflated for balanced towing.
In addition, if the tires are under-inflated, not only will it be difficult to tow the trailer, but the risk of tire burst and rim damage will also increase.
IMPORTANT: You should check tire pressure at regular intervals, especially before a long ride or before leaving the trailer in storage for a long period of time. Also, just like bicycle or car tires, tires naturally lose air over time.
Conclusion On the How to Assemble a Bike Trailer
To manage the process and make the process smooth we have broken down the step by step guide on How to Assemble a Bike Trailer such as: unboxing, setting up the frame, attaching the hitch and adding final features.
If you attach the bike trailer very well then you can actually take your kids to the park, your dog on an adventure with a whole new level of freedom.
So, you can comment below for more information or any particular unresolved query.
FAQ’s on How to Assemble a Bike Trailer
1. How long does it take to assemble a bike trailer?
Answer: So most bike trailers actually take between 30 minutes to 1 hour to assemble, and yes it depends on the model and your experience too. As foldable models with quick-release wheels and tool-free hitch systems are typically quick to set up and you should read the manual first and organize your parts which can very easily save time.
2. Do I need special tools to assemble a bike trailer?
Answer: Most bike trailers actually come with everything you need or even only require basic types of tools such as Allen keys or wrenches, and Yes, some advanced models may require a torque wrench for really precise tightening, especially if you’re attaching to a bike with a thru-axle.
References:
[1] U.S. Consumer Product Safety Commission NEISS (1991). Mechanical issues contributed to approx.
https://www.cpsc.gov/s3fs-public/pdfs/344.pdf
[2] Powell EC, Tanz RR. Tykes and bikes: injuries associated with bicycle-towed child trailers and bicycle-mounted child seats.
https://pubmed.ncbi.nlm.nih.gov/10768671/
Jonathan, the passionate owner of Bicycle Time, brings a lifelong love for bikes and automotive craftsmanship, that reflects into every corner of the shop. With deep passion in both cycling and automotive accessories, Jonathan is more than just an expert.
