 Skip to content
Written By: Jonathan
Fact Checked By: Caroline Dezendorf
Reviewed By: Matt Tanner
When bicycle brakes are misaligned then you may feel like your bicycle brakes aren’t working because they’re grinding, squealing, or only pulling to one side.
So the biggest thing is that your bicycle brakes might be poorly aligned and they are just annoying and yes totally unsafe.
It doesn’t matter if you’re riding a bicycle with rim brakes or disc brakes, because in this guide you’ll learn how to align bicycle brakes at home with some basic tools.
In 2022, the UK reported 11,546 bicycle accidents, of which 4,056 were serious, as some incidents were caused by faulty brakes, and could have been prevented with just basic maintenance.[¹]
These are really clear instructions from someone who has done this countless times, so there will be no confusion or guesswork.
Types of Bicycle Brakes
There are two main types of brakes available on most bicycles today, rim brakes and disc brakes, and each type works differently and literally requires a slightly different method of aligning them in order to achieve proper alignment.
1. Rim Brakes
So, these are one of the most commonly found braking systems that you can find on road bicycles, vintage bicycles, and many entry-level bicycle models.
They actually work by pressing rubber brake pads against the edges of the wheel rim, which leads to creating friction and slowing down the bicycle.
Now, there are actually two popular types of rim brakes available in rim brakes:
V-Brakes
V-brakes also be called liner-pull brakes, and they are found mostly on mountain bikes and hybrid bicycle models.
Because, it actually makes its maintenance easier as it provides stronger braking power.
Visually, you will find two long arms that pull the brake pads onto the rim from both sides.
Caliper Brakes
You’ll most commonly find these on road bicycles, as caliper brakes use a single pivot point and short arm design.
They are actually very smooth and light, but may offer slightly less stopping power than V-brakes, especially in wet conditions.
But yes, Rim Brakes are indeed simpler and lighter in design than disc brakes, but their performance can be affected by rain, dirt or wear on the rim surface.
2. Disc Brakes
Nowadays, disc brakes are becoming more common on almost all types of bicycles, but especially on mountain bicycles, gravel bicycles, and high-end road bicycles.
Disc brakes work by pressing brake pads onto a metal disc/rotor attached to the wheel’s hub, rather than applying pressure to the rim.
And yes, they also comes with two types:
Mechanical Disc Brakes
This is actually similar to a rim brake, as it uses a standard brake cable to activate the caliper and again these are easier to service than hydraulic systems and are often found on mid-range bicycles.
Hydraulic Disc Brakes
These actually use fluid in a sealed system to transfer force from the lever to the caliper and they actually provide more precise braking with better modulation, which means control over the braking force, and its stopping power is stronger whenever you drive it in wet or muddy conditions.
However, you will need more maintenance and special tools to service them properly.
At last, disc brakes perform better than rim brakes in terms of all weather conditions as they don’t wear out the wheel rim, but they are really heavy and a bit more complicated to adjust than the others.
You can check this out if you want to know:
Signs Your Brakes Are Misaligned
Firstly you should know when you brakes are actually out of alignment is essential that keeps you safe and enhances the performance.
So these are the most common signs that you’ll have to look out for:
Squealing or Screeching Noise
When you stop the bicycle and you hear a rattling sound while braking, this is a sign that the brake pads are not making proper contact with the rim or rotor, so this could be due to misalignment, worn pads or a dirty surface, so you should have it checked.
Uneven Braking
If your bicycle really pulls to one side when you apply the brakes or you notice one brake pad touching before the other, your brakes probably need to be aligned, as they are not aligned.
And yes, it really affects your control and balance at high speeds or during emergency stops.
Reduced Stopping Power
If you really feel like your bicycle is taking longer to stop or that the brake levers are applying more pressure than before.
This means that your brakes may not be aligned correctly and can actually cause the pads to press inefficiently and lead to reduced braking force overall.
One Pad Touches First
The ideal thing about braking is for both pads to hit the braking surface at the same time so they are properly aligned.
But if your bicycle’s brake pad makes contact first, this can lead to uneven wear and vibration.
Don’t worry about it as it’s a common problem with both rim and disc brakes, so usually it just indicates a need for pad or caliper adjustment.
So proper brake alignment actually improves brake stopping performance and it also increases the life of your brake pads, rotors or rims.
That’s why you need to recognize these signs early on as it will help you prevent more serious mechanical problems later on and keep your ride safe and smooth for a long time.
How to Align Rim Brakes
It’s a straightforward process to align rim brakes, requiring some basic tools and a little attention to detail, as it can greatly improve your braking performance and safety.
Just you have to follow these steps in right way:
1. Inspect the Brake Pads
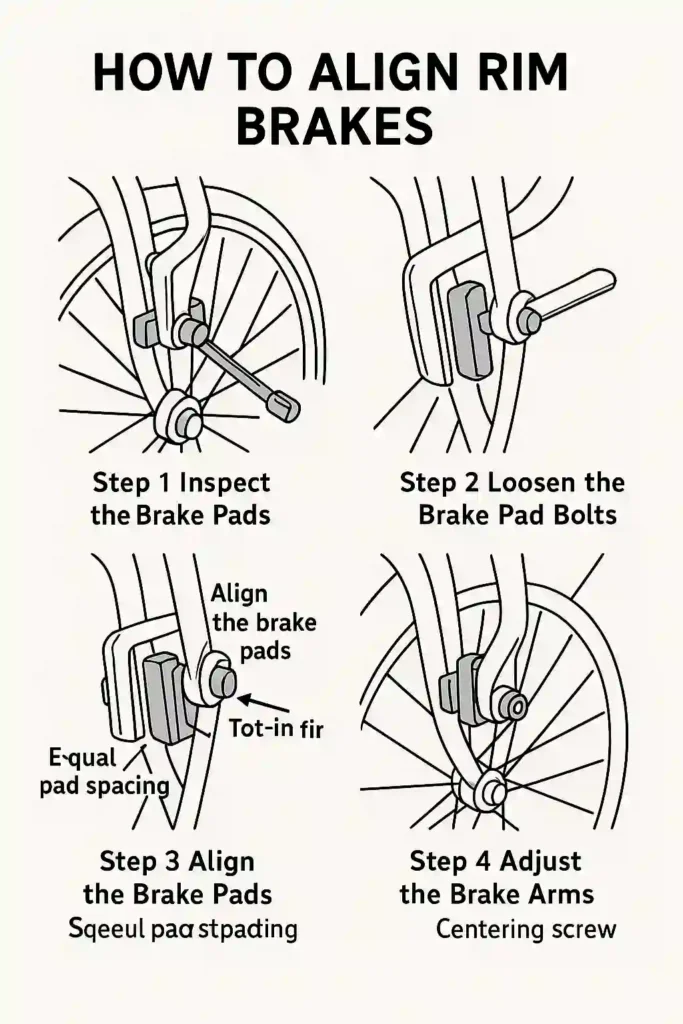
You also need to inspect the brake pads closely, and make sure that no pieces of rubber are stuck to the wheel when you press the brake lever.
And each pad should be in complete and equal contact with the edge of the rim, just make sure it doesn’t matter whether it touches the tire or the air top of the rim.
Because misaligned pads can literally cause poor braking, and damage your tires or rims over time.
So you have to check these following questions:
Q1. Are the pads flat against the rim?
They must apply pressure to the braking surface of the rim, but not at an angle, keep this in mind.
Q2. Are they worn Out?
If you find that the grooves in the pads are barely visible, this means that the surface of the pads has hardened or cracked, then it’s time to replace them before they start aligning.
Q3. Are they hitting the tire or missing the rim?
Just check whether or not they touch the tires because if they do touch them it’s a really dangerous thing because they can literally wear away the rubber and it can actually cause the tire to burst so if they’re too low you’ll see that they won’t brake as effectively.
If you take some time to inspect it carefully, it will definitely save time and prevent problems later on.
2. Loose Brake Pad Bolts
If you want to loosen the bolt you will need to use a 5mm Allen key or a hex wrench as this is what holds the brake pads in place.
All you have to do is loosen them and there is no need to remove the bolts, as you have to slide and angle the pads.
Just give support the brake arm with one hand and loose the bolt so the pad doesn’t drop or rotate during this process.
As well as, you have to be gently to avoid overtightening or stripping the bolt threads as it later it can damage the brake arms.
This loosening thing will give you the power to reinstall the pads exactly where they should really be.
3. Align the Brake Pads
Now that you have loosened the bolts and placed the pads in the correct position, you will need to make a few adjustments such as:
- You’ll need to place the pad flat against the rim.
- Center these vertically; just make sure they’re not too high on the tire and not too low above the braking surface.
- Also, you need to space them equally spaced on either side of the rim.
You’ll need to use a technique known as the “toe-in” method which will give you the best possible results: Like you need to place the front of the pad a little closer to the rim than the rear, and don’t think this is a small thing, because this little angle which is only a millimeter or two really helps to reduce squeak and improves the brake feel.
To align the brakes with this method you need to do these simple steps:
First, you need to hold a thin piece of paper or a commercial car while adjusting the rear end of the brake pad, then you need to tighten the pad bolts while holding this position and then you can remove the paper properly.
All you have to do is make sure that the pads stay aligned when tightening the bolts, and you should check on both sides once again.
4. Adjust the Brake Arms
Brake arms also need to be balanced, even if the pads are in the right place.
If you notice that one arm moves more than the other, or if the pads don’t contact the rim at the same time as they should, you need to center the brake arm as this is the ideal position.
- You need to press the brake lever and then watch how the pads actually hit the rim.
- You see where one side touches or rests close to the rim first, then you have to look at a small screw that is near the base of each brake arm and this is a centering screw.
- Now, you will need to use a Phillips screwdriver so that you can turn the center screw.
:- You will need to pull the arm away from the rim to tighten it.
:- Let the hand come closer so you can loosen it.
You will need to rotate both arms together until both arms are positioned evenly and move together when the lever is pressed.
5. Test and Tune It
A test bench simulating braking conditions showed how important accurate alignment is for consistent braking at different wheel speeds.[²]
Once you find everything is in their place then you have to test and check for they are perfect tune or not.
- You have to spin the wheel to ensure it spins freely without the pads rubbing the rim.
- Then just squeeze the brake lever, and check if both pads should hit the rim at the same time or not, and the brake should feel firm and truly responsive.
- If you still feel that the wheel slows down unevenly or one pad still contacts it early, then just repeat the centering adjustment to fix this issue.
- Yes, at last you have to do a short test ride if possible and just listen for squeaking or rubbing.
NOTE: You will need to check the tension of the brake cable, and if you find that the brakes feel too soft or are pulling up to the handlebar before applying, you may need to tighten the cable by turning the barrel adjuster on the brake lever or brake arm.
How to Align Disc Brakes
Disc Brakes are known for their powerful and reliable quality, but no matter what, if they are not properly aligned, you will hear very annoying rubbing sounds or experience a decrease in braking performance.
Yet it doesn’t matter whether you have mechanical or hydraulic disc brakes, as these steps will surely help you align them precisely for smooth and quiet operation.
1. Loose Caliper Bolts
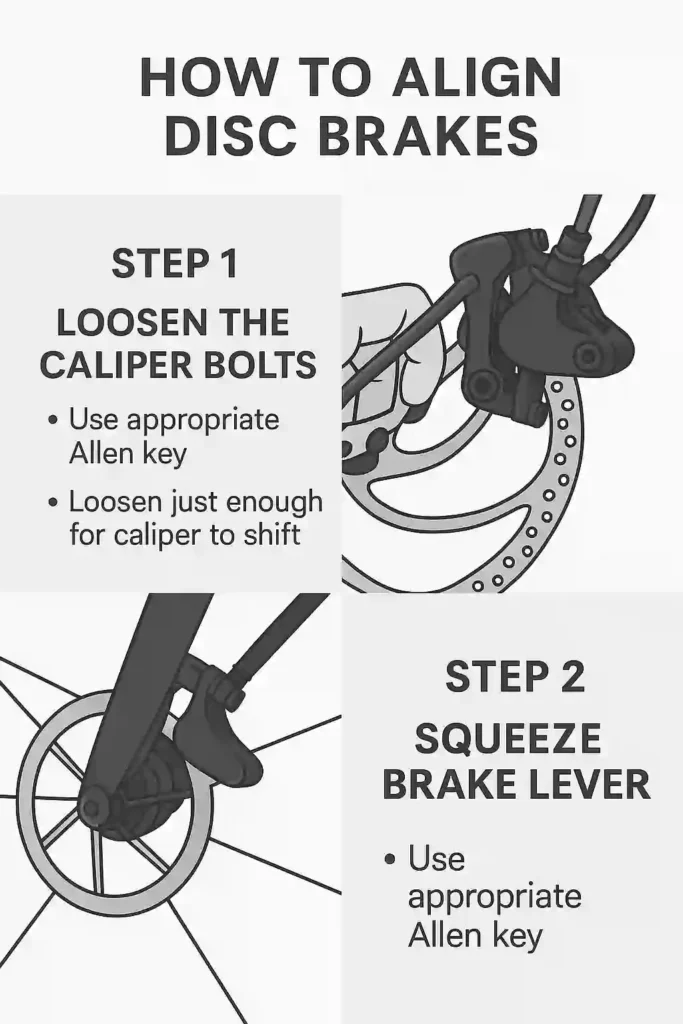
First you need to loosen the bolts securing the brake caliper to the frame or fork.
As these are usually located on the side of the caliper body where it attaches to the mounting bracket.
- You will need to use the correct Allen key to loosen both bolts a little which is usually 5mm or 6mm.
- Just loosen them as you go because you don’t need to remove them completely: just loosen them enough so that the caliper can move a little from side to side.
- You just need to make sure the wheel is seated snugly in the dropout or thru-axle before proceeding, as misalignment at this stage can really screw everything up.
Loosening these bolts actually allows the caliper to be centered over the rotor in the next step.
2. Squeeze the Brake Lever
You will need to press the brake lever firmly and hold it down while keeping the caliper loose, as this will cause the brake pistons to push the pads against the rotor, and naturally center the caliper.
- If you’re working alone you can use rubber bands, zip ties, or have a friend help you hold the brake lever firmly.
- And while holding the brake lever down you’ll need to tighten the caliper bolts evenly, alternating between up and down, so that the caliper locks into its new centered position.
- This technique works well with both mechanical and hydraulic disc brakes, and it often solves most alignment problems in one go.
Just make sure not to move the bike or wheel during this step, as this can literally move the caliper alignment.
3. Check Rotor Clearance
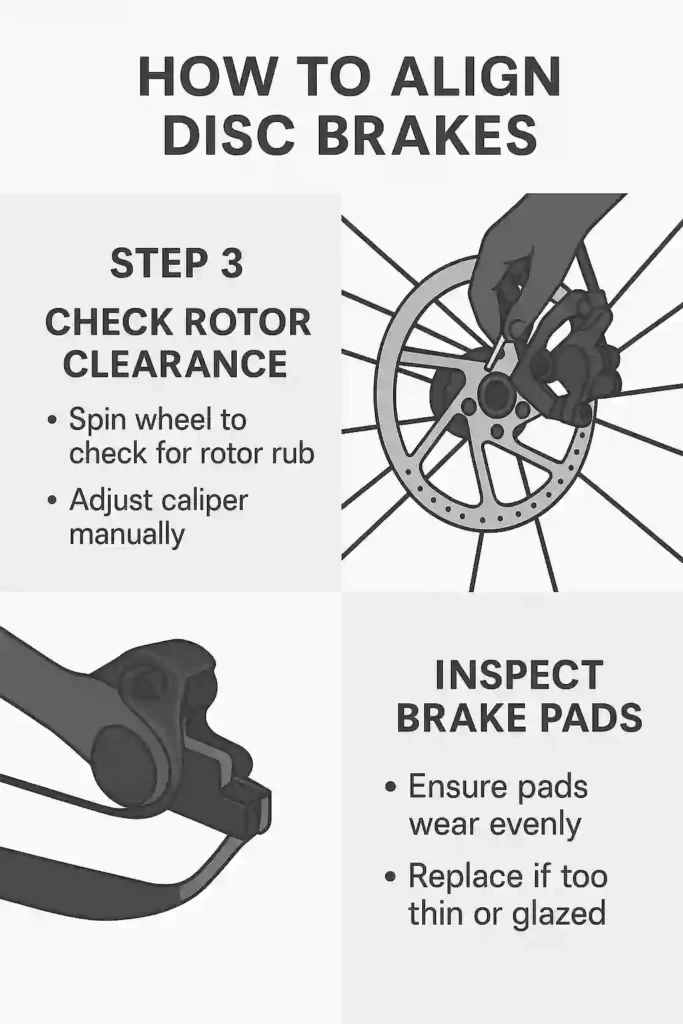
After you tighten the bolts, release the brake lever and spin the wheel, just listen carefully and watch for any signs of the rotor rubbing against one of the brake pads.
- If you notice the wheel turning freely without any noise, your caliper is probably centered.
- If you hear a really soft scraping sound or see the rotor making contact with a pad, the caliper may still be slightly off center.
Now, what you need to do if the rubbing persists:
- You may need to loosen the bolts again slightly and move the caliper left or right by hand.
- You will then need to re-tighten and spin the wheel.
- Then repeat as necessary until the rotor spins cleanly with equal space between the two pads.
NOTE: If you hear some slight noise this can be normal, especially with new pads or rotors, but constant rubbing means the alignment is not working properly.
4. Inspect Brake Pads
This is the final step, as you will need to take some time to inspect the condition and condition of the brake pads.
- Just look through the caliper slot or above it, as you need to make sure the rotor is seated evenly between the two pads.
- Now, you need to see that the pads should be worn evenly from top to bottom and left to right.
- If you notice that the pads have a shiny surface, which can cause noise or reduced stopping power, a light sanding with fine grit sandpaper can really help.
- If your bicycle pads are less than 1mm thick, it’s time to replace them, as thin pads not only lead to poor braking, but they can also damage the rotor or even cause brake failure.
Yes, properly aligned disc brakes are very quiet, powerful and smooth, and once you have completed all these steps you need to take a test ride of your bicycle and then apply the brakes at different speeds.
Now, they should feel strong and responsive, and there should be no rubbing or vibration.
Conclusion
Having properly aligned brakes is vital for a safe, smooth and responsive ride, no matter if you’re commuting, traveling or hitting the trails.
Now, you have to understand exactly what type of brake system your bicycle uses and then you have to follow the step-by-step methods for rim or disc brakes, so that you can virtually eliminate annoying noise and it will greatly improve stopping power with extended life of your pads and components.
You can still align brakes even if you’re not a mechanic, as these adjustments are entirely doable at home with a few basic tools and a little patience.
So you need to remember to always double-check after a test ride and also check the brake pads regularly.
Proper positioning of the brake pads on the rim significantly improves friction and braking performance while preventing uneven wear.[³]
So, that’s all about this guide on How To Align Bicycle Brakes, and if you want to know more about it or have questions, just write your queries in the comments.
Frequently Asked Questions (FAQs)
1. How often should I align my bike brakes?
Answer: If you drive regularly, or after an accident, wheel change, or long trip, you should have your brake alignment checked every few weeks or every month. If you ever hear rubbing, squeaking noises, or feel uneven braking, check immediately and realign after a complete misalignment.
2. What tools do I need to align bicycle brakes?
Answer: For most rim and disc brake alignments you will simply need: a 5mm or 6mm Allen key, a Phillips screwdriver for some rim brake centering screws, and a business card or piece of paper for toe-in on the rim brakes. If you have problems with disc brakes you can use a bike stand which can make this process much easier, but it is not necessary, it is up to you to use it or not.
Reference:
[1] Cycle Legal, Bike Maintenance Tips to Prevent Cycling Accidents, cycle-legal.co.uk
[2] Construction of a Test Bench for Bicycle Rim and Disc Brakes, ResearchGate
https://www.researchgate.net/publication/232278982
[3] Topology Analysis of Bicycle Rim Brake Pad to Improve Braking Performance, ResearchGate
https://www.researchgate.net/publication/328357628
Jonathan, the passionate owner of Bicycle Time, brings a lifelong love for bikes and automotive craftsmanship, that reflects into every corner of the shop. With deep passion in both cycling and automotive accessories, Jonathan is more than just an expert.
