 Skip to content
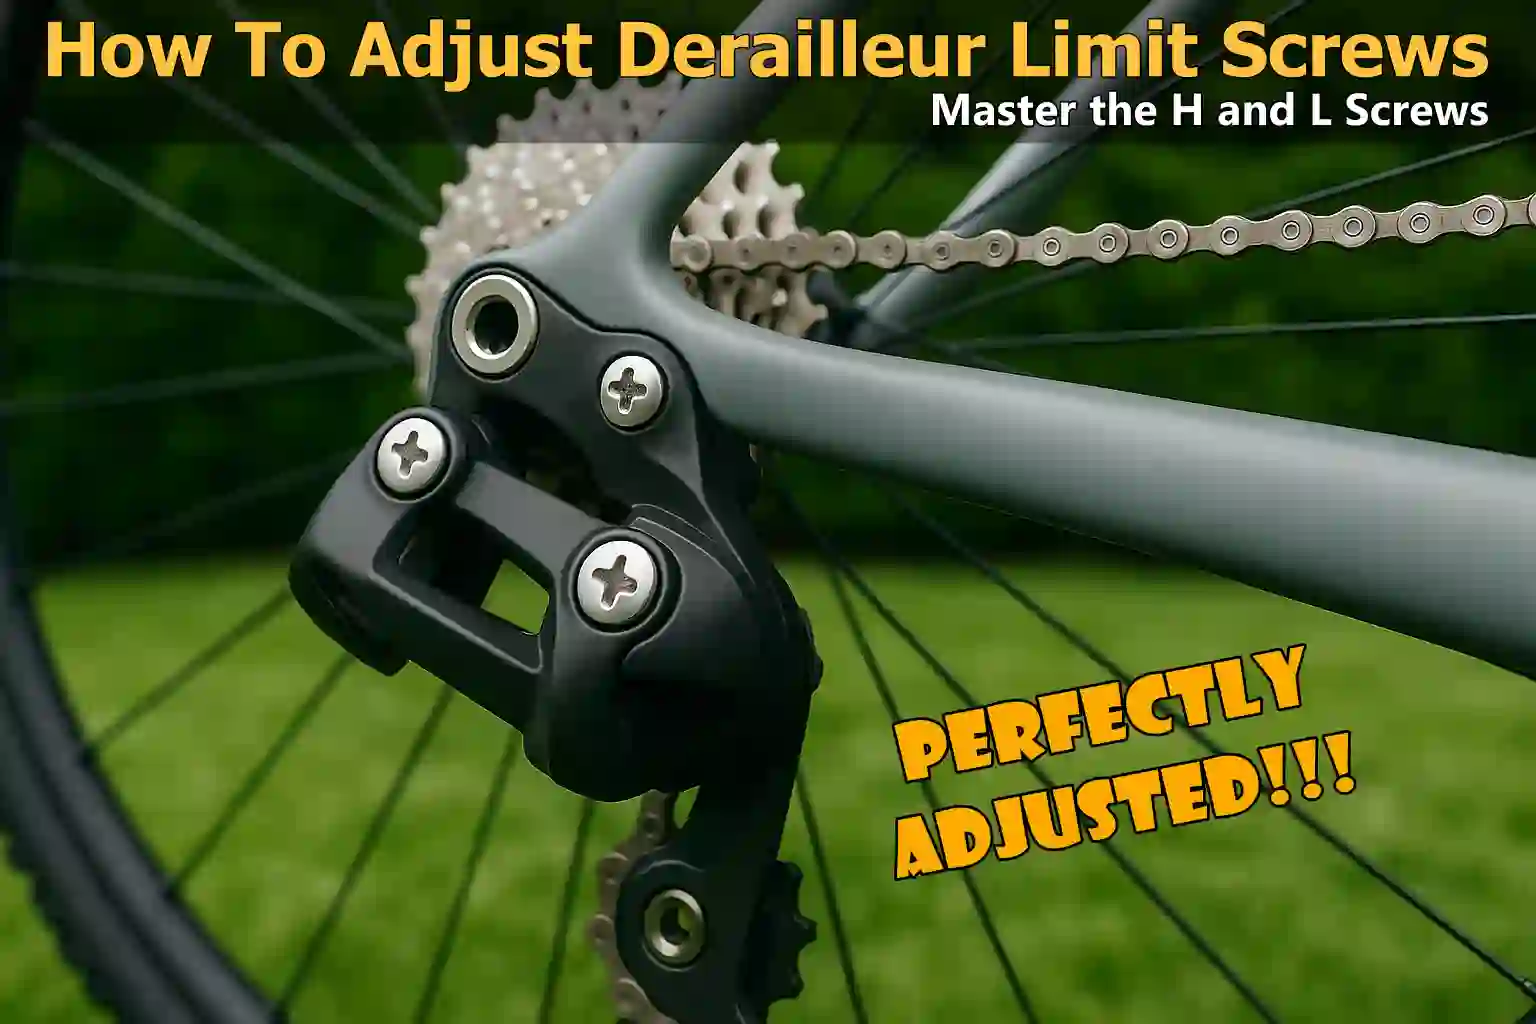
Written By: Jonathan
Fact Checked By: Caroline Dezendorf
Reviewed By: Matt Tanner
When you discover that the gears on your bicycle are not really working properly or the chain is slipping past the last cog or not reaching the smallest gear, this is a strong indication that the derailleur limit screw must be adjusted.
These are really small screws that may seem unimportant but they actually play a really important role as it keeps the mechanism that makes up your drivetrain safe and working smoothly.
Because the derailleur limit screw actually acts as a physical limit to how far inward toward the spoke or how far outward toward the dropout the derailleur can actually move.
And without proper adjustment your chain can actually fall off the cassette, jam between gears, or even seriously damage a spoke or derailleur.
Plus, According to mechanical principles in bicycle design, the H-screw which is the high limit screw ideally controls the outward travel towards the smallest cog, and in addition the L-screw which is the low limit screw actually controls the inward travel toward the largest cog.
When both these L-screw and H-screw limit screws are adjusted correctly it actually protects both your drivetrain and your riding experience by making sure your chain stays exactly where it should: because there will be no skipping, no grinding and no sudden failures mid ride would happen.
In this guide we have mentioned very simple method on How To Adjust Derailleur Limit Screws, as you can do it with just the help of a screwdriver and of course a bit of patience is needed, and then anyone can learn how to tune them easily.
All About Derailleur Limit Screws
1. What Are Derailleur Limit Screws?
Derailleur limit screws are actually two small but very important screws that you can find on both the rear and front derailleurs of a bicycle. Their main function is to control how far the derailleur can move when changing gears.
Also, these screws actually create a physical “stopping point” that actually prevents the derailleur from moving too far in any direction.
Also, without properly adjusting these screws: Your chain can fall off the cassette or get caught between the cassette and the spokes and this can literally damage your drivetrain or even cause an accident.
Also, in short the limit screw helps protect your gear system by keeping the derailleur movement within a safe and correct range.
2. What Is The High Limit Screw: H-Screw
Actually the high limit screw is usually marked with an “H” which literally controls the movement of the derailleur towards the smallest cog on your rear cassette also known as high gear.
So, when you turn the H screw clockwise: It actually tightens the limit and prevents the derailleur from moving too far in the outward direction.
Not only that, turning it anti-clockwise actually allows the derailleur to move toward the outside of the cassette and if the H screw isn’t set correctly, the chain may overshoot and fall off the smallest cog or not shift onto it at all.
And this screw actually ensures that your derailleur stops exactly where it should for high-speed gear engagement.
3. What Is the Low Limit Screw: L
The low limit screw, also marked “L”, also limits the movement of the derailleur towards the largest cog or spoke on the rear cassette.
Plus, it’s your low gear that literally provides the most mechanical advantage for climbing.
Additionally, if the L screw is too loose then the derailleur may push the chain too far and it literally cause it to fall off into the spokes and it potentially damaging them or the derailleur itself as well.
Moreover, If it is too tight then the derailleur might not reach the largest cog as well that makes the climbing very harder.
So, when you turn the L screw clockwise it prevents inward movement and when turned anti-clockwise it allows more inward movement.
4. What About the B-Tension Screw?
So, the B-tension screw is actually the third adjustment screw found only on the rear derailleur, and it’s actually related to derailleur position as it doesn’t control side-to-side movement like the H and L screws.
But instead, the B-tension screw ideally adjusts the vertical distance between the upper jockey wheel which is the guide pulley and the cog on the cassette.
Also, this distance really affects how smoothly the chain shifts, specially on wide-range cassettes, which you can easily find on mountain bicycles.
Yes, this is a really useful adjustment but it’s not really a limit screw and that’s why you have to handle it separately, as beginners should focus on the H and L screws before worrying about anything about B-tension.
Read More:
Tools
| Tool | Purpose | Notes |
|---|---|---|
| Phillips or Flathead Screwdriver | This requires turning the high and low limit screws on the derailleur. | In fact most derailleurs use Phillips heads, so check the type of derailleur you have first and then decide what will be best for you. |
| Bike Repair Stand (Optional) | This is actually an optional thing, but it will actually raise the bike and allow free movement of the wheel and gears during adjustment. | Moreover, it makes the work easier and more stable but it is not mandatory at all. |
| Hex/Allen Wrenches (Usually 5mm) | You can use it to adjust the derailleur mounting bolt or cable tension if necessary. | This is really useful if you need to re-align the derailleur or check the cable tension. |
| Clean Rag | It’s a good idea to wipe off any grime or oil from the derailleur before adjusting it. | Because it keeps your hands and tools clean during the process. |
| Bike Chain Lubricant (Optional) | The derailleur area needs to be re-lubed after adjustment is complete. | This ideally helps in ensuring smooth shifting and also prevents rust. |
| Gloves (Optional) | By using this you can keep your hands more safe from grease and sharp edges. | Yes, it is not actually necessary, but recommended for the hygiene and protection of your hands. |
How to Adjust High Limit Screw: H-Screw
There’s also actually a high limit screw, which you might see labeled “H,” which is responsible for controlling how far the rear derailleur can move outward toward the smallest cog on your cassette.
Yes, it’s very important to adjust it, because if the derailleur goes too far, the chain can slip off the cassette completely, potentially getting stuck between the frame and even the smallest gear.
1. Purpose of the High Limit Screws
So, the high limit screw sets the outer limit of the derailleur travel, and it acts like a safety stopper that actually tells the derailleur how far outward you’re allowed to go.
It also virtually prevents the chain from falling off the cassette from the outside, which could cause drivetrain damage or loss of control when pedaling really fast.
This is why you need to properly adjust the H screw, which ensures smooth, precise shifting even in the smallest cogs and helps maintain drivetrain performance, specially when you want to drive at high speeds or even while going downhill.
2. Locate the H-Screw
Most rear derailleurs have two small screws mounted next to each other, often marked “H” for high and “L” for low.
And these markings are usually marked next to the screws on the derailleur body.
Also, the H screw is usually the one that is closer to the outside of the derailleur.
And if your derailleur isn’t labeled, you can simply identify the H screw by seeing which screw is affecting the derailleur’s speed when the chain is on the smallest rear cog, which is actually the outermost gear.
3. Understanding the Screw Directions
Now, you also need to adjust the high limit screw to adjust how far the derailleur can move in the outward direction:
- When you turn the H screw in a clockwise direction it means it will tighten the limit, which restricts movement towards the smaller cog.
- And when you turn the H screw anti-clockwise that means it loosens that limit which actually allows it to have more outward movement towards the smaller cog.
So, basically the goal is to find the exact setting where the derailleur can shift to the smallest cog, without going beyond that.
4. Adjusting the H-Screw: Step-By-Step
These are very simple steps that are actually very convenient for adjusting your high limit screw.
1. Shift to the Smallest Cog
First, you need to use your shifter to put the chain on the smallest rear cog which is the outermost gear and the smallest front chainring.
And this position really helps you reduce cable tension and it actually isolates the natural resting position of the derailleur as well.
2. Check the Jockey Wheel Alignment
Now, look at the top part of the jockey wheel which is the upper pulley on your derailleur cage, and it should line up right below the smallest cog.
And if the jockey wheel is positioned too much inwards or outwards then it clearly means that the H screw really needs a lot of adjustment.
3. Make Adjustments
So, if the jockey wheel sits too far in, meaning it doesn’t reach the smallest cog, you actually need to loosen the H screw by turning it in a anti-clockwise direction.
And if the jockey wheel is too far out, risking the chain falling out of the cassette, the H screw is actually tightened by turning it in a clockwise direction.
NOTE: You should usually make small turns such as 1/8 to 1/4 turn at a time and then recheck the alignment after each adjustment.
4. Test the Shift
After making your adjustments you will now need to turn the paddles and then shift between the second smallest cog and the smallest cog a few times.
Also, by now the chain should shift smoothly to the smallest cog without any hesitation or overshooting.
How to Adjust the Low Limit Screw: L Screw
The low limit screw, often labeled “L”, actually controls how far the rear derailleur can move inward toward the largest cog on the cassette, the one closest to the spoke.
Also, this adjustment is very important because if the derailleur is moved too far inward, the chain can slip past the cassette and get stuck between the largest cog and the rear spoke.
1. Purpose of the Low Limit Screw
The low limit screw actually sets the maximum inward travel of your rear derailleur, as its primary function is to prevent the derailleur from shifting the chain beyond the largest cog, this can easily cause the chain to get stuck in the spoke and cause serious damage or even an accident.
Now, this is specially important for climbing gear where torque and chain tension are at their highest.
Proper L screw adjustment actually ensures that you can safely use your lowest gear without any kind of risk of overshooting.
2. Locating the L Screw
As most derailleurs actually have two limit screws, typically marked with an “H” and an “L”, the L screw is usually the one that is closer to the inside of the derailleur body than the one closer to the frame.
If your derailleur doesn’t actually have any markings on it, you can identify the L screw by turning it slightly, with the chain on the largest cog: you will actually see a change in the derailleur’s inward range.
Also, don’t confuse it with the B-tension screw which adjusts vertical spacing and not side-to-side movement.
3. Understanding the Screw Directions
This is just like the H screw, when you turn the L screw in different directions it changes the range of the derailleur movement:
- When you turn it in a clockwise direction it tightens the boundary and actually restricts inward movement.
- And if you turn it anti-clockwise it actually loosens the limit and allows more inward travel.
Essentially the goal is to find the ideal position where the derailleur can easily reach the largest cog without the risk of the chain falling off the spoke.
4. Adjust the Low Limit Screw
You just need to follow these simple and practical steps to properly tune the low limit screw.
1. Shift to the Largest Rear Cog
Simply use your shifter to put the chain on the largest cog which is actually the easiest gear in the rear.
Also, shift to the smallest chain ring at the front which reduces cross-chain tension.
Because this setup also gives you a clear view of the full inside reach of the derailleur.
2. Check the Derailleur Cage Alignment
Now, look at the upper jockey wheel of the rear derailleur, as it should align perfectly under the largest cog and if it sits too far to the outside the derailleur won’t be able to reach the gears.
And if it is pushed inward too much, it can push the chain into the spoke.
3. Adjust the L Screw
- If you notice that the derailleur is not shifting to the biggest cog, simply turn the L screw anticlockwise as this gives more movement on the inside.
- And if the derailleur cage moves in too much and the chain looks like it’s going to fall off the spokes, you’ll need to turn the L screw clockwise to limit the travel.
IMPORTANT: You only need to make small adjustments like: 1/8 turn and then recheck it after each one, then use the paddles to cycle the drivetrain and test the shifts over and over again.
So, When you set your low limit screw correctly, you protect your rear wheel and ensure that even your lowest gear is usable and safe: this is specially important when you’re going up steep hills or loaded down with gear. Plus, it’s a simple but really powerful step that keeps your bicycle shifting smooth and safe.
Conclusion On How To Adjust Derailleur Limit Screws
When you adjust your derailleur limit screw ideally, it gives you more control and confidence over your bicycle’s performance.
As it plays a major role in keeping your bicycle in a safe, smooth, and reliable condition, these tiny screws act as a physical limiter that ensures your derailleur doesn’t push the chain too far in any direction: that’s why it protects your drivetrain from chain drop, gear skipping, and even any serious damage to your wheels or frame.
In fact, screws can loosen due to vibration and movement, so periodic inspection is necessary, and technicians often use low-strength Lock-Tite or wax to stabilize them.[¹]
You can always ask your questions in the comments section and we will try to answer them as soon as possible. Thanks for Reading!
Frequently Asked Questions
Q1. Do I need to adjust limit screws every time I shift poorly?
Answer: Now you always have to adjust the limit screw, as poor shifting is often caused by cable tension issues such as: worn cables, dirty drivetrain or bent derailleur hangers, and limit screw adjustment is only necessary when the derailleur cannot reach the first or last cog or goes beyond them.
References:
[1] Bicycles Stack Exchange. Limit screws can loosen over time; use thread-lock
https://bicycles.stackexchange.com/questions/82617/is-it-common-for-derailleur-limit-screws-to-drift-over-time
Jonathan, the passionate owner of Bicycle Time, brings a lifelong love for bikes and automotive craftsmanship, that reflects into every corner of the shop. With deep passion in both cycling and automotive accessories, Jonathan is more than just an expert.
