 Skip to content
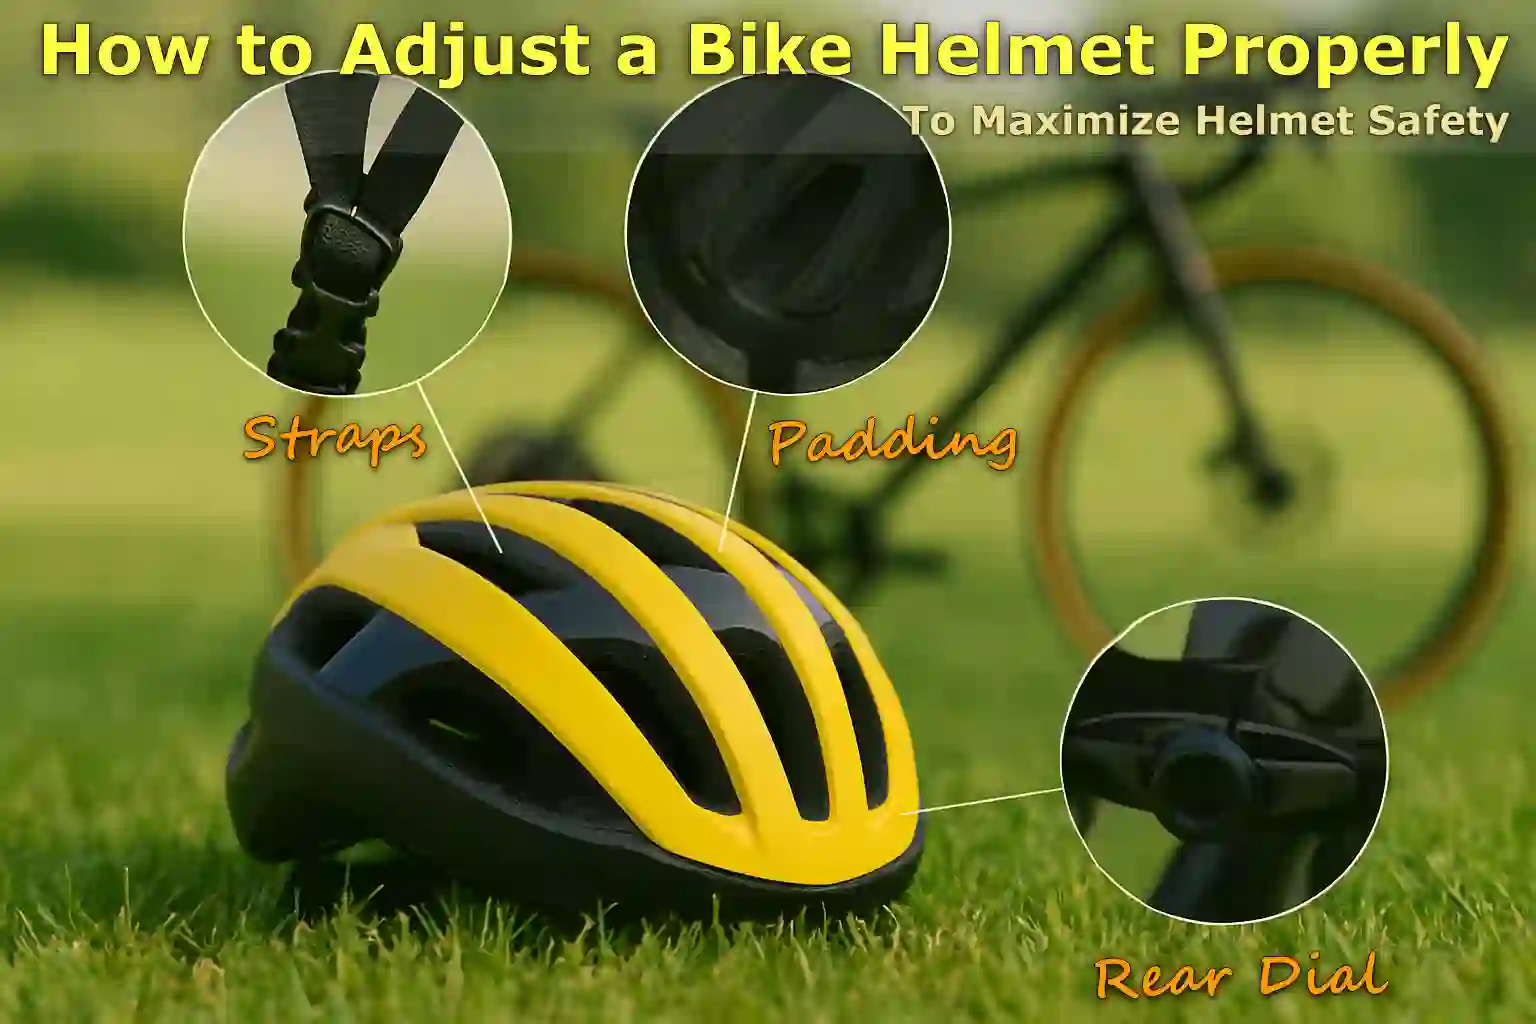
Written By: Jonathan
Fact Checked By: Caroline Dezendorf
Reviewed By: Matt Tanner
Wearing a bicycle helmet proved to be a lifesaver.
Plus, according to the Centers for Disease Control and Prevention, helmets can reduce the risk of serious head injuries during a crash by up to 85%, and that’s a serious thing to consider a helmet as your best friend.[¹]
But there’s a catch, even the best helmet won’t protect you adequately if it doesn’t fit correctly.
So, if your helmet is loose, tilted, or poorly fastened, it could literally slide off during an impact, causing an injury to your head.
In fact, one study that did a field study of 5,862 helmeted cyclists (Alberta, Canada) found that 15.3% of cyclists were actually wearing their helmets incorrectly, whether it was too far back, the straps were loose, or they were using a helmet other than the bike one. And more than 40% of people under the age of 18 wear helmets incorrectly, greatly reducing their effectiveness, and even when worn, they are very harmful.[²]
Even if you just want to ride a bike for your daily commute, you need to learn How to Adjust a Bike Helmet Properly because it can make a big difference in your safety.
Plus, it only takes a few minutes to do and doesn’t require any special tools.
Types of Bike Helmets
This is the very first step, as first you need to choose the right type of bike helmet and then it becomes important to know how to properly adjust each type.
1. Road Bike Helmets
Road helmets are lightweight and aerodynamic, particularly suited for speed and ventilation.
Plus, they come with very little padding and lots of air vents, so you need something that fits exactly, as precise fit is very important in road bike helmets.
So, with less surface area on your head, you will need to install the chin straps with the fit dial at the back and ensure it is snug as well as comfortable.
Hence, these helmets are ideal for long distance commuters, travellers, and racing cyclists as well.
IMPORTANT: If you really want a comfortable fitment then just get the comfort dial fit and make sure it has V-straps which is the key to protecting you from any wind resistance that could cause movement if the helmet is loose.
2. Mountain Bike Helmets
Mountain bike helmets are exactly the type you need when you want more coverage, as they provide coverage on the back and sides of the head and also often come with a visor to block out the sun or protect you from debris during rain and heavy wind conditions.
Apart from this, you also need to make sure that the helmet is seated down and securely, but pay special attention to the back of the head as it should fit snugly on that area, If it has a sun visor then you have to adjust it accordingly so that it does not block your view while riding.
3. Commuter or Urban Helmets
These types of commuter or urban helmets are great for when you commute around the city on a daily basis, as they usually have a more solid and rounded shape, similar to what you might see on skateboard helmets and sometimes there are even built-in lights or reflectors that really enhance visibility.
Other than that, these helmets really focus on comfort and practicality.
Yes, their build quality is solid, which is why you need to check the internal padding and rear dial fit first so that you can avoid pressure spots or wobble later on during intermittent rides.
4. Kids Helmets
Kids helmets are actually made for growing heads, which is why they often have extra padding as well as adjustable sizing systems that allow for growth.
Plus, many kids helmets are also styled with fun colors or characters that encourage kids to use them on a daily basis with some excitement.
Not only that, you have to make sure to use the two-finger rule: that is, the helmet should be two fingers above the eyebrows and only two fingers should fit between the chin and the strap as well.
Because another study of children in emergency departments found that helmets that were too big for a child’s head nearly doubled the risk of head injury compared to well-fitting helmets, so buy a perfectly fitted helmet for your child and keep checking its fitting every few months, as children grow quickly.[³]
Read More:
What to Do Before Adjusting Your Bike Helmet: Pre-Adjustment Checklist
For this you just need to check a few simple things as this is really important, so don’t go straight to adjusting the straps or tightening the fit system, follow this checklist first as this will be a quick thing as well.
1. Have the Right Helmet Size
Just be clear that a helmet will only protect you properly if it actually fits your head size. Yes, most helmets come in small, medium or large sizes, but that’s not even if they don’t actually fit.
Then choose some brands because they use head circumference measurement in centimeters, so the thing is if the helmet is not fitting well according to your personal size, just get the customized ones.
You can use a soft measuring tape or just a piece of string and a ruler to measure around the widest part of your head, which will usually be about 1 inch above your eyebrows.
Important: A properly sized helmet should feel really snug around your head without being too tight, so it shouldn’t move when you move your head from side to side, but it shouldn’t be too tight either.
The basic shapes of traditional helmets are as follows:
- Small: 51 to 55 cm
- Medium: 55 to 59 cm
- Large 59 to 63 cm
Always check the manufacturer’s size chart first for best accuracy.
2. Inspect the Helmet for Any Damage
If you find that your helmet is in perfect condition and doesn’t show any visible damage to the eye, it’s still wise to inspect it carefully before each use: simply check the outer shell for cracks, dents or signs of impact.
Then it is also important to inspect the inner foam which is usually EPS foam, for any crushed areas, loose padding or separation from the shell, because if you find anything like that it could be the cause of a loose fitment.
As we all know, helmets are actually only designed to absorb a one-time impact, so if you have had an accident or the helmet has dropped hard it is better to replace it even if it looks perfectly fine.
As most of the time it is about safety standards, they recommend that it is a good idea to replace a helmet every 5 years, even if you haven’t had an accident, since foam breakdown and UV exposure are things that can affect it over a long period of time.
3. Helmet Is Level on Your Head
It is essential that you make sure that the helmet and its position on your head is ideal before you tighten anything.
As a properly placed helmet should be level and flat, not tilted back like a baseball cap or too low like a forehead shield, check for things like that.
You should even check that the front rim of the helmet should be about the width of two flingers, which is about 1 inch above your eyebrows. Yes, it actually ensures that it completely protects your forehead, which is the most injured part of the head in case of any bike accident.
How to Adjust a Bike Helmet Properly: Step-by-Step Guide
It is very important for the helmet to fit correctly, so these are the things you need to do for your cycling safety, even if you think it is a high quality helmet and you don’t need to think about anything else, Then you’re wrong, because even if it’s a high-quality helmet, it still won’t effectively protect your head if it’s too loose, bent, or not properly secured.
1. Position the Helmet Properly
The very first step is to place the helmet in the correct position on your head, as a helmet placed too far back will not really protect your forehead and will leave your forehead open to any potential injuries and if it is too low it can block your vision while riding, any number of unfortunate things can happen with this little problem.
Be sure to check these points carefully:
- The helmet should sit level on your head, not tilted back or forward.
- Apart from this, the front edge of the helmet should also be about 1 inch above or you can also keep two fingers above your eyebrows and this is also a very important factor.
- Apart from this, it should also cover the upper part of your forehead properly, as this becomes the most vulnerable area when you fall.
- You should also feel that the helmet is centered and stable even before you tighten the straps.
IMPORTANT: Just look in the mirror and then tilt your head upwards, if you can barely see the front edge of the helmet then you can say the position is correct.
2. Adjust the Fit System
Therefore, most modern helmets actually have a rear adjustment dial also known as a retention system that actually helps the helmet get a comfortable and perfect fitment around your head.
- Simply turn the dial clockwise to tighten it or you can turn it anticlockwise to loosen it easily, do this until the helmet feels snug but not tight.
- Now slowly shake your head from side to side: this will keep the helmet in place without moving.
- If your helmet doesn’t actually have a dial, it more likely uses a removable foam pad, then use a thicker pad to tighten it or a thinner pad to loosen it.
- Not only that, but you also need to make sure that the padding is evenly distributed all around the inside of the helmet.
IMPORTANT: You should always adjust any strap before tightening it, as this effectively fits the base of your helmet.
3. Adjust the Side Straps (Y-Straps)
Now, it’s time to adjust the side straps that come down from each side of the helmet, and this will form a neat “Y” shape that should be right below your ears.
So, slide the plastic adjusters up or down accordingly so that the Y junction sits just below and slightly in front of your earlobe.
Also, you must ensure that the straps are equal on both sides of your head, as uneven straps can literally cause discomfort and reduce safety while riding.
Additionally, the straps should also lie flat on your head without any kind of twisting.
IMPORTANT: You should always adjust one side at a time and then check in the mirror to get the right symmetry, as some helmets actually require you to thread the strap through the clip: so just take your time to get it right.
4. Buckle the Chin Strap
Now, finally you have to fasten the chin strap, which is a very important item that holds the helmet in place during a crash.
Therefore, the buckle must be properly centered under your chin and then fastened securely.
Additionally, the straps should be tight enough that only 1 or 2 fingers can fit between your chin and the strap.
Additionally, it should not be too loose, bent, or hanging down, as a loose chin strap could cause the helmet to fly off in the event of an accident.
IMPORTANT: Just check by opening your mouth: since the helmet exerts a little pressure on your head and if you see that the chin strap is correctly tightened, you have adjusted it perfectly.
How to Check If your Helmet Is Secure or Not?
Once you have properly adjusted your bicycle helmet it is necessary to perform some important fit tests that can be done very quickly.
1. Shake Test
This is the quickest way to check the overall stability of your helmet:
- Simply place both your hands on the helmet and slowly shake your head from side to side and front to back.
- Also, the helmet should stay firmly in place and move with your head, not slide around.
- If you notice that the helmet is shifting or feels loose, simply tighten the rear dial, chin strap or you can even adjust the inner padding to secure it correctly.
IMPORTANT: If you notice the helmet is shaking easily it means it will not stay in place during a fall even if you are driving at low speed so it is very important that your helmet should not shake easily.
2. Open-Mouth Test
This is the test that actually checks if your chin strap is tight enough to keep the helmet seated properly.
- Like you have to tie your chin strap and then try to open your mouth completely, just like you do while yawning.
- Now, when you do this you will feel that the helmet is applying slight pressure on your head.
- If you don’t feel any downward pressure, the chin strap may be too loose, so you may need to tighten it until this feedback is no longer noticeable, but make sure you don’t feel uncomfortable.
IMPORTANT: When you actually wear the helmet make sure that you are able to talk comfortably, as you have to make sure that it is not so loose that you can easily insert your fingers between the strap and the chin, otherwise make sure that you do not feel uncomfortable while talking.
3. Visibility Test
This ensures that the helmet is covering the right part of your head, especially your forehead, which really matters a lot.
- So, you just have to look up with your eyes, but don’t bend your head.
- Now, you should just barely see the front edge of the helmet in your upper field of vision.
- Now, if you can’t see it at all, this basically means that the helmet is probably tilted too far back, leaving your forehead completely exposed.
- Or, if you can see it too much, it could be too low and actually block your vision while riding.
IMPORTANT: You just need to aim for the front rim to be about 1 inch or two finger widths above your eyebrows, that’s it, you don’t need to think too much to ensure you get it right.
Tips for Kids Helmet Adjustments
You must ensure that the fitment of the helmet is correct on the child as this is a very important aspect, as children’s skulls are still developing, which often makes them more prone to accidents due to inexperience and unexpected movements or it seems like they can easily get distracted while riding.
1. Use “Grow-With-You” Adjustable Helmets
Yes, many kids helmets actually come with adjustable sizing systems, which actually include a rear dial and removable or replaceable inner pads, and these are actually ideal because they can accommodate growth as the head grows without requiring a new helmet every few months.
- All you need to do is look for helmets that say “youth” or “child” and that range in size from 48 to 54 cm.
- Plus, you get to use the dial at the back so you can easily adjust its softness as your baby grows.
- Not only that, but you can replace the thicker or thinner pads that are usually included with the helmet, so that it always fits correctly.
IMPORTANT: If you notice that your child’s helmet moves when he really moves his head, that means you have to tighten the dial or simply use thicker padding if that solves the problem, as the fitting should be snug but not too tight.
2. Let Kids Help With the Fitting Process
You really need to involve the child in this fitting process, as you need to teach them about safety while also giving them a sense of ownership over their gear.
- This makes them more likely to wear the helmet consistently and correctly, without making any kind of annoying face.
- As you can encourage them to adjust the rear dial, you can also ask them to feel the buckle of the chin strap to see if it is loose or tight and then ask them to look in the mirror to check the position.
- You should always use fun language like: it’s a “superhero helmet” or “power strap” which makes the process enjoyable and not like some official terms.
- Additionally, you need to praise them for wearing the helmet properly, and explain in simple terms how the helmet actually “protects their brain” from a variety of things while riding.
IMPORTANT: You really have to choose an adjustable helmet for your child because you will have to adjust it over time so that it can always be worn without any resistance.
3. Recheck the Fit Regularly
It is a well-known fact that kids heads grow really fast, and especially between the ages of 2 and 10 years, which is why even if you choose the best fitting helmet it may become too tight in just a few months.
- So, be sure to check the fitting at least every 2 to 3 months, especially when you notice a growth spurt.
- Now, you will also need to do the shake test, open-mouth test, and visibility test, as you did with the adult helmet.
- In addition, you should also check the helmet for wear and tear, such as: worn straps, broken buckles or damaged foam, and if you notice any of these you should replace the helmet.
IMPORTANT: Just listen to your child, if your child complains that the helmet is uncomfortable, this could be a sign that the fitting may need to be rechecked or adjusted slightly.
Conclusion
A properly fitted helmet is essential to riders safety, as wearing a helmet is the simplest and most effective way to protect yourself while riding.
But yes, it should be properly adjusted according to your head for best results.
It doesn’t really matter if you just travel or commute normally, you just need one that suits you the best.
So, take the time to properly condition, adjust, and regularly check your helmet to make sure it works when you need it most.
Remember: Helmet is not just a device but it is actually your first line of defense against any serious head injury, so you must invest your money and time in strengthening your defense line.
If you still have any confusion or query in your mind, please let us know through the comment section.
Frequently Asked Questions
1. Can I adjust a bike helmet for different head shapes?
Answer: Yes, modern helmets nowadays actually come with an internal fit system as they have a rear dial or adjustable pads that can easily fit various head shapes, be it round, oval or somewhere in between. But the point is that you have to experiment with the thickness of the padding or the length of the strap for the best possible results.
2. Can I wear a hat, cap, or ponytail under the helmet?
Answer: You should always avoid any thick caps or caps under the helmet, as they can hinder the proper positioning of the helmet, and yet thin caps that are specifically designed for cycling are fine, but for longer hair, you can use a low-height ponytail that fits below the retention system so that it can keep the helmet from lifting up.
3. Is it safe to use a helmet after a crash if it looks fine?
Answer: No, helmets are actually designed to protect your head in a single impact, and even though you may not see any visible damage, the inner foam can actually be compromised, so it’s always best to replace your helmet after any crash or hard impact.
References:
[1] Centers for Disease Control and Prevention. Safety-Belt and Helmet Use Among High School Students — United States. MMWR. 1990;39(11):184–186.
https://beta.cdc.gov/mmwr/preview/mmwrhtml/00016109.htm
[2] Hagel BE, Lee RS, Karkhaneh M, Voaklander D, Rowe BH. Factors associated with incorrect bicycle helmet use.
https://pubmed.ncbi.nlm.nih.gov/20423904/
[3] Rivara FP, Astley SJ, Clarren SK, Thompson DC, Thompson RS. Fit of bicycle safety helmets and risk of head injuries in children.
https://pubmed.ncbi.nlm.nih.gov/10518266/
Jonathan, the passionate owner of Bicycle Time, brings a lifelong love for bikes and automotive craftsmanship, that reflects into every corner of the shop. With deep passion in both cycling and automotive accessories, Jonathan is more than just an expert.
