 Skip to content
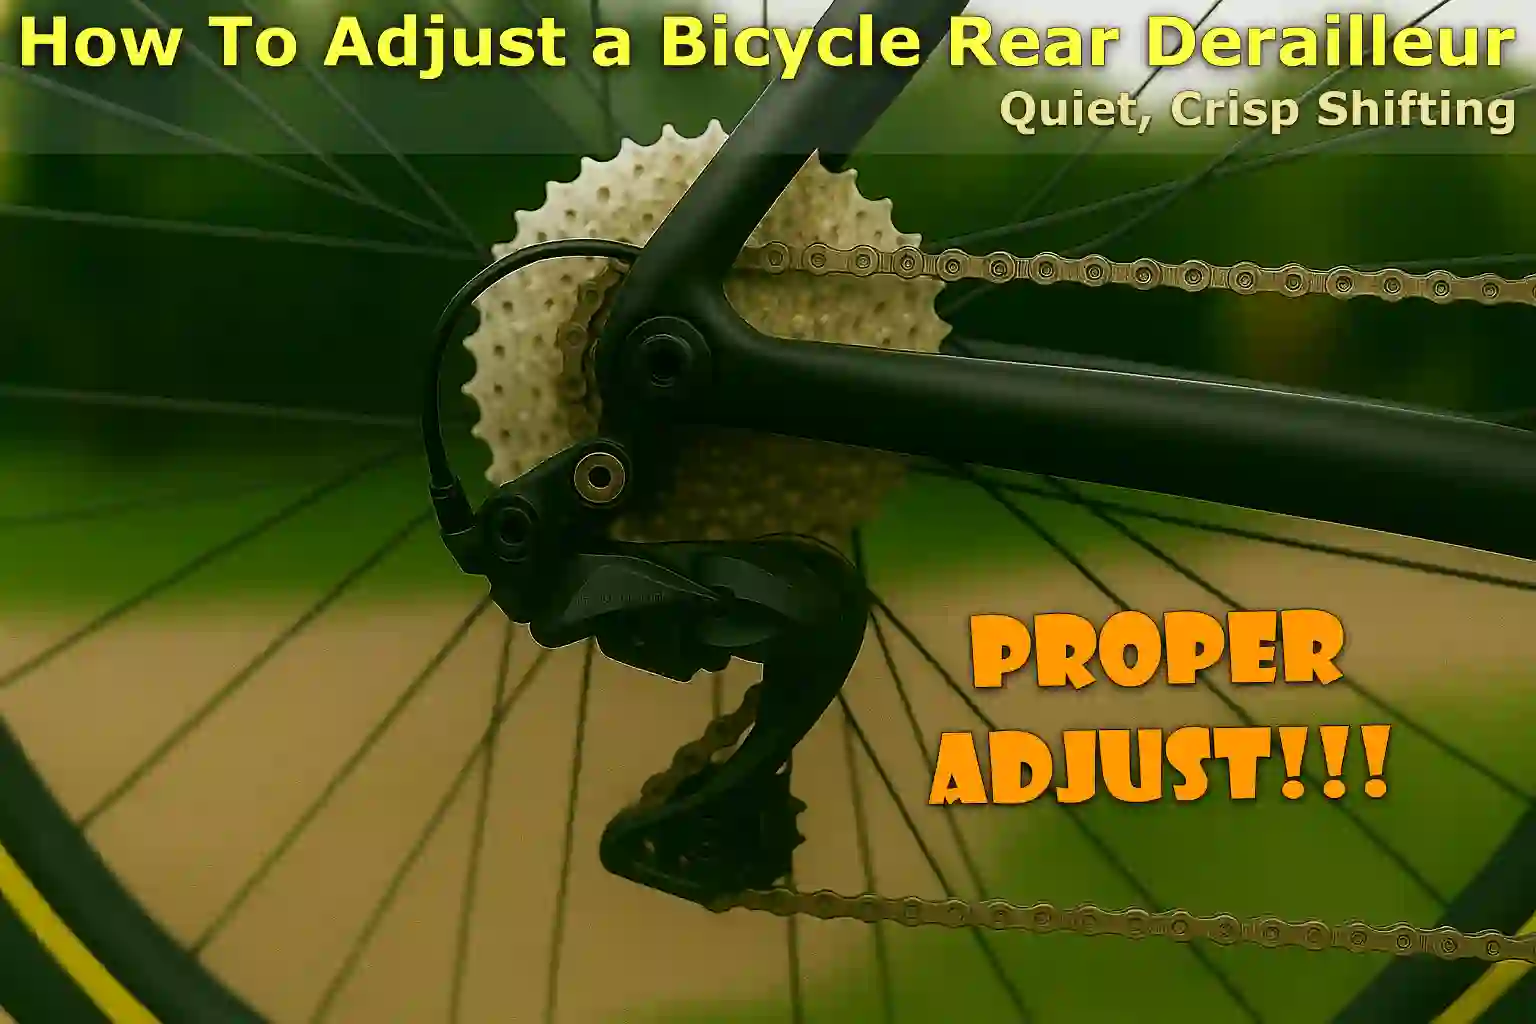
Written By: Jonathan
Fact Checked By: Caroline Dezendorf
Reviewed By: Matt Tanner
Indeed there is no doubt about the importance of the rear derailleur to a bicycle’s drivetrain, it’s actually a small mechanism located near the rear wheel that moves the chain between the gears on your cassette.
So, when it is adjusted correctly, it allows you to move easily and efficiently and thus helps you ride uphill, downhill or on flat roads with ease.
Moreover, if there is even a slight misalignment, the derailleur can really cause a lot of problems like the chain cab can slip, there is noise in shifting, which is one of the top five most common problems that cyclists actually face.
And it is often seen that this is also due to simple cable tension or limit screw errors.
But you can easily adjust the rear derailleur to the best extent, and you don’t even need to be a professional mechanic to do this but you just need to have a little patience and with the right guidance the job will get done.
This guide is all about How To Adjust a Bicycle Rear Derailleur, so you can make gear shifting clear and quiet.
Understanding How the Rear Derailleur Actually Works
It’s actually the rear derailleur’s responsibility to shift gears smoothly, as it consists of a spring-loaded mechanism mounted near the rear wheel that moves your chain from one cog/gear to another on the cassette as you shift gears.
1. Basic Components of Rear Derailleur
So, let’s just understand derailleur adjustment, and also about the main parts:
Derailleur Body
So, this is the main arm that actually attaches to the frame of your bicycle, because it actually holds all of the other parts together and moves back and forth on the cassette.
Jockey Wheels (Pulley Wheels)
These are the small wheels on the derailleur that help guide the chain, and one is called the upper pulley which is also known as the guide pulley, and the other is the lower pulley which is also known as the tension pulley, and both of those pulleys help keep the chain aligned and in tension.
Limit Screws
These are simply little screws marked “H” for high and “L” for low, and they are actually responsible for keeping the derailleur from moving too far in either direction, which is how the chain is prevented from falling off the cassette.
Barrel Adjuster
Now, this is the round no, which is often located where the cable actually enters the derailleur, and it actually allows you to adjust the cable tension without any type of tools, you Just Need To Turn It Clockwise Or Anti-clockwise To Easily Adjust The Cable Tension.
2. How the Derailleur Moves the Chain Across Gears
So, basically the derailleur is connected to your gear shifter by a cable, and when you change gears, you either pull the cable tighter or loosen it.
Shifting to a Larger Cog (Easier Gear)
So when you click to a lower gear, which really means that the shifter increases the tension of the cable so that it pulls the derailleur inwards towards the wheel and thus it moves the chain onto a bigger cog, making it much easier to pedal, which is specially useful on hills.
Shifting to a Smaller Cog (Harder Gear)
And when you shift to a higher gear that literally means the shifter cable reduces tension.
A spring inside the derailleur pulls it in the outward direction, which moves the chain to a smaller cog that gives you faster speeds on flat ground or downhill conditions.
Furthermore, this activity has to be very precise, which is why even a small mistake can really cause a lot of problems.
3. Common Problems Caused By Poor Adjustment
So, if the derailleur is not adjusted correctly, it can cause a number of problems:
Chain Skipping
It’s very common for the chain to jump between gears or slip under pressure, specially when climbing, and this is often due to incorrect cable tension.
Slow or Unresponsive Shifting
If the chain doesn’t move really fast when you change gears, the barrel adjuster may need to be precisely tuned.
Chain Falling Off the Cassette
If you are frequently experiencing your chain falling off the cassette, it is actually because the limit screw is not set properly, as it allows the derailleur to move too far.
Grinding or Clicking Noises
So if these noises are coming then basically the cause of these noises is often the derailleur which tries to push the chain between the gears but is not aligned properly, that is why these grinding or clicking sounds occur in the bicycle.
Tools and Equipment
So, just gather some important tools that you will need to use to adjust your rear derailleur in an easy and safe way.
1. Phillips Screwdriver
Therefore, it is used to adjust the limit screw on the rear derailleur, usually marked with “H” for high gear and “L” for low gear.
Because these screws control how far the derailleur can move, and therefore prevent the chain from falling off either side of the cassette.
And the standard size Phillips head works for most bicycles, too.
2. 5mm Allen Wrench (Hex Key)
Yes, it is very essential as the 5mm Allen wrench is used to loosen or tighten the derailleur mounting bolt, adjust the B-screw or even straighten a misaligned derailleur hanger.
Not only that, it’s actually one of the most commonly used tools in any bicycle toolkit, so it might as well be readily available.
Also, misaligned derailleur hangers can actually cause poor shifting or skipped gears, which is very common in 11-12-speed drivetrains, and even subtle misalignment can degrade performance.[¹]
3. Bicycle Repair Stand (Optional)
This is actually optional, but it makes the process much easier, as it raises the bike off the ground so you can turn the pedals and change gears without having to hold the bike.
Plus, it gives you a clear view of the derailleur, allowing you to work with more precision.
4. Chain Checker (Optional)
Therefore, a chain checker tool is used to measure chain wear, because if your chain is stretched too much, simply adjusting the derailleur may not solve the shifting problem.
Chains typically wear out every 2,000 to 3,000 miles, and a worn chain can also damage the cassette and derailleur over time.
5. Lubricant
You should properly lubricate the derailleur and chain, which is also important for smooth shifting and long-term durability.
Therefore, only use special chain lube for bicycles, not general-purpose oil or WD-40, as it can attract dirt or even cause wear.
And by lubricating the moving parts of the derailleur, friction and noise are also reduced substantially.
6. Rag or Cloth
Also, a clean cloth is very useful for wiping off dirt, old grease or any type of debris that may be stuck to the derailleur.
Also, a dirty derailleur can cause really bad shifting, so cleaning that area before adjusting ensures better results as well.
IMPORTANT: You must keep the drivetrain properly clean and well lubricated so any adjustments will greatly increase your chances of success. So, if your chain or derailleur is really clogged with dirt, even the right adjustment won’t really fix your shifting problems, which is why it’s important to have a clean and properly lubricated drivetrain.
Read More:
How To Adjust a Bicycle Rear Derailleur (Step-By-Step Guide)
So, this guide is actually divided into some clear steps, which is why it becomes easily manageable even for beginners.
1. Shift to the Smallest Cog
First, you need to shift your chain to the smallest rear cog which is also the highest gear and is in the middle of the front chain ring.
So, this is the position that actually gives you a very stable and clear view of how the rear derailleur is actually aligned and where you need to make some adjustments.
Plus, it also removes most of the tension from the cable, which virtually allows you to reset the derailleur’s natural position.
That’s why always start your adjustments from this baseline setup to avoid any confusion.
2. Set the High Limit Screw
So, to set the high limit screw you first need to find the screw that is marked “H”, which means “high gear”, and this screw actually controls the derailleur outward, towards the smallest cog.
You will then need to turn the screw clockwise to limit its movement, or anti-clockwise to allow more movement.
Essentially your goal is to align the upper jockey wheel directly under the smallest cog, and if this isn’t set properly, the chain can even slip past the cog and fall between the cassette and the frame, and this is something that can cause serious damage over time.
3. Set the Low Limit Screw
Now, to set the low limit screw you need to shift the chain to the largest rear cog which is also called the lowest gear and then see how far the derailleur moves inward.
Then just find the “L” screw as this actually controls the inward limit of the derailleur.
And if the derailleur goes too far out, that means the chain can fall off the spoke and that’s actually very dangerous as well and can cause damage to both your wheels and your derailleur.
This is why you must adjust this screw until the upper jockey wheel rests just below the largest cog, which prevents over-travel and also allows for smooth gear engagement.
4. Adjust the Cable Tension
Now, using the barrel adjuster, which is that little knob where the cable enters the derailleur, this is your main tool to perfectly tune shifting performance.
So, if the chain hesitates or struggles to shift onto larger cogs, you’ll need to turn the barrel adjuster anti-clockwise to add tension.
And if the chain resists being moved toward the smaller teeth, you’ll need to turn it in a clockwise direction to release the tension.
As small turns do the trick, and usually no more than a quarter turn at a time, this can really make a big difference.
Simply continue testing by changing gears and see how each adjustment is actually affecting performance.
5. Match the Indexing
So, basically “indexing” really just means aligning the derailleur perfectly with each individual cog, so just shift one gear at a time and listen carefully: is the chain quiet and perfectly centered, or is it clicking or hesitating?
If you notice that the shifting isn’t clean, simply make slight adjustments to the barrel adjuster until each shift feels smooth.
This is very important, as poor indexing often results in skipping gears or making noise in the vehicle, specially under pressure from pedaling.
So, this is the step that is crucial to achieving a clear and satisfying click between gears.
6. Check B-Screw Adjustment (If Needed)
So, the B-screw is often overlooked by many, but it sets the gap between the top jockey wheel and the largest cog.
And if this gap is too small, the jockey wheel can rub the cassette, specially on wide-range cassettes, which is why this is common on mountain bikes.
If you notice the difference is too big, simply shift to the biggest cog which may feel slow or clunky.
Ideally, there should be a gap of about 5 to 6 mm between the jockey wheel and the largest cog.
So, simply turning the B-screw clockwise will increase the gap; and turning it anti-clockwise will actually decrease it.
Now, this is a step that is very important if you have recently changed to a larger cassette or even installed a new derailleur.
IMPORTANT: After making this adjustment you will need to test the gears which is very important, so test how well your bicycle changes gears in real conditions.
Conclusion On How To Adjust a Bicycle Rear Derailleur
By simply adjusting the rear derailleur you may notice a significant improvement in the squeaking sound and the gear shifting process may also become smoother.
This is a complete guide that explains everything about how to adjust a bicycle rear derailleur, from checking the derailleur hanger to perfectly tuning the cable tension with the barrel adjuster, because each part of the process actually plays an important and meaningful role as they help your bicycle move smoothly and run more efficiently.
FAQs on How To Adjust a Bicycle Rear Derailleur
Q1. How do I know if my rear derailleur needs adjustment?
Answer: There are a variety of signs, including slow or delayed shifting, chain skipping, noises or clicking sounds when pedaling, and if you’re having trouble staying in one gear. So, if you have recently installed a new chain or cassette your shifting has become inconsistent, and it is a good time to inspect the derailleur and adjust it to the correct alignment.
References:
[1] Shifting skipping gears: Is the rear derailleur the problem?
https://bicycles.stackexchange.com/questions/91960/shifting-skipping-gears-is-the-rear-derailleur-the-problem
Jonathan, the passionate owner of Bicycle Time, brings a lifelong love for bikes and automotive craftsmanship, that reflects into every corner of the shop. With deep passion in both cycling and automotive accessories, Jonathan is more than just an expert.
