Written By: Jonathan
Fact Checked By: Caroline Dezendorf
Reviewed By: Matt Tanner
Actually in child’s development it is major milestone to learn to ride a bicycle, and that’s where training wheels play a key role in making this process safer and actually boost the confidence significantly.
Because training wheels are actually like a big brother as they keep the wheels stable and prevent scares and don’t let your child fall.
This is definitely useful for beginners, as it keeps the bicycle upright and teaches them balance, steering and pedaling.
Also, children usually start using training wheels between the ages of 4 and 8, and the real benefit of training wheels is that they allow children to practice more without worrying about balance and will actually develop a lot more coordination, agility, motor skills and sense of balance so that they will soon be able to ride a bike without training wheels.[¹]
In fact, these wheels are also useful for building muscle memory as they literally reduce the fear of falling, which can discourage young riders.
Plus, most training wheels are actually adjustable, so they can easily fit bikes with wheel sizes ranging from 12 to 20 inches.
Plus, they are very easy to install as you don’t need any mechanical skills, just some basic tools and knowing the right method.
So in this guide on How To Install Training Wheels On a Bicycle, we have covered everything from choosing the right type of training wheels, to installing them correctly and making sure your child is safe afterwards.
Tools & Materials
To get the job done quickly and to ensure the safety of the training wheels, you actually need some tools that will help you install the training wheels easily.
1. Wrench or Adjustable Spanner
This is a very essential tool as with the help of this you can loosen and tighten the rear axle nut of the bicycle and it usually requires a 15mm wrench but if you are not sure about the exact size then it would be best if you have an adjustable spanner.
2. Training Wheels Kit
Yes, training wheels kits are available which usually include two smaller wheels, L-shaped ones that support brackets, bolts, nuts and washers.
Therefore, these parts are truly designed to be universal, but it is wise to check compatibility with your bicycle’s wheel size first, as most kits are made for 12″, 14″, 16″ or 20″ bikes.
3. Screwdriver (Optional)
Some training wheels brackets come with an additional safety plate or protective guard, so you will need a screwdriver to tighten or loosen it.
But it is not necessary, but it would be a useful tool.
4. Pliers (Optional)
You can use pliers to hold and position bolts or washers in tight spots, as they are especially useful when you need to remove old axle nuts or realign brackets during the installation process.
5. Thread Locker (Optional)
You can put thread locker on the bolts which can actually prevent them from loosening over time, as it is a small step but it can add a layer of long term protection, and it will be a wise decision, especially if your child cycles on rough surfaces or uses the cycle frequently.
Choose the Right Training Wheels
You need to choose the right training wheels that are actually compatible with the bicycle.
1. Sizing Guide
When you’re choosing training wheels, the first thing you need to check is the wheel size of your child’s bicycle.
Plus, most training wheels are actually made for bicycles with a wheel size between 12 inches and 20 inches, meaning it’s suitable for kids between the ages of 3 and 7.
Because 12-inch bicycles are usually only ideal for younger children, and 16 or 20-inch bicycles are common for older children.
So the point is that you should always match the training wheel kit to the bike’s wheel size, and you can see it on the tire sidewall like: “16 x 2.125”.
2. Compatibility with Single-Speed Vs Geared Bikes
Generally, training wheels are designed for single-speed bikes, like the ones most kids use, and don’t have gear shifters or derailleurs.
Additionally, if your child’s bicycle is geared or multi-speed, you will need a specially designed training wheel kit, as they must be installed away from the gear mechanism, such as they should be attached directly to the frame or chainstay rather than to the axle.
Also, you have to use compatible wheels because otherwise it can literally block the gears or the chain making the bicycle completely unsafe or very difficult to ride.
3. Adjustable Vs Fixed Training Wheels
There are two types of training wheels available: adjustable and fixed.
So, adjustable training wheels actually allow you to raise or lower the wheels, so you can control how much balance and support they will provide, and this is the ideal thing that gradually builds the child’s confidence: So start with full contact on the ground initially, then gradually you should raise the training wheels as you notice improvement in their balance.
Fixed training wheels actually stay at one height and provide full time support, yes this type of training wheels are more stable but it becomes useless in developing balance factor, and this may result in your child taking longer to ride a two-wheeler, so avoid doing this.
4. Consider Weight Capacity & Stability
It is a fact that not all training wheels are designed equally, as you have to check the weight limit of the wheels, yes most of the standard type of wheels actually support up to 50 to 60 pounds which is 22 to 27 kg, but if you choose the heavier model, it can actually handle kids weighing up to 80 pounds, which is 36 kilograms or more.
In addition, you should make sure to choose wheels with wide rubber tires, sturdy metal brackets, and anti-slip washers because training wheels with these features actually provide better stability and grip.
Having a reinforced bracket is very important if your kids ride on rough surfaces.
Read More:
Prepare the Bicycle
You must prepare the bicycle properly before installing the training wheels as this ensures that the process runs smoothly and safely, reducing the chances of mistakes.
1. Flip the Bicycle or Use Bike Stand
When you want to install training wheels you can turn the bike upside down or rest it on the handlebars and seat and this is the safest and easiest way to do it.
Or you can use a bicycle repair stand if you have one, the point is to keep the bicycle completely still so that it gives you easy access to the rear wheel and axle nut.
Flipping the bicycle over is a method commonly used by both parents and bicycle shop owners as it really helps a lot in protecting the bicycle from tipping over while working.
2. Remove Any Obstructing Accessories
You will need to remove all parts that may get in the way, especially around the rear wheel there may be a lot of things available, because there may be pegs available for the rear axle, there may be reflectors available, or if you already have training wheels there may be remains available or baskets available.
If you have a BMX-style kids bicycle, it may have axle pegs available, as these are very popular on BMX-style bicycles, but you will need to remove these to make room for the training wheel bracket.
Just remember that if there is anything that interferes with the fit of the brackets properly or evenly on both sides, this can lead to an unbalanced ride and can be costly.
3. Check Rear Axle Nuts
Just take a close look at the rear axle nut, which you can say is the large bolt available in the hub of the rear wheel.
Therefore, you will need to loosen the training wheel bracket first to install it in the correct location.
Furthermore, you also need to ensure that these nuts are not rusted, broken, or overtightened for the obvious reason that damaged hardware can actually hinder proper installation.
If you find it is too difficult to turn the nuts, you can use a penetrating oil like WD-40, wait a few minutes after applying the oil and try again.
If you see that they are really worn out, you should replace them on the first priority as you would rather not risk a loose or unsafe setup just because of pieces of the nut.
How To Install Training Wheels On a Bicycle: Step-by-Step Guide
You can install training wheels in less than 30 minutes using some basic tools, so just follow these steps and you will have the training wheels safely installed on your bicycle.
1. Loosen the Back Wheel Nuts
Simply take a 15mm wrench or you can use an adjustable wrench and you will need to loosen the two large nuts that are on the rear wheel, these nuts are known as the rear axle nuts.
Keep in mind that you don’t need to remove them completely, but just loosen them enough so that the training wheel brackets can slide in easily.
Note: If dirt or rust is making the nuts hard to turn, you can spray a little WD-40 or other oil to help loosen them easier.
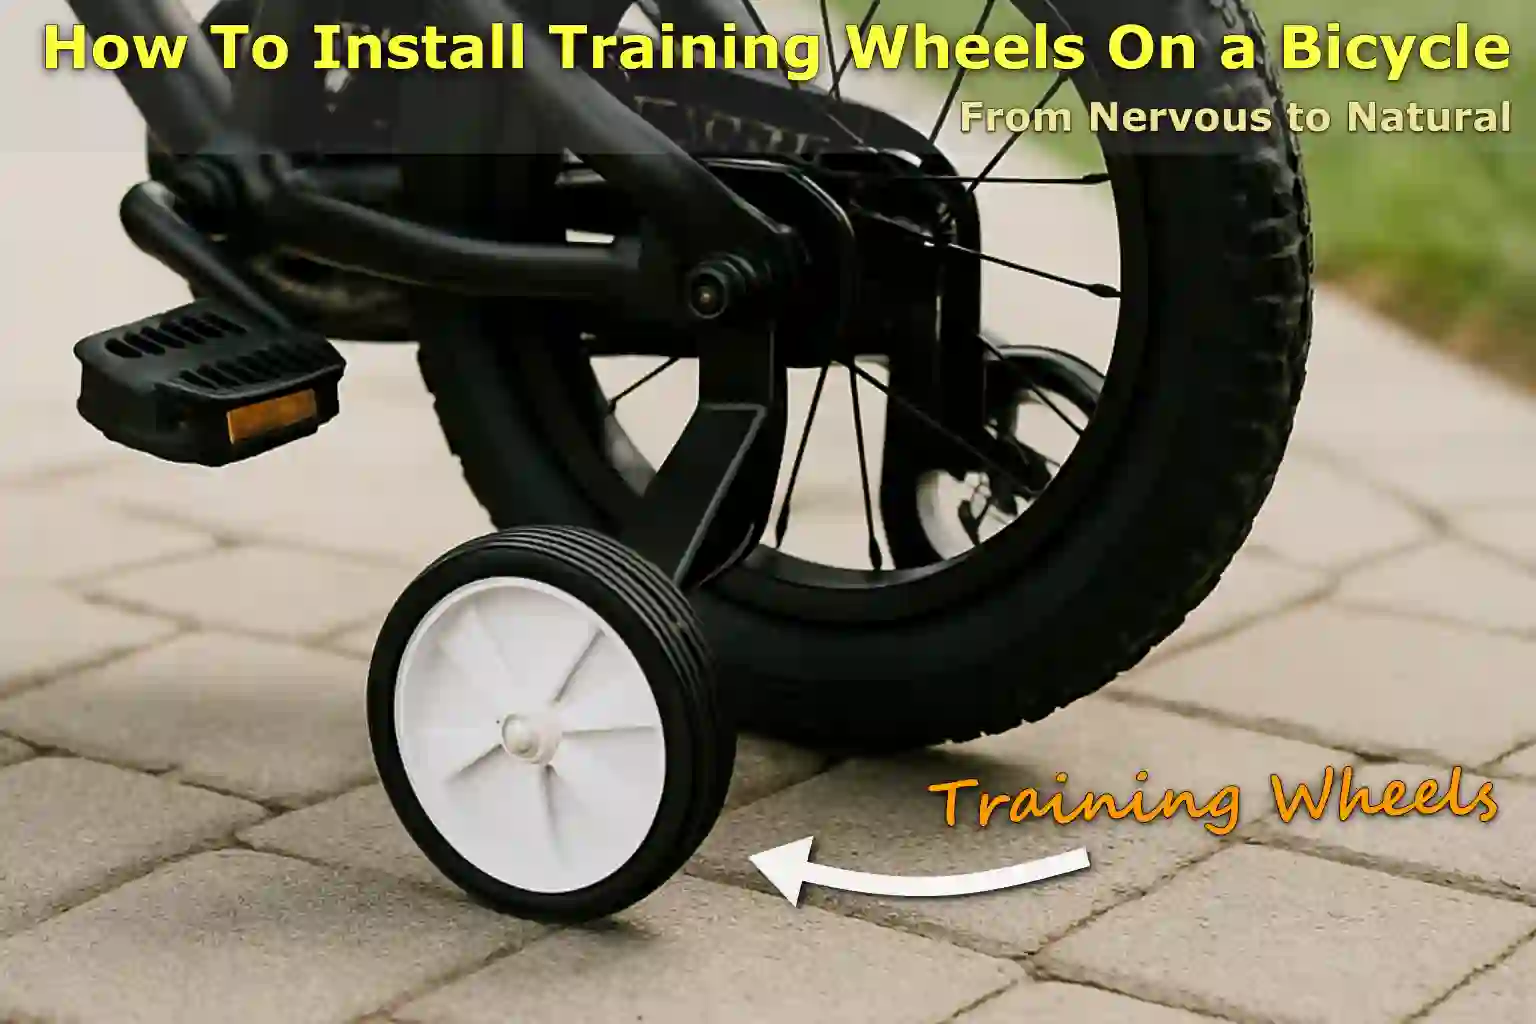
2. Attach the Brackets
Now, you’ll need to take the L-shaped metal pieces known as brackets and they came with your training wheels, so simply slip them onto each side of the rear wheel axle.
But you have to make sure that they are slightly downwards and towards the rear of the bicycle.
It is important to place them in the same position on both sides, because this way the bicycle will stay upright and be more balanced.
If you notice that they are uneven then there are chances that your kid will wobble when he rides the cycle.
3. Add the Training Wheels
Now, you take the training wheels and place them in each bracket, you can easily hold them in place with the help of the nuts, bolts, and washers that come with the kit.
Also, you have to make sure that they are completely tightened but at the same time, do not press them beyond their limit as applying too much force can also damage the parts.
To prevent the wheels from coming loose while the bicycle is in motion, most kits include a special washer known as a locking washer and it actually prevents the wheels from coming loose.
4. Set the Right Wheel Height
Setting the proper height level is very important, as training wheels should not be flat on the ground.
So, the training wheels should be about half an inch to 1 inch or 1.2 to 2.5 cm above the ground when the bike is standing upright, as this small gap really helps your child learn to balance.
If you keep the wheels at ground level, meaning they touch the ground all the time, your child may never learn to balance the bicycle on his own.
When the training wheels are slightly off the ground, this is actually considered the proper setup, as this allows only one touch at a time and is effectively enough to encourage the child to lean forward and learn balance.[²]
5. Tighten Everything and Check Stability
Once you have set the wheel height to the learning level, you need to check all the nuts and bolts and make sure they are tight, nothing should be loose by now.
Now, it’s time to place the bicycle on a flat floor to make sure it’s standing straight.
So, gently press each training wheel down to check that they are sturdy and safe enough to handle your child’s weight, as they should not bend or slip in any way.
Test After Installing the Training Wheels on Bicycle
To make sure everything is safe and working properly you have to test them, this will give you a clear idea if everything is tight, balanced and safe.
1. Check for Loose or Wobbly Parts
You will need to take a close look at the training wheels, and then attempt to move each wheel by hand, as well as gently rocking it from side to side.
If you notice that the wheel or bracket is loose, simply use a wrench to tighten the bolts or nuts, because if loose training wheels are available they will literally shake or drop the bike, not only that they will also wear out really fast.
So, you need to check that the level on both sides should be the same and if you see that one side is actually lower than the other, it will cause the bike to tilt to one side.
2. Let Your Child Sit and Try the Bike
Now, make the child sit on the seat, hold the handle and let him/her go for a test ride.
Just look at how the training wheels actually touch the ground:
If you notice that both wheels are always touching the ground then travelling may seem very difficult.
If you see that none of the wheels are touching each other while turning then it means they are at a very high level.
Therefore, the best setup is to show a little side-to-side rocking motion, this means your baby is learning to balance while getting support from the training wheels and this is where the learning actually takes place.
3. Adjust If Needed
If your vehicle shakes or tilts too much, you may need to adjust the wheels.
So, you have to loosen the bolt that actually holds the wheel on, so move the wheel up or down a little and then re-tighten it.
Finally, double-check all the nuts and bolts as sometimes things get a little loose after the first ride, so this final check will keep your child safe throughout the ride.
Conclusion On How To Install Training Wheels On a Bicycle
Just by installing the training wheels actually is the first major step in a child’s journey toward independence, balance and that enhances the confidence in a very positive way.
As traditional training wheels do not teach balance, many children often need some extra support or it takes longer to literally ride independently.[³]
And this is where training wheels come in with the solution, because the fact is that training wheels should actually act as a temporary guide, but they’re really helpful in guiding you through the fundamentals of cycling: stability, steering, speed and coordination.
And according to child development experts, if a child learns to ride a bicycle between the ages of 3 and 7, it actually leads to significant improvements in motor skills, spatial awareness, and even self-esteem, so, it is clear that cycling is not only a physical achievement for a child, but also a developmental achievement.
These training cycles by giving them the initial motivation really help them to start the journey fearlessly and then after gradual progress it becomes the character building milestones of early life too.
Now, that is all from this guide and now you know everything that you need to make that milestone memorable and safe, so if you still have any kind of query then please let us know with the help of comment below.
Frequently Asked Questions
Q1. Are training wheels better than balance bikes?
Answer: The two actually differ in terms of purpose, as training wheels are actually designed to help kids learn pedaling and steering, while also providing side support, which makes them suitable for kids who need more confidence and stability. Whereas balance bikes actually leave out the pedals and are more about teaching balance first and yes it does help some kids transition to a pedal bike faster.
Q2. Is it okay to reuse training wheels for a second child or different bike?
Answer: Yes, you can reuse training wheels for another child or on another bike, but you need to make sure you inspect them for any cracks, rusty bent brackets, or damaged hardware, training wheels must not be loose or damaged as this can pose a serious safety risk.
References:
[1] Stanford Children’s Health. (n.d.). Buying a bike for your child. Retrieved from https://www.stanfordchildrens.org/en/topic/default?id=buying-a-bike-for-your-child-1-2954
[2] Training wheels. In Wikipedia.
https://en.wikipedia.org/wiki/Training_wheels
[3] TwoWheelingTots. (n.d.). Training Wheels: 10 Frequently Asked Questions. https://www.twowheelingtots.com/training-wheels-faq/
Jonathan, the passionate owner of Bicycle Time, brings a lifelong love for bikes and automotive craftsmanship, that reflects into every corner of the shop. With deep passion in both cycling and automotive accessories, Jonathan is more than just an expert.