 Skip to content
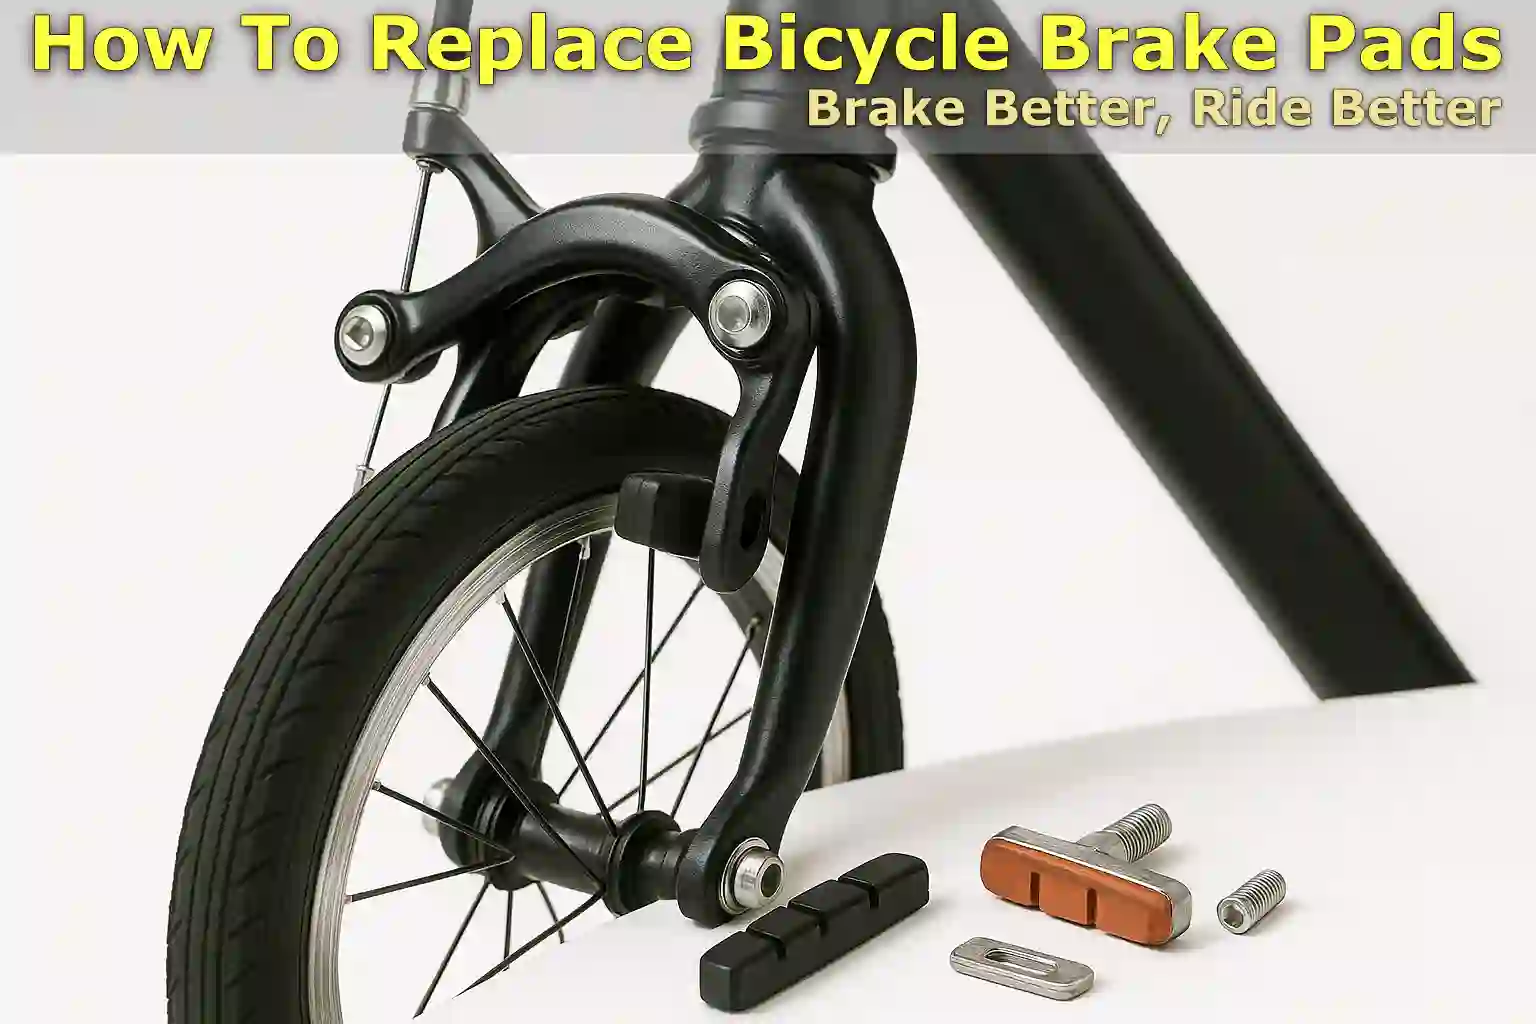
Written By: Jonathan
Fact Checked By: Caroline Dezendorf
Reviewed By: Matt Tanner
Brake pads are what play a vital role in helping you stop safely and timely.
And over time due to their service, brake pads wear out due to friction, yes it is a completely natural phenomenon.
Most brake pads need to be replaced after 400 to 2,000 miles and approximately 640 to 3,200 kilometers, yes this depends on how often you drive and under what conditions.[¹]
For example, it will wear out faster when you drive in muddy, wet, or hilly areas.
Furthermore, worn brake pads actually feel less responsive and may even produce louder squealing noises.
The good news is that replacing brake pads is fairly easy and is a simple maintenance task that many riders can perform at home with a few basic tools.
So, this is actually the guide on how to learn How To Replace Bicycle Brake Pads so that you can have better brakes and also improve the ride quality.
1. Identify Your Brake Type
First things first, before you begin replacing your bicycle brake pads, it’s most important to know what type of brakes you actually have.
As different types of brake systems require different tools, the pads and steps also differ.
Rim Brakes
These are the brake type most commonly found on bicycles, as older, urban bikes and many entry-level road or mountain bikes also use rim brakes.
They press rubber pads directly onto the edges of the wheel rim slowing it down, simple.
Furthermore, there are two popular types of rim brakes: V-brakes and caliper brakes.
V-brakes (linear-pull brakes): While very common on mountain bikes and hybrids, these are also very strong and simple. V-brakes actually have two arms that are attached to the frame near the wheel, and each arm has a brake pad, so when you press the brake lever the pads move inward to compress the rim.
Caliper Brakes: This type of brake is commonly used on road bikes, they actually use a single mounting bolt that is on top of the wheel and both arms pivot around that bolt. Generally you can say that they offer less stopping power and also they are usually lighter than V-brakes, but they are really good for paved roads and if the bicycle is light.
Disc Brakes
Disc brakes are really modern and powerful brakes, and nowadays they are becoming very popular on mountain bikes, gravel bikes and you can see their presence in road bicycles as well.
The difference is that, instead of using the rim of the wheel, disc brakes actually press a metal disc called a rotor that is attached to the hub of the wheel.
The fact is, disc brakes are really good in wet or muddy conditions and actually provide more stable stopping power. There are also two main types of these disc brakes:
Mechanical Disc Brakes: These essentially use a cable which is similar to rim brakes in that when you press the brake lever, it pulls a cable which moves the brake pads inward toward the rotor.
Hydraulic Disc Brakes: These are the brake types that actually use a fluid system like the one used in car brake systems to move the pads. Because hydraulic brakes are stronger and more responsive than mechanical brakes, they also automatically adjust as the pads wear.
Note: Replacing brake pads in disc brakes is a bit challenging so you need to be cautious and have more detailed knowledge about everything.
How to Tell Which Brakes You Have
| Feature | Brake Type | What to Look For |
|---|---|---|
| Pad Location | Rim Brakes | When you see that the pads apply pressure directly to the wheel rim. |
| Disc Brakes | In this case the pads are mounted on a metal disc which is the rotor and is near the center also known as the hub area of the wheel. | |
| Cable vs. Hose | Mechanical Brakes | Just see that it uses a visible cable attached to the brake lever. It can be of the rim or disc type. |
| Hydraulic Brakes | It actually uses sealed hoses and actually no visible cables are available. Usually only found on disc brake bikes. | |
| Brake Caliper Position | Rim Brakes | You can see that it is located near the top of the tire, above the rim. |
| Disc Brakes | This will be located near the wheel hub, attached to the frame or available on the fork near the axle. |
Guideline for Replacement of Brake Pads
Rim Brakes: You should replace the brake pads when the grip has worn out or before when you see that the it is reaching the wear line indicator as well.[²]
Disc Brakes: If you see that the pads are less than 3mm thick, just include the metal holder as well, then they should be replaced as soon as possible.[³]
2. Tools & Parts
You need to gather some essential tools to easily replace your bicycle’s brake pads.
Tools for Rim Brakes
If your bicycle actually uses rim brakes such as: V-brakes or caliper brakes, these are the tools you will need to do the job comfortably:
- 5mm Allen Wrench: This is used to actually loosen and tighten the bolts that hold the brake pads in place.
- Adjustable wrench or open-end wrench: This may be required for some older brake models.
- Screwdriver: You will need this to adjust the angle or position of the pads.
- Needle pliers: This is helpful in grabbing and removing parts, which is completely optional and up to you.
These are basic tools often found in any home tool kit.
Tools for Disc Brakes
For disc brakes (mechanical or hydraulic), the devices differ slightly:
- Hex wrenches: These are used to remove retaining bolts or brake calipers and usually require a 2.5mm, 3mm, 4mm, or 5mm hex wrench.
- Needle-nose pliers/pad spreader tool: This really helps to remove the pad retaining clips and take the pistons apart if necessary.
- Clean cloth/paper towel: This will be needed to keep the rotor and pads clean and free of oil or dirt.
- Isopropyl Alcohol: This is needed for cleaning the rotors and pads, just keep in mind that you should not use regular cleaner, instead use isopropyl alcohol which is up to 90%.
- Gloves: These are great for keeping oils from your skin from contaminating the brake pads or rotors, and use nitrile or latex gloves in addition to regular gloves.
So, these are the listed items and tools that you want to use to remove the disc brake.
Choose the Right Replacement Pads
The fact is that not all brake pads are actually the same, which is why you need to choose the right type according to the type of bicycle you have, and choosing the right type is very important for both safety and performance enhancement.
Choose the Replacement Pads For Rim Brakes:
Just look for pads that are specifically designed for your brake style, which could be anything from V-brakes to calipers.
Always choose quality pads that are suitable for your riding conditions, for example pads suitable for “wet weather” or “all weather” which are really good for rainy areas.
Also, check that some rim brake pads come with a holder, while others are made of rubber only and fit only into a reusable holder.
Choose the Replacement Pads For Disc Brakes
You need to match the brand and model of your brake system such as Shimano, SRAM, Tektro.
Disc pads also come in different compounds:
- Resin pads: which are very quiet and better for dry riding conditions, but they wear out quickly.
- Metal Pad: This is actually very durable and is great for wet or muddy conditions, but it can be noisier than others.
- Semi-metallic pad: This is a type of balanced pad between the two types.
Double-check everything according to your bike’s manual or refer to the brake model printed on the caliper to get the correct fit for your bicycle.
Read More:
4. Remove the Old Brake Pads
After stabilizing the bicycle now the first thing you need to do is to remove the worn out brake pads, yes this step is also different depending on whether you have rim brakes or disc brakes.
Remove the Old Brake Pads for Rim Brakes
You can easily remove the brake pads on rim brakes, as these are the easiest to work on.
1. Loosen the Pad Bolt
Most rim brake pads are actually held in place by a small bolt or you may find screws in its place, usually a 5mm allen bolt or a small nut depending entirely on the brake model.
So you will need to use the correct sized Allen wrench or screwdriver to loosen them, just make sure you don’t have to remove it completely, but just enough so that the pad can come out easily.
2. Slide Out the Old Pads
Once you have loosened the bolts, it’s time to remove the brake pad from its holder or arm.
Some pads are in a cartridge style holder, meaning the rubber pad itself slides out, while others are a solid unit that is both the pad and the holder.
If you find that the pad won’t come out easily, check for any small locking pins or washers that are actually holding it in place.
IMPORTANT: Take a photo or note the angle and position of both pads before removing them.
Remove the Old Brake Pads for Disc Brakes
Disc brakes are indeed more powerful and precise but you need to do some extra work to change the brake pads.
As these pads actually sit inside the brake caliper and they exert pressure against a metal disc called a rotor.
And over the period of usage, the pad material wears out and if you don’t replace it on time, it can literally expose the metal backing plate which can even damage the rotor.
1. Remove the Wheel
If you remove the wheel it will actually give you clear access to the brake caliper, so just carefully release the quick-release skiver or thru-axle and then remove the wheel without bending the rotor.
When you take the wheel out you will clearly see the brake pads inside the caliper.
2. Take Out the Retaining Pin or Clip
Most disc brake pads are held in place with small retaining pins, cotter pins, or clips.
Yes, this also depends on your brake brand, such as Shimano, SRAM or Tektro, so you will either have to unscrew a small bolt with a 2.5mm to 3mm Allen wrench or straighten out the safety pin with pliers.
Just keep this pin in a safe place, as you will need it later to secure the new pad.
3. Slide Out the Worn Pads
Once you have safely removed the pin, you have to slide the old brake pads out of the caliper, and most of the times, it is seen that the pads are attached to a small spring clip that actually helps in separating the pads during braking.
So you have to remove the pads and the spring clips together, also take note of what their arrangement is and just see how they actually seated inside.
This will surely help you when you put the new one in correctly and properly.
5. Install New Brake Pads
After removing the previously installed worn out pads, you need to install the new brake pads properly.
Install New Brake Pads for Rim Brakes
This is usually a straightforward matter, as it is very easy to install new brake pads on rim brakes such as V-brakes or caliper brakes.
Yes, you have to make sure of their proper alignment and proper position, as incorrectly installed pads can create noise, cause weak braking or even damage the rim.
This means that if you install these pads poorly, everything will be the same as before, so it is better to do this process again paying close attention to the alignment and position to avoid all this drama.
1. Align the Pads With the Rim Surface
Yes, now the first thing you need to do is slide the new brake pad into the holder or brake arm, and make sure that the braking surface of the pad lines up with the flat part of the rim for proper braking.
It is very important to ensure that it does not touch the tire, as this can sometimes cause a tire burst and also not to place it too low, as this reduces braking power.
Read More:
2: Adjust Angle and Position
You need to align them at such an angle that the brake pad alignment is slightly inward, which basically means that the front part of the pad should touch the rim before the rear part.
So, yes, it really does help reduce brake squeal as well.
Also, you can adjust toe-in by placing a thin piece of cardboard or a folded business card (something like this) between the back of the pad and the rim while tightening the pad bolts.
Also, this virtually ensures that the pad is aligned parallel to the rim surface so that it sits on a flat surface, not tilted or angled.
Because it has been observed that pads which are crooked or bent do not actually grip the rim properly and this causes one pad to wear out faster while the other wears out slower.
3. Tighten Bolts Securely
Once you have installed the pads correctly, you need to tighten the mounting bolts or nuts firmly and for this purpose, you can use a 5mm Allen key or wrench to tighten them.
It is essential to always check that the pads stay in place when you press the brake lever and if they twist or bend too much then you will need to re-tighten or adjust them as they are still not completely fixed.
Read More:
Install New Brake Pads for Disc Brakes
You need to be very careful when you install disc brake pads because they actually sit inside the brake caliper and therefore must be positioned correctly to work with the rotor.
So, this process is a bit more delicate but yes, still very manageable when you apply the right approach, so just don’t worry about it you can do it with just some knowledge that is provided in these step-by-step guide.
1. Insert the New Pads
First of all, you need to take your new disc brake pads and then place them inside the caliper, but make sure it should be the same size as the old one.
The basic thing is that the braking surface should be on the inside, where the rotor actually goes and yes, this is the obvious thing to follow.
Just check if your pads are using a spring clip or something, if yes then place it between the two pads to help separate them evenly while braking.
The pads slip easily into the slot or channel inside the caliper, but you have to make sure they’re fully seated, so push them in gently but firmly to seat them.
You can use your fingers to do this job which is best, or a soft plastic tool can do the job for you well enough to position them evenly.
2. Reinsert the Retaining Pin or Clip
Once you have seated the pads it is time to secure them in place using the retaining pins or cotter pins that you removed earlier, remember this!
Therefore, for threaded pins, you will need to use a small Allen wrench so that you can tighten them correctly.
And for the cotter pin, you really have to make sure the legs are bent a little bit so the pin doesn’t slide out when the brake is being used.
You have to understand that: This part is really very important to play a safety role, because without the pin, the pads are nothing as they can come out anytime during the riding or this happens a lot when you brake hard.
3. Ensure the Pads Are Properly Seated
You may need to wait a moment and look at the pads to make sure they are seated correctly before you reinstall the wheel.
So, they must sit evenly and parallel inside the caliper, and you have to make sure there is enough space between them so that the rotor can fit without rubbing against each other.
If you see that the pads are really tight or rubbing then that is not a good thing or we should let them be but we need to gently push the pistons back with the help of a pad spreader tool or a clear plastic tire lever.
Just keep in mind that you should never use metal tools, as they can damage the piston very badly.
So, this is how you can easily install new brake pads, and it doesn’t matter whether you have disc or rim brakes, as we have explained the installation method for both types in detail, so that you don’t have to think about anything.
Conclusion
When you replace old brake pads and install new ones it virtually increases the braking capability and gives you total control over your bicycle.
Whether your bike has rim brakes or disc brakes, you just need to know How To Replace Bicycle Brake Pads, and yes there are many layers to it as you must first identify the type of brakes you have, then gather the right type of tools and then you have to remove the old pads that are already installed and then it will be the turn to install the new pads.
Yes, it can drastically improve the braking performance, as a study on rim brake pads found that reducing groove size and width also can improve the braking performance by 3% while increasing contact length can enhance the performance by up to whopping 64%, so you can consider that kind of structural brake pads as well.[⁴]
So, just make sure you install them properly, then you will notice strong, quiet and reliable stopping power, and yes, this is the essential thing for riding a bicycle safely, no matter what the conditions are.
So, that’s all about this guide on How To Replace Bicycle Brake Pads and I am sure that from now on, you must have understood the method and if you still have queries then the comment section is open for you.
FAQs on How To Replace Bicycle Brake Pads
1. How long does it take to replace brake pads?
Answer: Actually it depends, but for most of the riders it usually takes around 20 to 30 minutes to change brake pads, and yes as I said it also depends on the type of brakes and experience. Additionally, rim brake pads can be replaced faster than hydraulic disc brake types.
2. Why do my new brake pads squeal?
Answer: It means the new brake pads are not aligned at all. They have oil or dirt contamination or if the pads and rot/rim just need bedding in, in all these situation even new brake pads squeal and to solve this issue you have to adjust the toe-in on the rim brakes, cleaning the rotors and bedding-in techniques are used to stop this squeaking.
References:
[1] Persistence Market Research. (n.d.). Bicycle Brake Components Market Size & Growth Analysis, 2033. Retrieved from https://www.persistencemarketresearch.com/market-research/bicycle-brake-components-market.asp
[2] My Journey Hampshire. (n.d.). Replacing Brake Blocks: A Guide to Adjusting Brakes. Retrieved from https://myjourneyhampshire.com/media/2122/bicycology-guide-to-brakes.pdf
[3] REI Co-op. (n.d.). Bike Disc Brake Care: Adjust & Repair. Retrieved from https://www.rei.com/learn/expert-advice/brakes.html
[4] Topology Analysis of Bicycle Rim Brake Pad to Improve Braking Performance https://www.researchgate.net/publication/328357628_Topology_Analysis_of_Bicycle_Rim_Brake_Pad_to_Improve_Braking_Performance
Jonathan, the passionate owner of Bicycle Time, brings a lifelong love for bikes and automotive craftsmanship, that reflects into every corner of the shop. With deep passion in both cycling and automotive accessories, Jonathan is more than just an expert.
