 Skip to content
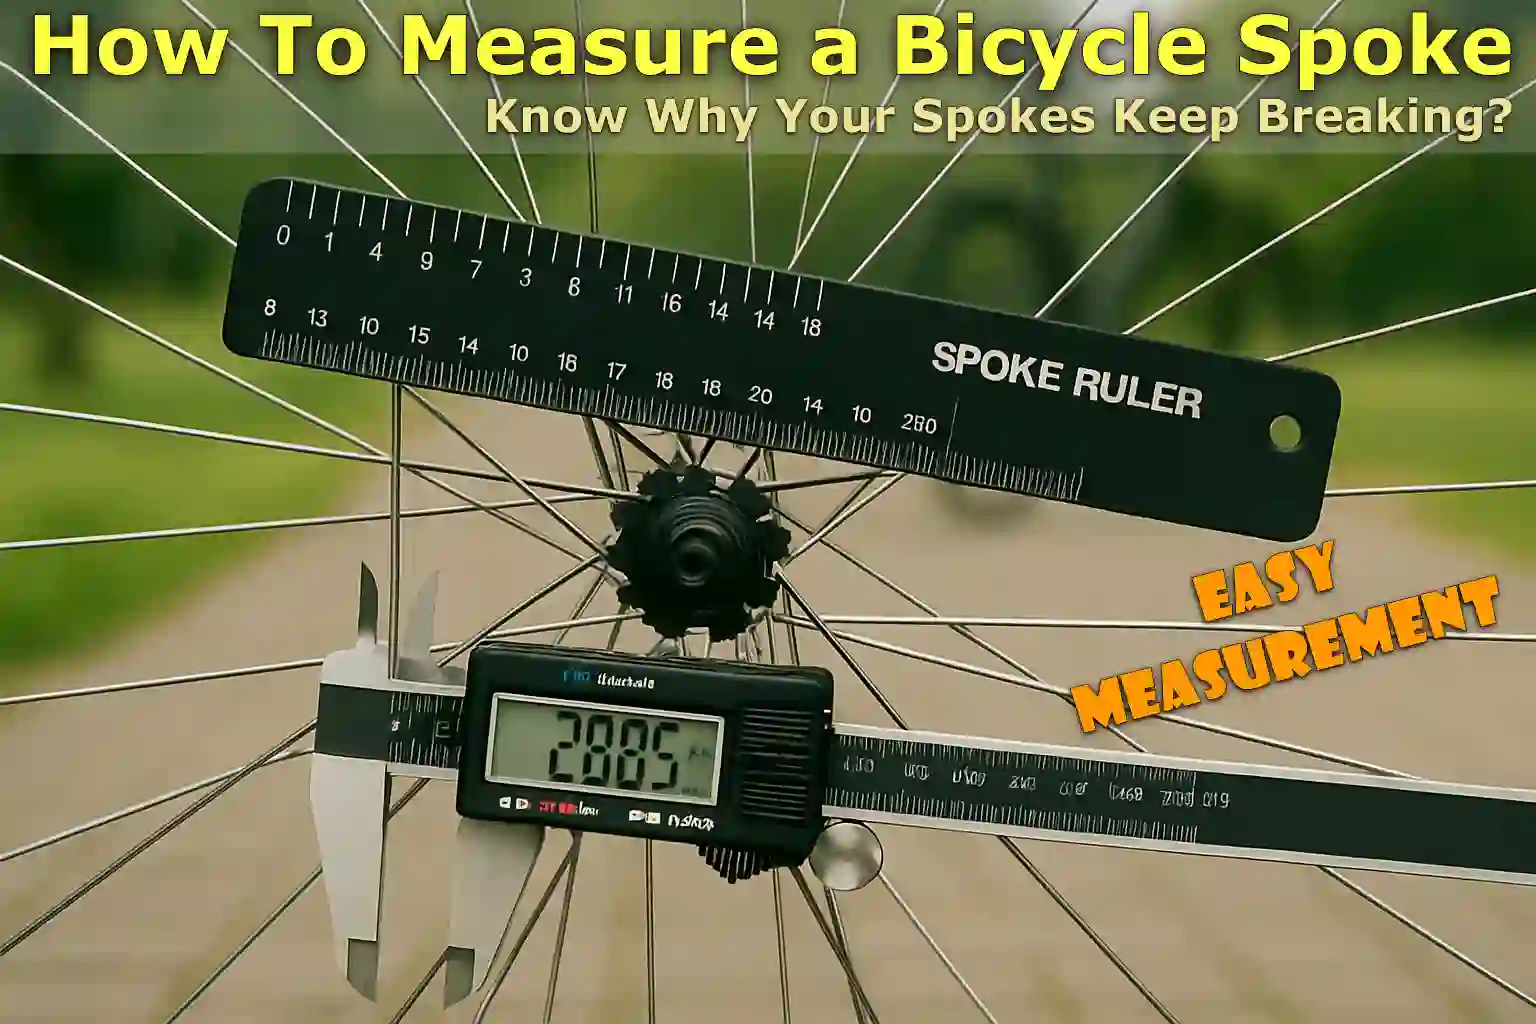
Written By: Jonathan
Fact Checked By: Caroline Dezendorf
Reviewed By: Matt Tanner
Basically the spoke length has to be accurate to the millimeter, because if even a small error like 1 to 2 mm is found, it can actually lead to poor wheel tension, uneven spoke alignment or even spoke breakage may occur during riding, because of a 1 to 2 mm error in the length.
This is why it is so important to have the proper spoke size when you are looking to replace a spoke or build a new wheel, and this is something that many cyclists and even beginners in wheel building often overlook or misunderstand.
This is because each bicycle wheel is actually made up of a number of spokes like: 28, 32 or 36 and these spokes actually connect the hub which is the center of the wheel and connects to the rim and this is what actually allows it to carry weight, it also absorbs shock and at the same time, it stays round and strong.
What’s more interesting is that the spoke lengths on the left and right sides of the wheel are often not the same, particularly you’ll see this on rear wheels and disc brake setups, as the hub design and dish is actually a side-to-side alignment.
Additionally, because of this importance many professional wheel builders and bicycle shops actually use spoke length calculators, which require accurate data such as: rim diameter, hub flange measurement and spoke lacing pattern, but you can do it without any fancy equipment, and you can even do it precisely at home with a ruler, a spoke gauge, or even digital calipers.
This guide is only about How To Measure a Bicycle Spoke, so it contains an explanation of all the things that make a great professional wheel setup guy.
First Understand Bicycle Spoke Anatomy
You should know the basic parts and types of bicycle spokes, which is very important before attempting to measure or replace them.
As each part of a spoke actually plays a role in the strength and performance of your wheel, this simple analysis of spoke structure can help you learn how different types of spokes can significantly impact measurements.
1. Parts of a Spoke: Head, Elbow, Shaft and Threads
At first glance you might see that this spoke is just a thin wire, but it’s actually made up of four important parts:
- Spoke Head: This is actually the circular part at the top of the spoke that is responsible for fitting into the hub flange, and also helps hold the spoke in place.
- Spoke elbow: This is located just below the head of the spoke, and the elbow is the small bend that is usually 90 degrees that allows the spoke to fit correctly through the hub flange. In addition, this area often experiences high stress as well.
- Spoke Shaft: Also known as the spoke body, this is the long straight part that literally connects the elbow to the threads, and it comes in a variety of thicknesses depending entirely on the type of spoke you have.
- Spoke Threads: Now, at the end of the spoke, you’ll see the threads, which is where the spoke nipple screws in and this actually allows for tension adjustment to get the wheel at the correct tension.
So, when you measure spoke length, the correct way is actually to measure from the inside of the spoke head to the end of the thread, not from the outside or all the way to the tip, but it’s actually the combination of these four things that makes spokes right or wrong.
2. Nipple Vs Spoke: Know What Each of This Does
- Spoke: This essentially acts as a tensioned wire that actually connects the hub to the rim, helping the wheel stay round and sturdy.
- Nipple: It is a small metal or brass fitting that ideally sits in the spoke hole of the rim and it attaches to the spoke thread, which is why it allows you to tighten or loosen the spoke so that you can easily adjust the tension of the wheel whenever you want.
And even though they ideally work together, the spoke and nipple are actually two different parts. Because the spoke actually carries the tension and the nipple on the other hand helps to tune it.
So, when you order or measure spokes, you only need to measure the metal spoke, not the nipple.
3. Different Types of Spokes and How They Actually Affect the Measurement
So, there are actually several types of spokes, and you should know all of them because when you know which one you actually have, it is a very important aspect because the size and thickness can slightly affect the way you measure or calculate the spoke length.
1. Straight Gauge Spokes
These are basically the same thickness from end to end, which is usually around 2.0mm, and they are really strong and economical too, which is the basic reason why they are commonly used in many bicycles. And the measurement is also very simple with these.
2. Butted Spokes
These actually come in different thicknesses, for example: a 2.0/1.8 mm double-butted spoke is actually thicker at the ends and thinner in the middle, and they’re actually lighter than straight gauge spokes, but they’re still really strong and even though the middle is thinner, you still have to measure the whole spoke from head to thread, just like a straight gauge spoke.
3. Bladed Spokes
So, these are actually flat or oval in the middle of the section, which actually helps reduce wind resistance, as well as bladed spokes can get twisted when installing, so they usually require a holding tool.
Other than that, the measurement method is still the same, but special care is required to keep them straight while checking the length.
So, now you know all the types of spokes which really helps in making a selection at the time of replacement and ensure proper performance once installed.
Table
| Tool | Purpose | Pro Tips |
|---|---|---|
| Spoke Ruler / Spoke Gauge | In particular it is necessary to measure the spoke length accurately, in millimetres. | As you should always measure from the inside of the head to the end of the thread. |
| Digital or Manual Caliper | These tools provide a really accurate measurement of spoke length or hub dimensions. | Moreover, it is used for quick and accurate readings in digital; manual calipers require fine focus. |
| Pen & Paper / Notes App | You will also need it to actually record the spoke lengths, hub specs, ERD, and calculator results. | This is used to easily and clearly label each value, such as: “rear, drive side” for later use as well. |
| Online Spoke Calculator | You can easily calculate the spoke length based on the wheel geometry and lacing pattern. | It is actually used as a reliable calculator like DT Swiss or Sapim. |
| Metal Ruler (Backup Option) | This is actually optional as it is the basic way to measure spokes if special tools are not available. | You can easily measure by laying the spoke flat, but only in millimeters and you’ll need to be as precise as possible. |
Method 1: How To Directly Measure a Bicycle Spoke (Direct Method)
If your bicycle already has a spoke for your wheel, and if it is from the same side such as left or right and in the same position: you can measure it directly as this is really the easiest and most accurate way to find the correct replacement.
1. Remove the Spoke from the Wheel
Now, first you need to remove the damaged or old spoke from the wheel, so you need to use a spoke wrench to loosen the spoke nipple, where the spoke connects to the rim, and then pull the spoke out of the hub.
Plus, you also have to be careful when removing it, specially if you plan to reuse the spoke or you need to measure it precisely.
And if you discover that a spoke is severely bent or broken, you’ll need to first try removing an identical spoke from the same side of the wheel so you can make an accurate comparison.
NOTE: Just remember that on rear wheels or disc brake wheels, the left and right side spokes may be different lengths, so you only need to measure the one from the correct side.
2. Straighten the Spoke If It’s Bent
Before you measure the spoke directly, you need to make sure the spoke is as straight as possible right now.
And if there is any curve or bend it might change the total length and give you the wrong measurement.
Also, you can use your hands to carefully straighten the spoke or gently roll it on a flat surface so you can easily flatten out small bends.
Moreover, these small differences can also significantly affect spoke stress and wheel fatigue, which is in fact also supported by finite-element and strain-gauge and studies have also shown that the quality of spoke manufacturing depends largely on correct preload and length.[¹]
Also, if it is so damaged that it cannot be straightened, use a matching spoke from the same wheel.
3. Measure from the Inside of the Head to the End of the Threads
You should use a spoke ruler, spoke gauge, or millimeter-marked ruler so you can easily measure spokes, as the proper measurement is from the inside of the spoke head, where the curve actually meets the shaft, to the end of the thread.
In addition, you should now also include the round head or measure from the outside of the curve: as this is a really common mistake that can lead to ordering spokes that are too long.
Precise measuring tools include: spoke rulers with millimeter markings, digital calipers so you can get very precise measurements and the regular steel rule with a fine MM scale but you have to be very careful using it.
4. Write It Down for Later Use
It is obvious but important that you should record the spoke length in millimeters either on paper or in a digital note.
Also, you should clearly label it e.g.: “rear wheel, non-drive side and 3-cross”, so you remember what it relates to.
And if you’re measuring multiple spokes for a set, pay attention to the gap between the edges and the wheels as well, it will definitely help.
Tips to Avoid Common Measuring Mistakes
- You should not measure bent spokes without first straightening them: even a small bend can change your measurement by 1 to 2 mm.
- Also, you should always take measurements from the inside of the head, not the outside curve.
- Also, check that you’re actually measuring the correct side eg: drive-side and disc-side spokes are often smaller due to different hub designs.
- Not only that, you have to use metric units like: Millimeters: Because spokes are always measured in mm, not inches or anything else.
Read More:
Method 2: How To Measure a Bicycle Spoke (Indirect Way)
So, now if you don’t have any existing spokes to measure eg: when building a custom wheel or replacing all the spokes, then you will actually need this to calculate the spoke length which is completely based on the exact specifications of your hub, rim, and lacing pattern.
Also, this method is often used by professional wheel builders and serious DIY enthusiasts, yes it is really technical at first but you can manage it if you break it down into clear steps.
1. When to Use This Method
Ideally, you should use this indirect calculation method in the following situations:
- When you are actually building a brand new wheel.
- Also, when the original spokes are actually missing, broken, or mismatched.
- Also, when you are actually replacing the rim or hub with a different model.
- And when you want to verify or double-check an existing spoke size using accurate technical data.
2. What Data You Will Need to Know
So, basically to calculate spoke length, you need to first collect some key measurements from your rim and hub.
So, you should pay attention to these points:
1. Hub Flange Diameter
It is actually the diameter of the circular flange on the hub where the actual spoke holes are drilled, and is usually measured from the center of one spoke hole to the center of the opposite hole, as it actually passes through the center of the hub.
Also, it is sometimes referred to as the “pitch circle diameter” (PCD).
So, we need to know this because larger flanges actually change the spoke angle and also require slightly smaller spokes.
2. Center-To-Flange Distance
Now, this is basically the distance from the centerline of the hub to the left and right flanges, and to the rear hub, both of which are almost always different due to the cassette/freehub or disc rotor.
And you have to determine how far the spokes actually reach from the hub center, this actually affects the length of the spoke on each side, so that’s really important to know.
3. Effective Rim Diameter: ERD
Also, ERD is actually the most important rim measurement when you want to calculate spoke length, as it literally represents the inner diameter of the rim where the end of the nipples actually sit, and also make sure it is not the outer diameter of the rim.
What’s more, rim manufacturers often provide this number, or you can easily measure it using two spokes and a nipple.
This is really important as even a 2 to 3 mm difference in ERD can significantly affect spoke length.
4. Number of Spoke Holes
Additionally, it is a simple task as you just have to count the number of holes made in the hub and the rim, which in most bicycles is usually around 28, 32 or 36.
Additionally, you must use a hub and rim with the same number of holes and it must match exactly.
Because this really affects how the spokes are actually arranged and what lacing patterns you can use on it.
5. Lacing Pattern (Spoke Cross Pattern)
So, this literally refers to how the spokes are actually woven between the hub and the rim, as the 3-cross pattern (3x) is actually the most commonly used pattern for rear wheels and some front wheels, where each spoke actually crosses three other spokes before reaching the rim.
And there are also other patterns like: 2-cross, radial which is also 0x or 4-cross.
Again, it matters if there are more crosses, it literally means that the longer spokes have to be simpler because they have to cross and then reach the rim.
3. Use an Online Spoke Length Calculator
So, once you have gathered all kinds of necessary data, you can easily enter them into a free online calculator like: DT Swiss Spoke Calculator, Sapim Spoke Calculator, ProWheelbuilder or SpokeCalc Excel-based calculators are used by advanced users.
Essentially these are tools that will easily tell you the exact spoke length on both the left and right side of a wheel, with many of these tools also offering presets for known hubs and rims which makes things even easier.
4. Always Double-Check with Manufacturer Specs As Well
Yes, even if you have gathered all kinds of data and then made accurate calculations as calculators are also accurate, it is a good idea to check the official hub and rim specifications first on the manufacturer’s website or tech sheet.
Because when you use incorrect or approximate type numbers specially for ERD or flange distance it can result in a spoke that may be too short or it may also be too long: and in both these situations it can pose a threat to both the safety and strength of the wheel.
Conclusion On How To Measure a Bicycle Spoke
So, when you repair or build a bicycle wheel, knowing the correct spoke length is a very important point and it cannot be done by just guessing.
A spoke that is even 1 to 2 millimeters too long or too short can cause really big problems such as: improper wheel tension, a rim that will not true up properly or even premature spoke or nipple failure, this is the basic and real reason why you need to take proper steps to collect all the data in an accurate manner.
And that’s what you’ve learned in this guide on How To Measure a Bicycle Spoke, which is specifically about just that.
You can always ask any curious questions via the comment button below.
FAQ’s On How To Measure a Bicycle Spoke
Q1. Are front and rear spokes the same length?
Answer: No, it isn’t necessary, as some front wheels with disc brakes actually use different spoke lengths on each side due to offset in the hub design, and the drive side of the rear wheel typically needs a shorter spoke than the non-drive side.
Q2. Can I use a spoke that’s slightly longer or shorter than needed?
Answer: This is not recommended at all, because if the spoke is too long the nipple may bottom out or penetrate the rim tape, causing a puncture. And if the spoke is too short it may not even reach far enough into the threads in the nipple which makes it very weak, which is why you should always use the correct length and ideally be within ± 1mm of the final calculated value.
References:
[1] UC Santa Cruz Thesis. (2019). Optimal spoke tensioning using geometry measurements.
https://escholarship.org/content/qt2ng3f65c/qt2ng3f65c_noSplash_958d2c6d232bb8a5191e78b9e12fc2b7.pdf
Jonathan, the passionate owner of Bicycle Time, brings a lifelong love for bikes and automotive craftsmanship, that reflects into every corner of the shop. With deep passion in both cycling and automotive accessories, Jonathan is more than just an expert.
