 Skip to content
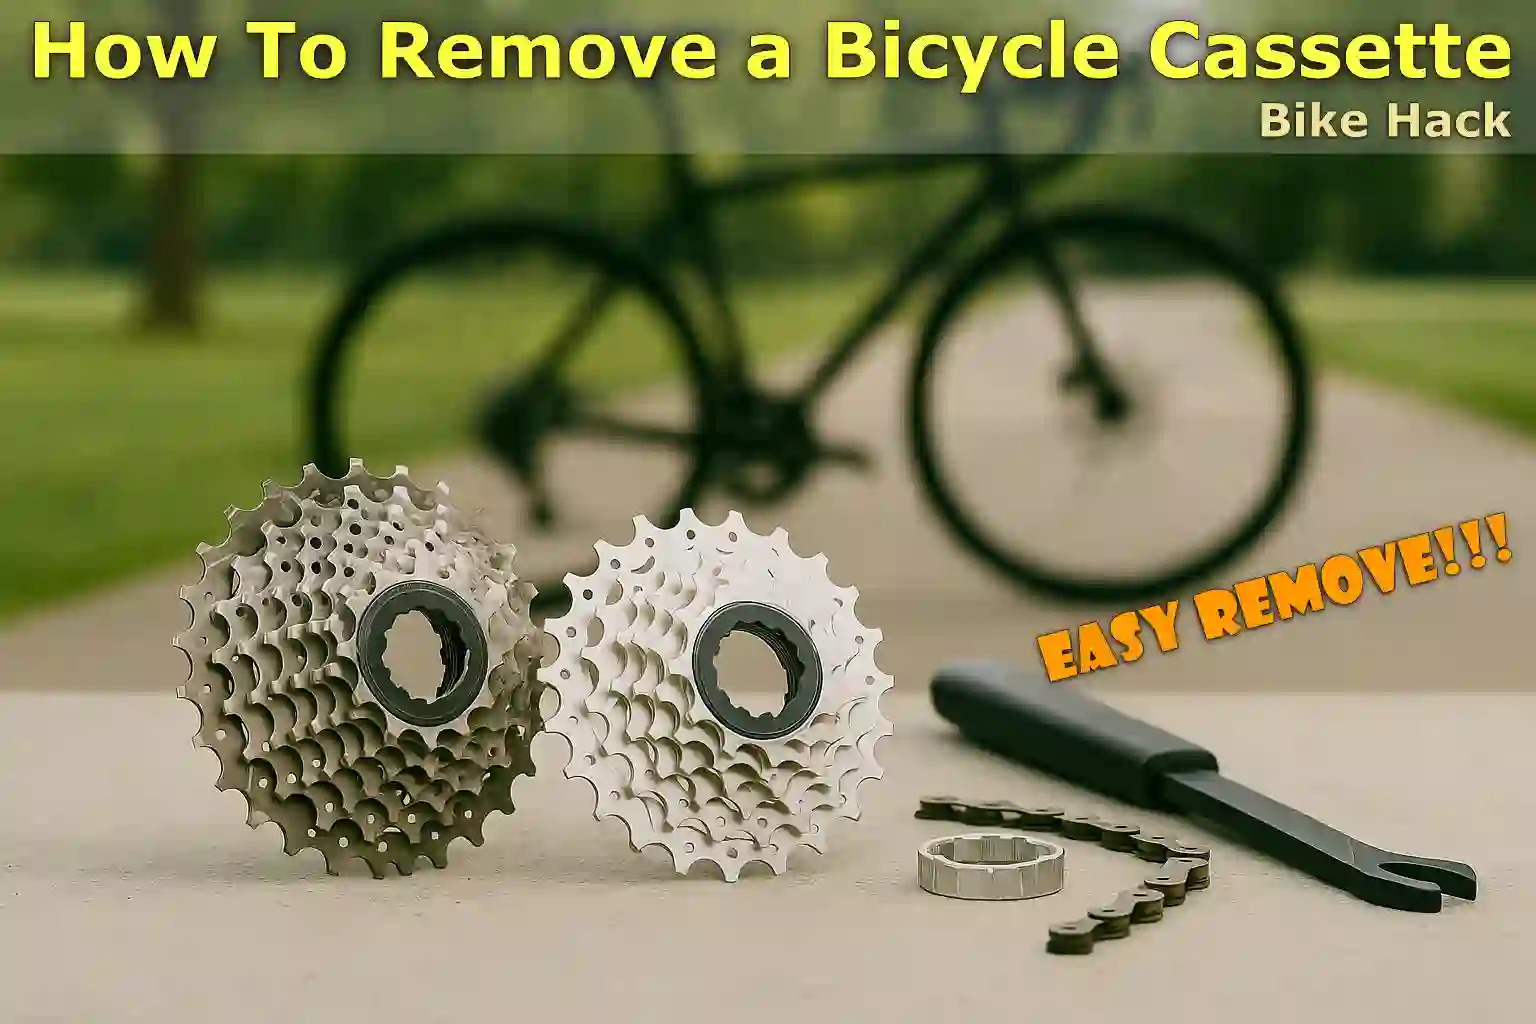
Written By: Jonathan
Fact Checked By: Caroline Dezendorf
Reviewed By: Matt Tanner
A cassette is actually a set of sprockets/gears fitted on the rear wheel of your bicycle that allows you to change speeds while cycling.
And most modern bicycles actually use cassettes with 8 to 12 sprockets, and they are actually designed to work smoothly with your bicycle’s chain and derailleur system.
But the thing is, cassettes can actually collect dirt, oil and road grime over time, and this can cause the teeth on the cogs to wear out and this can be a reality specially if the chain is not replaced or maintained at a certain interval of time.
And in fact, what many cyclists actually don’t realize is that a worn cassette can actually lead to slipping gears, poor shifting and even chain wear, and that’s the basic reason why you need to perform regular maintenance such as: you must remove it occasionally for cleaning or replacement which is very important.
So, the reason for removing a bicycle cassette can be anything, whether you want to give your drivetrain a deep clean, or you want to upgrade your gear range for different terrains or simply replace a worn-out cassette.
The thing is, this guide is specifically designed to guide you on How To Remove a Bicycle Cassette, which is why it focuses specifically on everything you really need to know to get it done safely.
What Is a Bicycle Cassette?
A bicycle cassette is essentially a group of individual sprockets, also called cogs or gears, mounted on the rear wheel hub of most modern bicycles.
Not only that, it’s a really important part of your bicycle’s drivetrain which includes the chain, chainring, derailleur, and pedals.
Plus, the cassette allows you to change gears easily while riding, which literally means you can pedal more efficiently whether you’re climbing hills, riding on flat roads, or going downhill.
Additionally, you need to know that most cassettes have 8 to 12 gears, and the size and number of teeth on each sprocket determine how difficult or easy it is to pedal in that gear.
Basically smaller sprockets with less teeth are actually for faster speeds, and larger sprockets with more teeth actually make it easier to climb or ride at lower speeds with less stress and both of these things are used if you use them in the right situation.
1. Cassette Vs Freewheel: What’s the Actual Difference?
Yes, they actually look very similar, but cassettes and freewheels are fundamentally two different types of gear systems found on the rear wheel of a bicycle.
The freewheel is an older style in which the gear cluster and the ratcheting mechanism, which is the part that turns the wheel when you’re not pedaling, are built into one unit; in fact it screws directly onto the hub.
Also, the cassette actually slides onto a freehub body, which already has the ratcheting mechanism, and cassettes are found on most bicycles made in the last 20 to 25 years and are actually stronger, more reliable and they are also easy to maintain or replace.
And a simple way to tell the difference is this: if the gear cluster screws on it’s a freewheel; and if it slides and is held in place by a lockring it’s actually a cassette.
2. How a Cassette Works with the Chain and Derailleur
So, when you change gears on your bicycle, your rear derailleur actually moves the chain between the different sprockets of the cassette, and it also actually changes the gear ratio, which affects and determines how easy or hard it is to actually pedal.
So, the chain actually wraps around the cassette cog which again depends on your shifter input, then the derailleur actually moves the chain to a smaller or larger cog as easy as you prefer.
Not only that, the cassette, chain and derailleur actually work together as a system and if you want a smooth and quiet gear shifting then they must all be in proper alignment and also in good condition.
And because they are all connected and work as one, that is why if one part is really worn out or dirty, it can cause gear skipping, poor shifting or chain noise and this is the main reason why you should do regular inspection and maintenance and that’s an important aspect of it.
The Basic Reasons that You Might Need To Remove the Cassette
There are several reasons for this and if you feel this is the case then you may want to consider removing the cassette to better your bicycle and improve your riding efficiency.
1. Replacing Worn-Out Cogs
It is an open fact that the individual cogs/sprockets on your bicycle cassette can wear out due to constant contact with the chain, and this is actually the most common thing that happens if the chain is not replaced on time, because it could be a stretched or worn chain and due to these reasons it puts extra pressure on the cassette teeth.
So, basically worn cogs actually develop a “shark fin” shape, making it harder for the chain to grip them properly, and this is what causes problems like poor gear changes, chain slipping or even abrupt gear changes while riding.
And if your bicycle stops changing gears under heavy load or you notice any wear on the sprockets, this is a very clear sign that the cassette needs to be replaced: and it also means that it will have to be removed first.
2. Upgrading to a Different Gear Range
So, sometimes cyclists actually want to switch to a cassette that offers a different gear range so that they can better match their riding conditions.
And now, let’s take an example: If you really want to climb more hills, you might need a cassette with larger cogs, like a 32 or 36-tooth sprocket, for easier pedaling.
And on the other hand, if you’re driving on mostly flat roads you’ll need a denser gear range, which can provide smoother and more consistent gear changes.
That’s why you can upgrade your cassette, which often involves removing the existing cassette and installing a new model that best fits your riding goals and derailleur capability.
3. Deep Cleaning the Drivetrain
In fact your cassette collects a lot of dust, grease and road grime and will suffer further damage if you drive in wet or dusty conditions.
Yes, it can be cleaned just fine with a basic cleaning, which can be done while it’s still on the wheel, as real deep cleaning often requires complete removal of the cassette.
In fact this allows you to clean in between each individual sprocket and also you can easily wipe down the freehub body as well, which keeps the cassette clean which not only improves shifting but it also extends the life of your chain and derailleur by reducing the friction and buildup as well.
Tools
| Tool/Supply | Purpose |
|---|---|
| Cassette lockring tool | Basically this requires the proper locking of the cassette. |
| Chain whip | You actually need this so that you can easily and safely hold the cassette when removing it. |
| Adjustable wrench | This would be really helpful for getting a lockring tool going. |
| Gloves (optional) | You can also wear it for grip and to keep hands clean which is its plus point. |
| Rag or degreaser | These are things that are known for cleaning expertise and in this case you need it to clean the hub and cassette. |
How to Prepare Your Bicycle
Now, you need to prepare your bicycle before removing the bicycle cassette, which will make the subsequent removal process much safer, easier, and smoother.
1. Shift to the Smallest Cog
First you’ll need to move your rear derailleur so that the chain goes onto the smallest cog, which is actually the highest gear on the cassette.
Yes, this is really important as it significantly reduces the tension in the chain and derailleur, and also makes it easier to remove the rear wheel.
Also, it helps to prevent the derailleur from tilting backwards or getting in the way during the process.
So, shifting to the smallest cog only takes a second, but it saves a lot of hassle later on.
2. Remove the Rear Wheel from the Bicycle
So, when the chain is in the smallest cog, you need to release the quick-release lever or if your bicycle has a thru-axle or bolt-on axle, you can use a wrench and then you can carefully remove the rear wheel from the bicycle.
Also, you may need to gently pull the derailleur back to give the cassette enough room to clear the chain, but removing the wheel actually gives you full access to the cassette and lets you use tools safely without risking damage to the frame or derailleur.
So you also need to make sure that you put the bicycle down gently so that you can avoid any kind of scratches on your frame or gear.
3. Lay the Wheel Flat on a Workbench or Ground
Now, you have actually removed the wheel, and then you need to place your bicycle on a clean surface such as a workbench, table, or the ground with the cassette side facing up.
When you keep the wheel level it actually stays very stable while you’re working on it and it actually prevents it from rolling or tipping over when you’re applying torque from the tools.
Also, you have to make sure that the surface should be clean so that the dirt does not get into the hub or the cassette, so you can also place a towel or a mat underneath it for the extra protection of your bicycle and it is all up to you and it shows your love for your bicycle.
How To Remove a Bicycle Cassette (Step-By-Step Guide)
So, when you have prepared everything properly and your tools are ready for use, it is the perfect time to remove the bicycle cassette.
1. Insert the Lockring Tool
Now, first you need to place the cassette lockring tool into the lockring which is located in the center of the cassette.
And you also need to make sure that the tool should fit snugly into the splines, which are the slotted grooves on the lockring, and it should sit flat without any vibration.
Also, if your cassette is Shamano or SRAM then most lockring devices will fit them, but it’s a good idea to check compatibility first.
This tool is actually designed to rotate the lockring, allowing you to both tighten or loosen it.
Also, if your tool has a center pin, this will also help you keep it aligned with the spindle while turning.
2. Hold the Cassette with a Chain Whip
So, after you have put the lockring tool in the right place, you will need to hold the cassette in one position while using the chain whip.
Wrap the chain portion of the whip securely around one of the middle cogs on the cassette, not the smallest or largest cogs, as those may be hard to grip.
The cassette will naturally try to rotate when you apply force to the lockring tool, because the chain whip actually prevents this rotation.
In addition, it is important to keep the cassette stable so that you can safely apply counter-torque without slipping or damaging any parts.
3. Loosen the Lockring
Now, you need to take your adjustable wrench and then fit it onto the lockring tool, and then turn the wrench antk-clockwise so that you can easily loosen the lockring.
Additionally, the cassette may require a hard push if it is installed tightly or has not been removed for a long time.
Not only that, if you hear a small “click” or “pop” sound when you apply pressure, this is completely normal and means that the lockring is breaking free.
But you also have to be careful that you don’t lose control of the wrench once the tension is released.
4. Remove the Cassette
Once you have determined that the lockring is completely loose and removed, you can now remove the cassette cog and spacer from the freehub body.
Additionally, some cassettes separate into a single piece, particularly on cheaper bicycles, but most higher-end models have the individual cogs separated by thin spacers.
Plus, you should also pay attention to the exact order and orientation of each piece, as you can even take a quick picture with your phone to remember the arrangement for reassembly.
Also, you need to carefully place them on a clean cloth or tray to avoid losing any small parts.
And if the cassette is dirty or greasy, now is the perfect time to give it a simple clean.
Read More:
Conclusion On How To Remove a Bicycle Cassette
So by getting to this point, now you have already done half the job of removing a bicycle cassette and now the rest of the work is just to implement what you know keeps your ride running properly.
Now, the reason for removing a bicycle cassette can be anything, whether you want to replace worn-out cogs, upgrade gearing for new riding conditions or simply deep clean your drivetrain.
So, now the bicycle cassette has been successfully removed, and you should make sure that when you re-install the bicycle cassette there should be no under tightening, anything less than 24Nm can actually cause loose shifting or stripped freehub splines, however, most experienced mechanics sometimes only tighten it by hand.[¹]
Now, that is all for this guide and you can comment your thoughts below or ask anything.
FAQ’s on How To Remove a Bicycle Cassette
Q1. Can I reuse the cassette lockring?
Answer: Yes, cassette lockrings are indeed reusable as long as they are not damaged or stripped, but you should inspect the threads and grooves for any signs of wear and if you find worn, rusted or corroded it is a safe thing to do to replace them.
References:
[1] Bicycles Stack Exchange. Consequences of under-tight cassette ring?
https://bicycles.stackexchange.com/questions/71212/consequences-of-under-tight-cassette-ring
Jonathan, the passionate owner of Bicycle Time, brings a lifelong love for bikes and automotive craftsmanship, that reflects into every corner of the shop. With deep passion in both cycling and automotive accessories, Jonathan is more than just an expert.
