 Skip to content
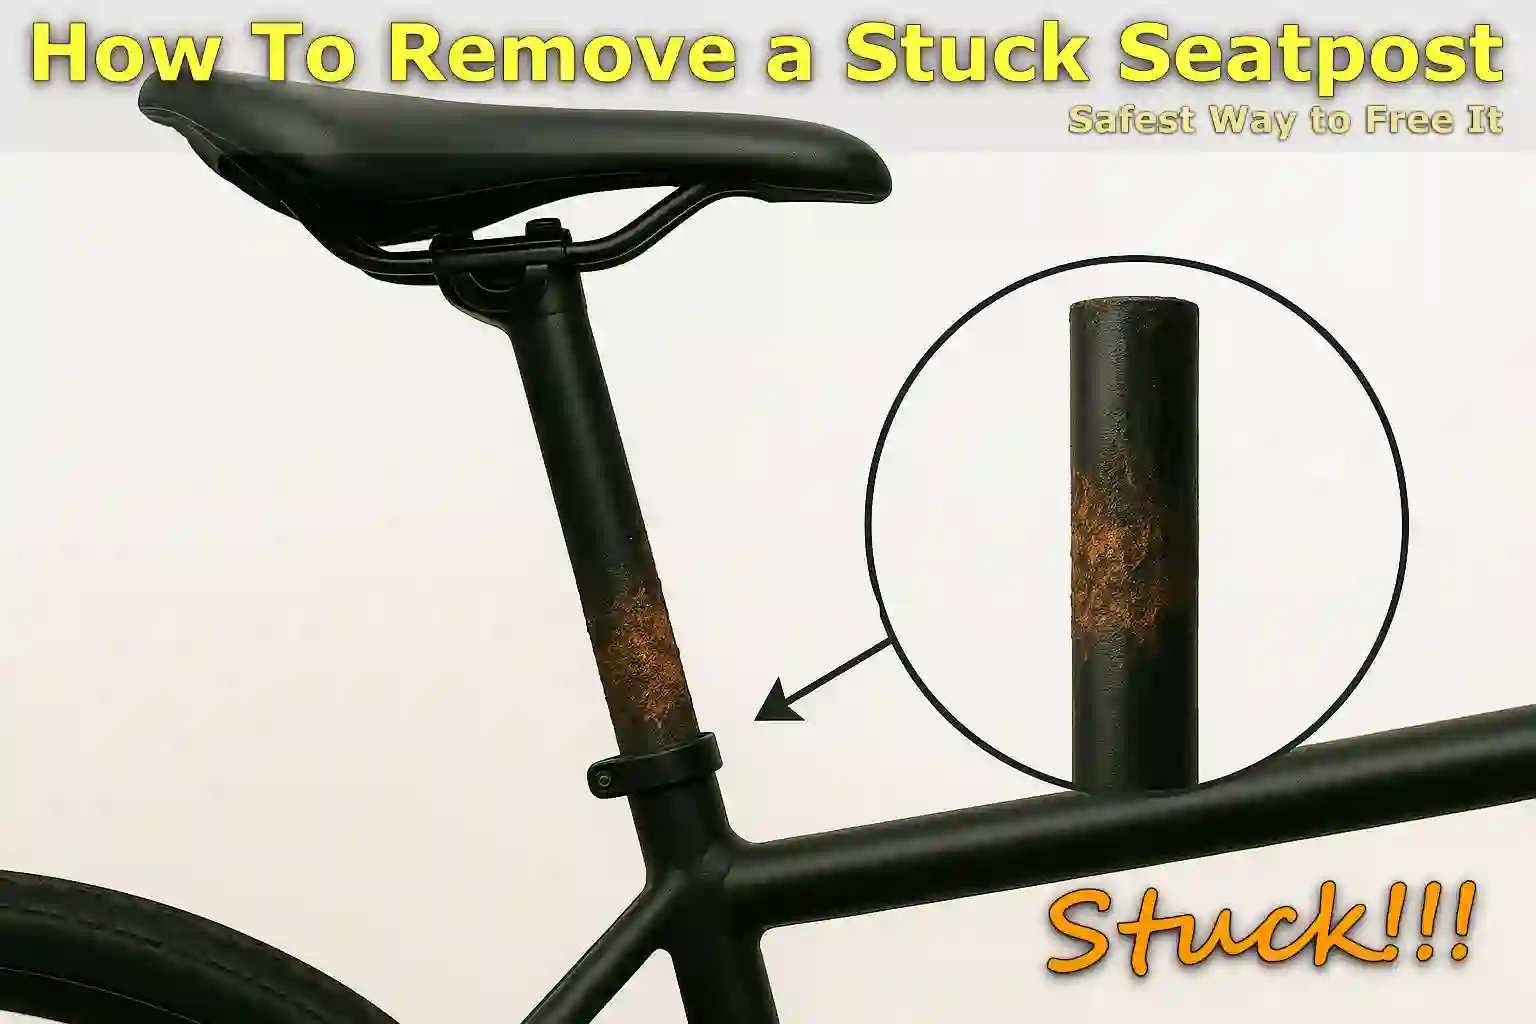
Written By: Jonathan
Fact Checked By: Caroline Dezendorf
Reviewed By: Matt Tanner
If you are worried about your bicycle seatpost getting stuck and this is actually one of the most frustrating maintenance challenges that cyclists face as it could be because the bicycle has not been used for a long period of time, stored in a damp environment or frequently ridden in wet weather.
Seatposts often become stiff due to rust, oxidation, or prolonged lack of lubrication.
For example: When an aluminum seatpost is inserted into a steel frame, a chemical reaction known as galvanic corrosion occurs, which causes the two metals to bond together over time.
Additionally, carbon fiber seatposts can also become brittle when bonded to aluminum frames due to the carbon paste drying out or reacting with moisture.
Furthermore, according to bicycle mechanics and frame manufacturers, surprisingly this is actually a very common problem and is particularly seen in older bicycles or bicycles whose seatposts are not regularly removed and serviced.
So, the solution is very simple as you only need to adopt the right technique and a little patience, as most seatposts can be removed safely without causing any damage to your frame or seatpost.
And this guide focuses only on How To Remove a Stuck Seatpost, and in this guide we have included proven methods that are very effective.
Tools
| Tool / Item | Purpose |
|---|---|
| Hex/Allen keys | It is used to loosen the seatpost clamp. |
| Penetrating oil (e.g., WD-40, PB Blaster) | The purpose of this is to actually break down the rust and remove it easily. |
| Heat gun or hair dryer | You can use it to stretch the frame a little by heating it up. |
| Ice pack (optional) | This is entirely up to you, but it helps to shorten the seatpost. |
| Torque wrench | Original tool for reinstalling the seatpost. |
| Bicycle Stand (optional) | Yes, it is actually optional for better control and stability on the bicycle. |
| Pipe wrench (last resort) | As it is prone to damage, it is used for extra grip. |
| Ammonia (for aluminum posts in steel frames) | It is used to dissolve aluminium oxide. |
Inspection Is Important
It is very important to understand what is causing the actual problem and for this, proper inspection must be done.
1. Check the Seatpost Clamp First
Sometimes the seapost actually gets “stuck” because it has been tightened for a long period of time, so just use the correct size hex key which is usually 4mm or 5mm so you can easily loosen the clamp bolt.
And then if you notice that the seatpost is moving after it’s been loosened, then your job is done without even starting over, because it wasn’t actually stuck, it was just that it was tightened too much and that’s it.
Additionally, you should make sure to never apply force to the seatpost while the clamp is tight, as this can scratch or even crush the post.
2. Inspect for Signs of Corrosion or Bonding
Now, to detect corrosion you need to check the area where the seatpost enters the seat tube, and if you see some white chalk-like build up which is commonly known as aluminum oxide, so it’s quite possible that the aluminum post has actually rusted inside the steel or aluminum frame.
If you see reddish-brown rust, that means the post or frame is probably made of steel, but yes, eventually it is a sign of rust.
Yes, rust is actually the most common cause of the seatpost bonding to the frame, and is particularly seen more on older bicycles or bicycles that are actually exposed to moisture, sweat, or salt from the road side.
3. Identify the Seatpost Material
Before applying any type of heat, chemicals, or force you need to know what your seatpost is actually made of.
Carbon fiber seatposts are really sensitive to both heat and chemicals, which is why special care and carbon paste is needed during seatpost re-installation.
Aluminum seatposts are really strong, but they are also susceptible to galvanic corrosion, especially seen when the inside of the frame is made of steel.
The steel seatpost is actually very durable, but if you haven’t lubricated it for a long time it can rust and become corroded inside the steel frame.
4. Understand The Frame Material
You should also understand what type of frame it is as the removal techniques also differ such as you can use a heat gun which is safe for metal frames but it can really damage a carbon frame if you don’t handle it carefully.
And so the chemical solutions vary as well with ammonia being great as it dissolves aluminum oxide but should never be used on carbon fiber or painted surfaces without some sort of protection.
Apply Penetrating Oil to Loose
In fact this is one of the safest and most effective ways to unclog a stuck seatpost easily using a good quality penetrating oil.
These oils get into the tiny gaps and actually dissolve the rust, oxidation, or other materials that connect the seatpost to the inside of the frame.
And most of the time people prefer to use WD-40 Specialist Penetrant, PB Blaster, Kroil, or Liquid Wrench, as each of these are designed for metal-to-metal applications and are truly trusted by mechanics all around the world.
1. Position the Bicycle for Gravity-Assisted Penetration
To get the best possible results you should turn your bicycle upside down or on its side, as gravity actually helps the oil flow more easily down the seat tube.
Also, you’ll need to completely remove the seatpost clamp bolt to open up access around the post.
This type of cycling position actually ensures that the old material gets absorbed deep into the grip area, not just on the top surface.
2. Let It Soak In
In fact, once applied, penetrating oil does not work instantly, so allow the oil to sit for several hours, or ideally you can leave it overnight, and this is especially important if the seatpost has been stuck for a long period of time.
So, basically it comes down to the longer it is soaked, the more likely it is to break down the rust or dried out bonding agents more effectively.
Read More:
Use Heat & Cold Technique
When you notice that the seatpost is really jammed up pretty badly and the oil isn’t doing the job at all, you can use temperature to your advantage which can be a powerful next step.
1. Apply Heat to the Seat Tube
Therefore, you can use a heat gun or a high-powered hair dryer, so that you can heat the outside of the seat tube, not the seatpost.
Essentially the goal is to expand the frame a little bit around the post, which actually reduces any grip that may be caused by rust or friction.
Also, you can slowly move the heat source around the area for 1 to 2 minutes, and you should always keep it moving so you can easily avoid damaging the paint or creating hot spots.
2. Cool the Seatpost to Make It Contract
When you apply heat to the seat tube, you may want to immediately place an ice bag or frozen cloth over the exposed part of the seatpost, as the cold will actually cause the post to shrink slightly, also increasing the size difference between the post and the frame.
And while this effect might seem minimal, even fractions of a millimetre can make a big difference when trying to loosen a strong bond.
3. Use Caution With Carbon Components
If your bicycle’s frame or seatpost is actually made of carbon fiber, it may be worth being extremely cautious.
As carbon frames can be damaged by high temperatures, especially above 120°C, which can actually soften the resins.
And in these cases, you should only use mild warming or you should avoid the heat method altogether and rely on other mechanical or chemical techniques instead.
4. Combine With Gentle Twisting
So, once the temperature difference has been established, try inserting a bicycle or bar into the seatpost and gently moving it around while the materials are still at different temperatures.
This is often sufficient as it can break the bond and actually allow movement.
This method of using heat and cold is actually a proven technique used by experienced bicycle mechanics and engineers, as it is especially effective when the seatpost is stuck due to severe friction or mild corrosion, and when you do it carefully it’s actually a lot less damaging than cutting or wrenching.
Also, you have to be very careful applying heat to the aluminum inside a steel frame, as this can make the stiffness even worse; so always be sure to cool the seatpost as well as re-heat it.
Gentle Rocking & Twisting
So, it is again a smart move to try gently shaking and twisting the seatpost to free it, as this method relies on using controlled but steady force, and don’t use excessive force to loosen any rust or friction holding the post in place.
1. Use the Bicycle Seat as a Lever
If you notice that the bicycle seat is still attached, it can act as a convenient lever for applying torque.
So, just stand behind the bicycle, hold both ends of the bicycle seat firmly and then you have to gently turn the seatpost from one side to the other.
Don’t try to pull it straight up just yet, but rather twist it and help break the bonds of the rust inside the seat tube.
As it is very important to apply even pressure, and to move it back and forth rather than twisting it all the way around.
2. Avoid Hammering or Sudden Yanks
Yes, this is problematic and many people actually make the mistake of pushing or pulling the seatpost upwards, as this can bend the post, damage the frame or even crack the carbon components.
This is why, if the post is carbon fiber or the frame is lightweight aluminum it’s risky, so never use a hammer unless you’re very lightly tapping on a protected area with a rubber mallet, and you should also try rotation and if it is not working then you can go with this method.
3. If the Bicycle Seat Breaks or Is Removed
If the bicycle seat breaks when folded, as can happen with older or cheaper posts, or if you’ve already removed it for better access.
You can then easily insert a metal rod, handlebar or thick wooden rod into the top of the seatpost.
As this will give you leverage on both sides, which acts like a large T-handle, and always wrap the bar in cloth or rubber where it makes contact with the post to protect it from any type of scratches or deformation.
4. Use Gentle, Repeated Motion
Yes, you can also try moving the post a few millimeters back and forth, and then the other way, and over time, even a small movement may completely break the rust’s grip.
Therefore, you should also apply more penetrating oil between attempts which will help make the bond more smooth.
As well as, you should use this method with very controlled force, not just apply a lot of force, as this works because the corrosion bonds within the frame are not actually always uniform, which is why even a small bend can start the breakdown process.
Not only that, it is also less likely to cause damage when done carefully, which is the real reason why it has become the first choice among mechanics before trying more invasive techniques.
Conclusion On How To Remove a Stuck Seatpost
Even at home you can easily remove the seatpost with these simple and very effective methods.
It doesn’t really matter if the seatpost is actually stuck due to rust, lack of lubrication, or binding of the material, as there is almost always a solution for it without damaging the frame.
Not only this, According to bicycle maintenance experts: To prevent the seatpost from getting stuck, it should be removed, cleaned, re-greased and re-installed at least twice a year, so you can easily prevent any kind of corrosion and stiffness.[¹]
So, if you have any queries then you can write them in the comment section.
Frequently Asked Questions
Q1. Why does a seatpost get stuck in the first place?
Answer: Seatposts usually get stuck due to a variety of reasons such as: rust, oxidation or chemical reactions as well as between different types of materials e.g.: aluminium post in a steel frame, which can actually create aluminum oxide and corrode the parts. In addition, lack of lubrication and exposure to water, sweat or salt over time can also cause the seatpost to get stuck.
References:
[1] How to make old bike’s seatpost slide smoothly when it needs adjustment again?
https://bicycles.stackexchange.com/questions/73522/how-to-make-old-bikes-seatpost-slide-smoothly-when-it-needs-adjustment-again
Jonathan, the passionate owner of Bicycle Time, brings a lifelong love for bikes and automotive craftsmanship, that reflects into every corner of the shop. With deep passion in both cycling and automotive accessories, Jonathan is more than just an expert.
